Have you seen Iron Man? The conversation between Tony and Jarvis must be the dream of many people (at least it is mine🤣). Today I will show you how to use the most popular AI (ChatGPT, Google Gemini) to customize the HA voice assistant to make the original A mentally retarded assistant becomes a truly "smart" assistant!
However, because I just got the ESP32-S3-BOX-3, I need to spend more time to install and test it. Today, I can only show you how to use Home Assistant, and I can’t talk yet ~ I will show you how to use ESP32-S3 in the next episode -BOX-3 Let your Home Assistant speak~
Table of contents
Why do we need smarter voice assistants?

You must have used "last generation" voice assistants such as Siri and Google Assistant, right? Commonly known as "mentally retarded assistant" 🤣 Because voice assistants of the previous generation such as Siri and Google Assistant have a common problem, that is, they can only understand fixed instructions. Rather than understanding, it is actually more like "can recognize", and recognition The method is hard-coded into the program by engineers, so if you don’t use precise words, these last-generation voice assistants will not understand what you are saying at all.
The preset voice assistant of the Home Assistant system is also in the same situation. This has also resulted in the proportion of voice control used in my smart home being less than 1%, because the success rate is too low. If you want to use it, it is better to just take it. It’s faster to control with a mobile phone🤬
In recent months, Google has allowed the built-in voice assistant in Android to be replaced with Gemini (but not Nest smart home speakers), and Apple has also reported that it is preparing to cooperate with ChatGPT. In the past, this "previous generation of mentally retarded assistants" should There will be improvements soon, and Home Assistant has also launched LLM (Large Language Model, large language model) that can be used by customized voice assistants in recent months. In order to make the smart home as localized as possible, let us start trying it. Give it a try!
Step 1. Create Home Assistant voice assistant
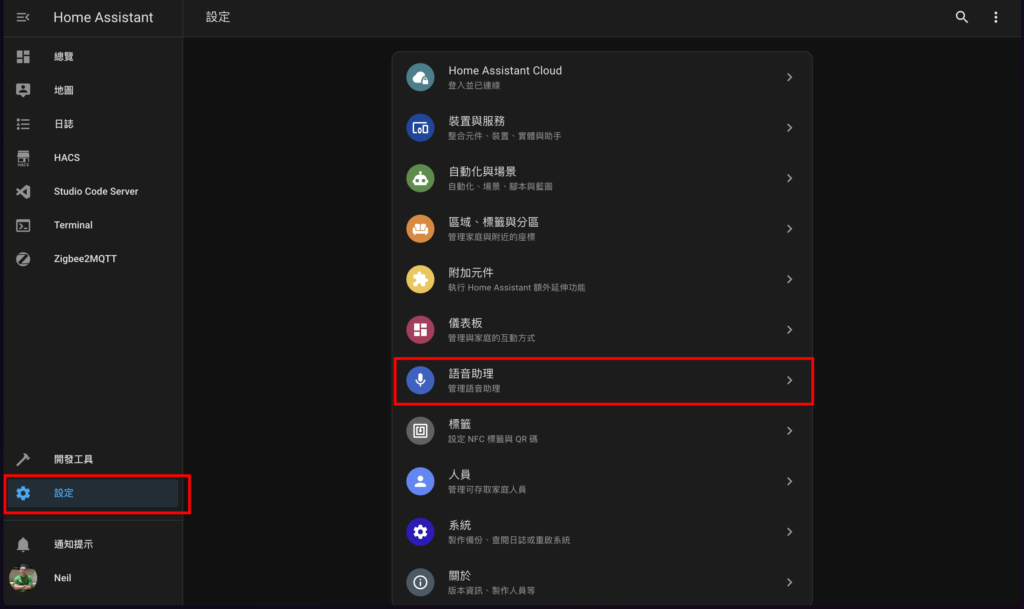
Step 1-1. "Settings" on the left ➜ "Voice Assistant"
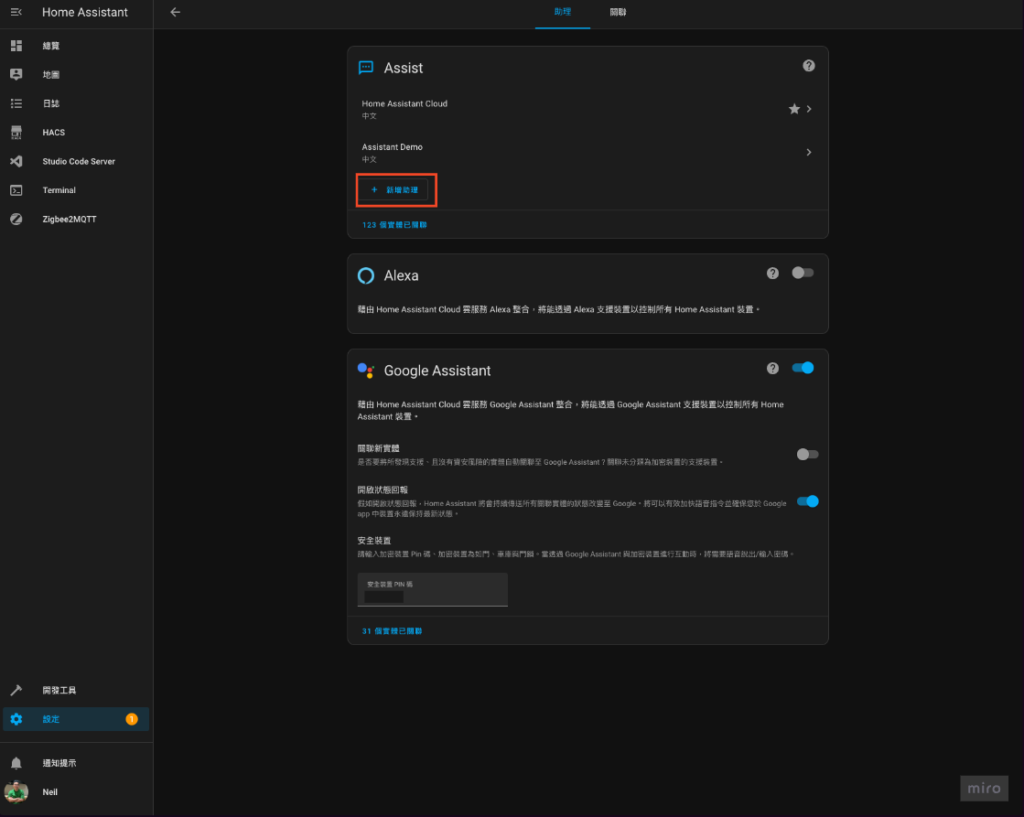
Step 1-2. Click "Add Assistant"
(If there is already an assistant here, you can skip it directly)
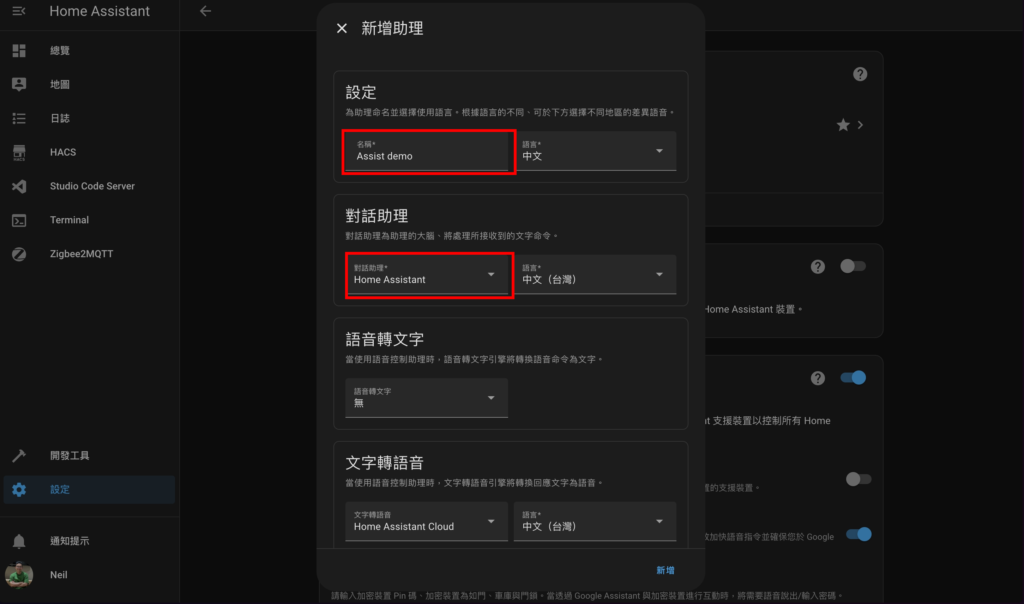
Step 1-3. Enter the "name" yourself and use the default options for everything else.
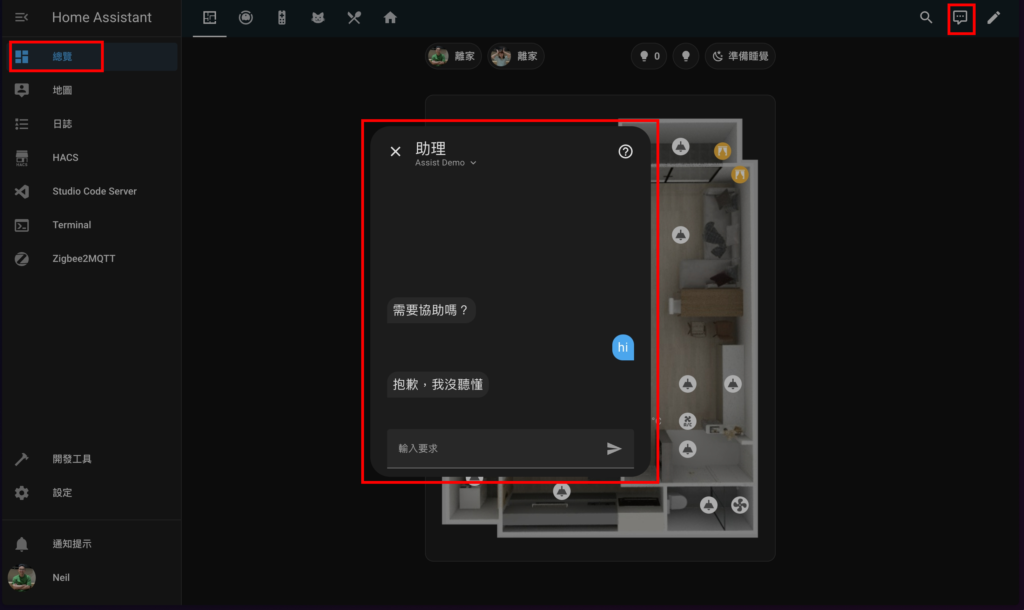
Step 1-4 Test whether the assistant is normal
Go back to "Overview", click the speech bubble button in the upper right corner, and try talking to the assistant. If there is a response, it means success!
At this time, it is still a "mentally retarded assistant", don't worry, next we will connect ChatGPT and Google Gemini to make it smart! 👍
Step 2. Obtain the OpenAI API key
Step 2-1. Register/Login OpenAI Platform
This is different from the commonly used ChatGPT, which comes first OpenAI Platform Complete registration and log in.
Step 2-2. Create OpenAI secret key
- Click "API keys" in the left column
- Click "Create new secret key" in the upper right corner
- 「Create secret key」Create secret key
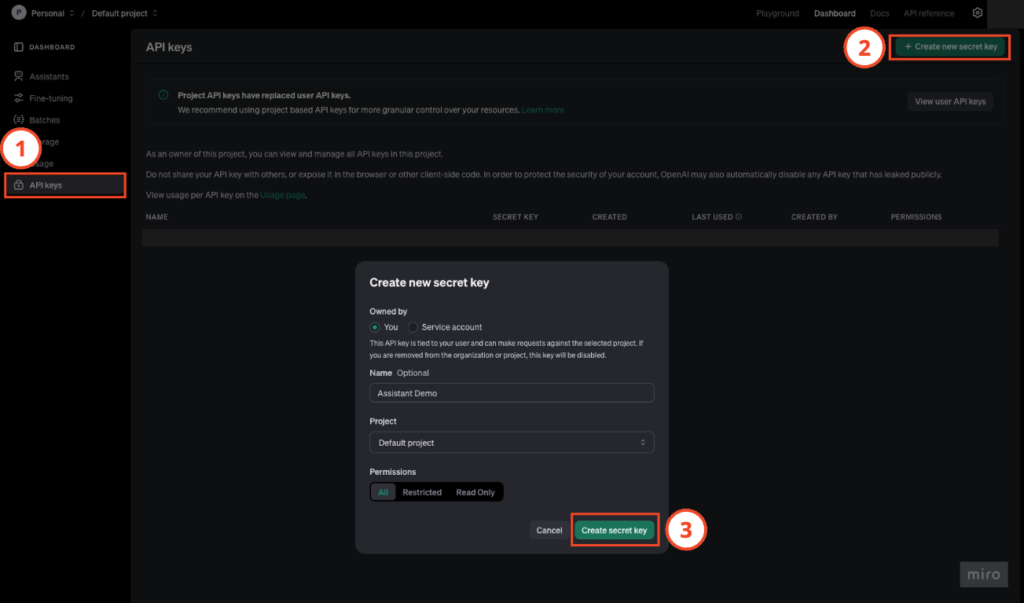
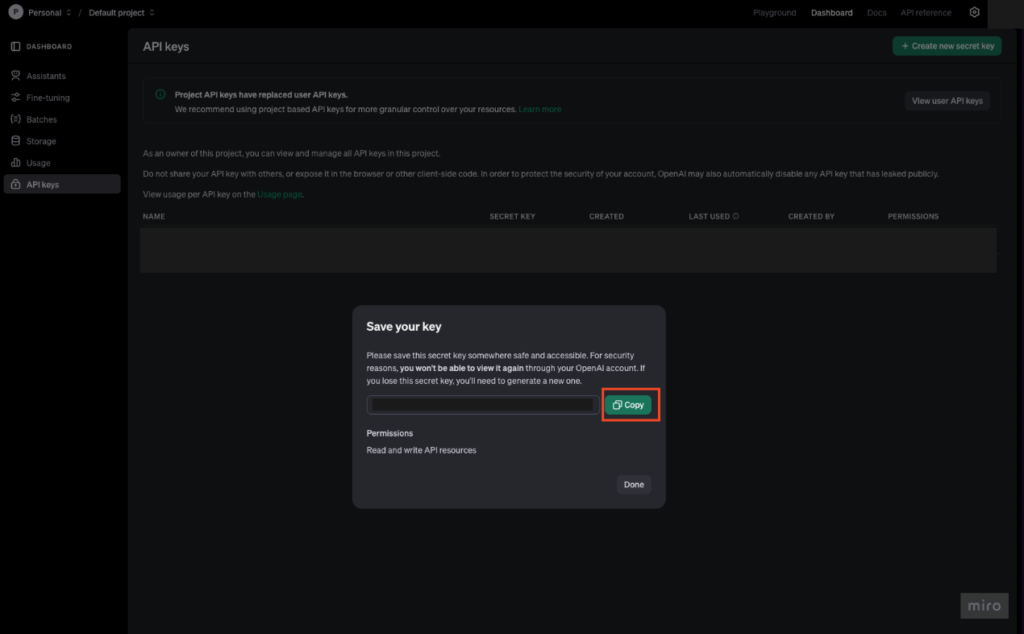
Step 2-3. Save secret key
"Copy" copy it, find a place to save it, you will use it later.
Step 3. Add “OpenAI Conversation” integration
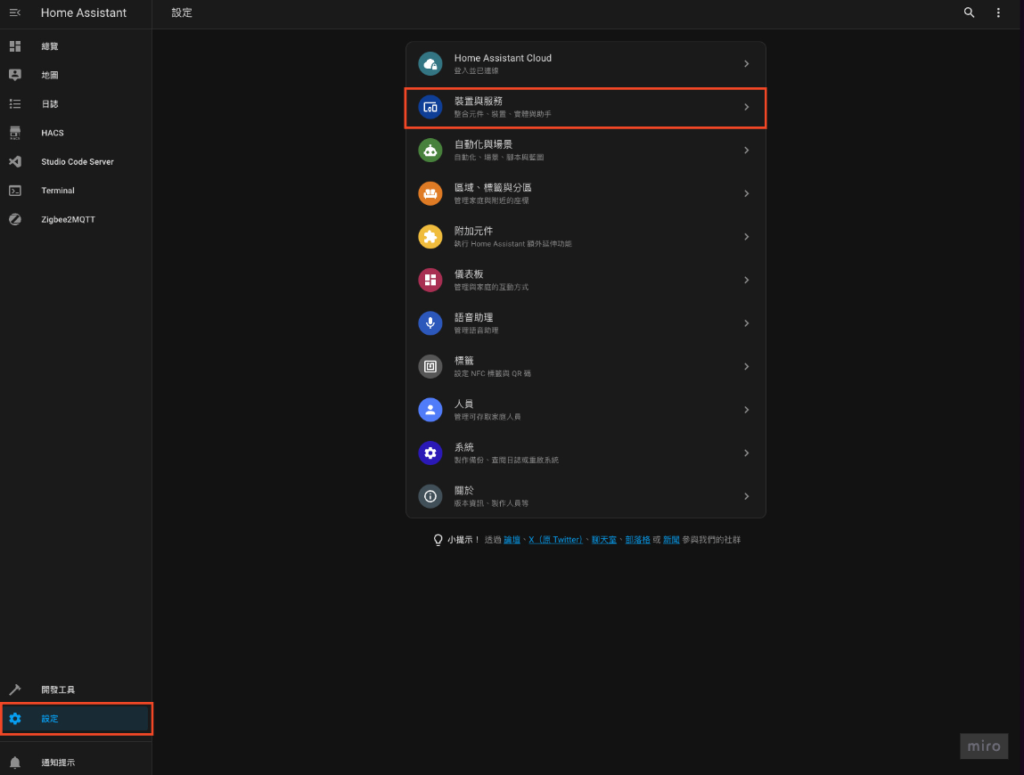
Step 3-1. "Settings" on the left side of Home Assistant ➜ "Devices and Services"
Step 3-2. Install “OpenAI Conversation”
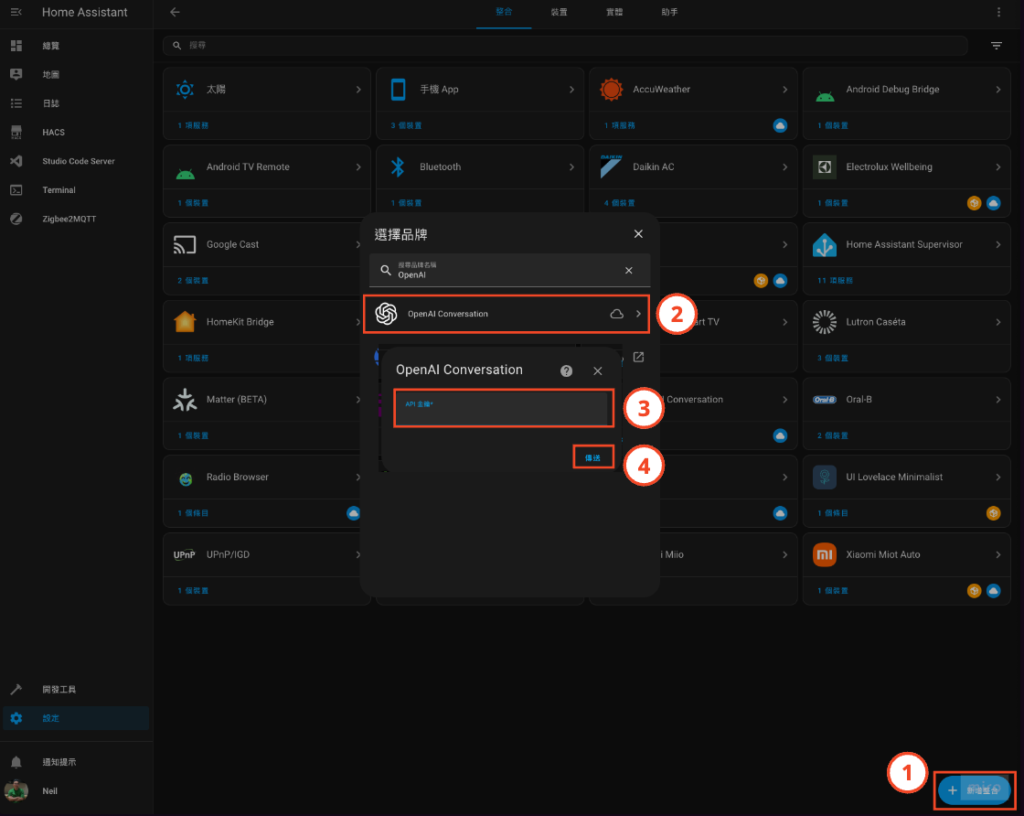
- Click "Add Integration" in the lower right corner
- Find "OpenAI Conversation" and click
- Fill in the API key in Step 2-3. Obtained secret key
- Click "Send"
Step 4. Obtain Google AI API key
Step 4-1. Register/Login Google AI Studio
to Google AI Studio Complete registration and log in.
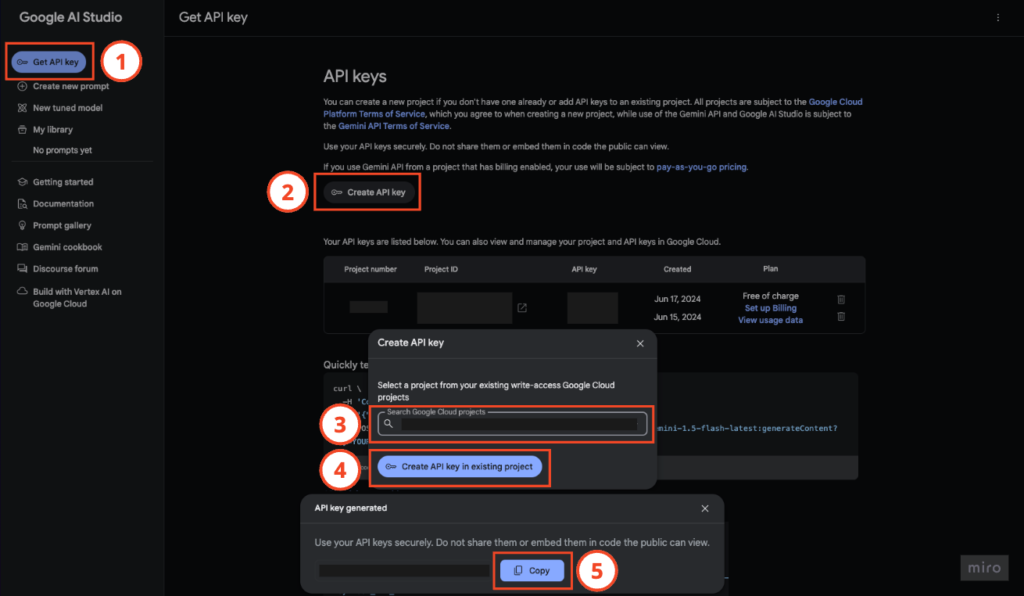
Step 4-2. Create Google AI API key
- Click "Get API key" in the left column
- Click "Create API key"
- Select "Google Cloud project" (if it doesn't exist, follow the guided steps to add one)
- Click "Create AI key in existing project"
- Copy "Copy" in the fill-in window and save the API key for later use.
Step 5. Add “Google Generative AI” integration
Step 5-1. "Settings" on the left side of Home Assistant ➜ "Devices and Services"

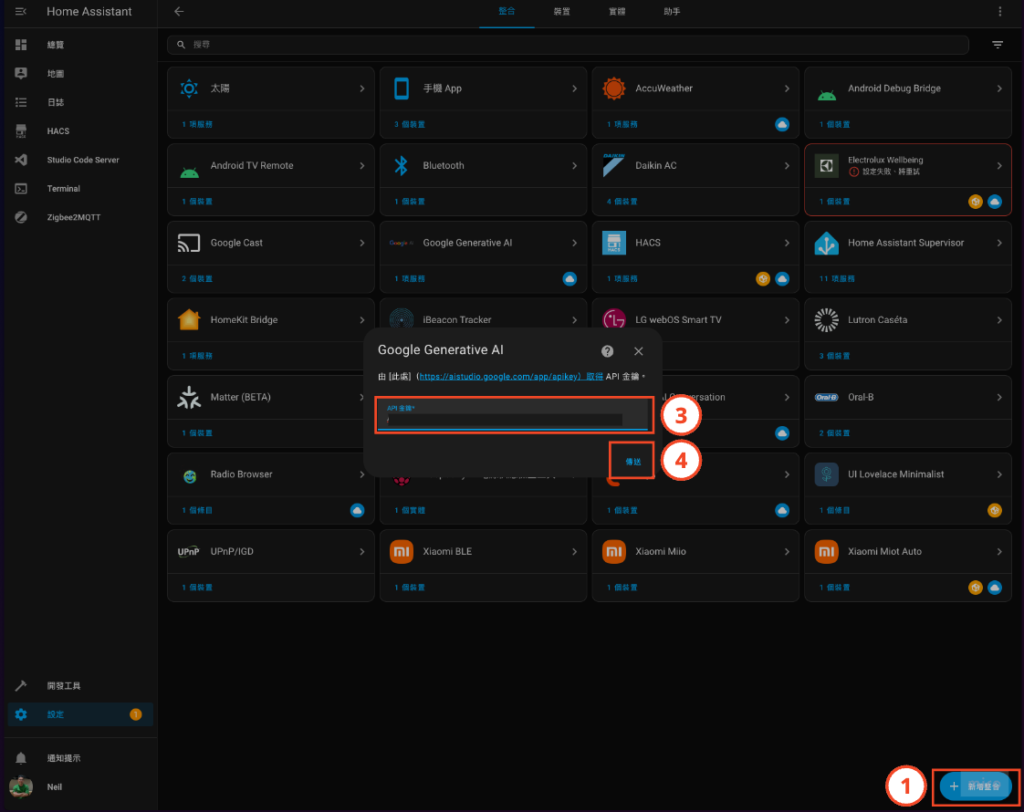
Step 5-2. Install "Google Generative AI"
- Click "Add Integration" in the lower right corner
- Find "Google Generative AI" and click
- Fill in the API key in Step 4-2. Obtained API key
- Click "Send"
Step 6. Set the conversation assistant used by Home Assistant voice assistant
It’s a bit verbose, but to put it simply, it’s to replace the original Home Assistant’s retarded voice assistant with ChatGPT or Google Gemini, whichever you like🤣
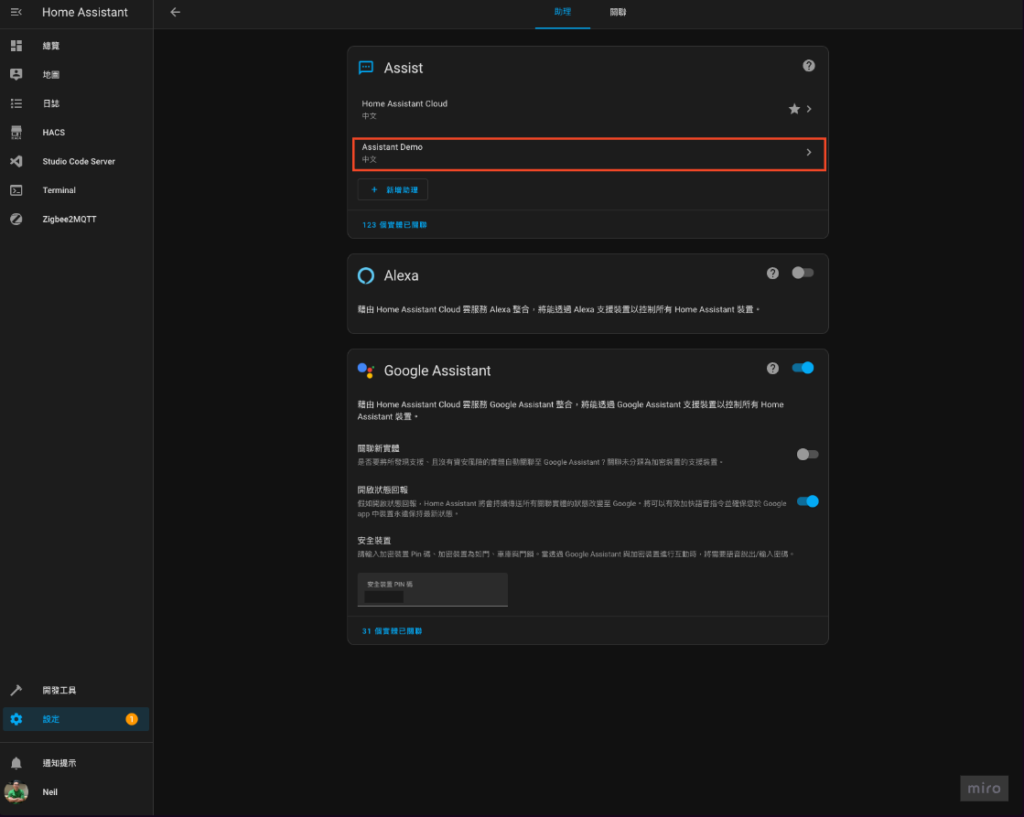
Step 6-1. Select Home Assistant voice assistant
- Home Assistant "Settings" on the left ➜ "Voice Assistant"
- Choose your voice assistant
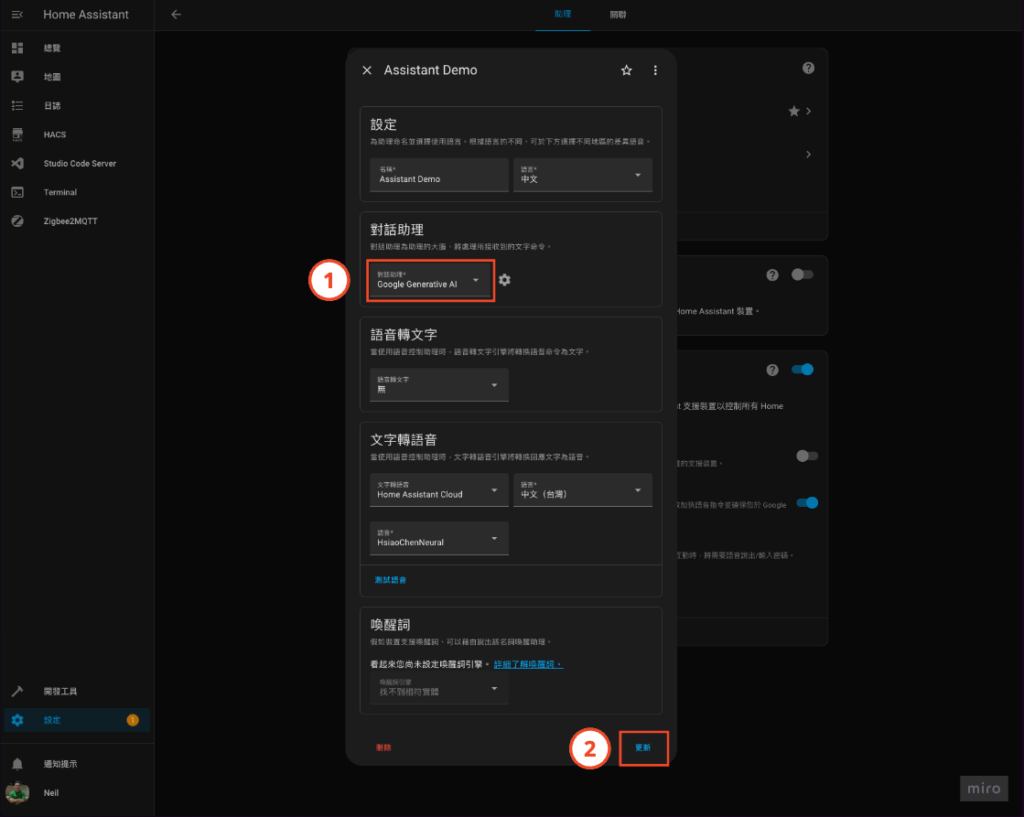
Step 6-2. Set up conversation assistant
- In the menu, you can choose between Home Assistant, ChatGPT, and Google Generative AI, choose the one you like (here is a demonstration using Google)
💡 There is a ⚙️ on the right side of the menu for advanced settings. It is recommended to try to adjust it after you have figured out the functions~
- Click "Update"
You're done!
congratulations! Your Home Assistant has become a real smart assistant~ Try talking to your Home Assistant~
You can also try to make your voice assistant more personalized through the advanced settings mentioned in Step 6-2.

Next episode preview
The next episode will show you how to use ESP32-S3-BOX-3 to create a “talking” voice assistant in Home Assistant!
Stay tuned~

May I ask which device should I use to make voice calls? Can I also make calls using the assistant on the smart watch? Thank you
Hi Eric,
I use Google Pixel 7 and can use it to make calls on the phone (wake-up word not supported), but the watch (Google Pixel Watch) does not work!
Suggestions can refer to ESP32-S3-BOX-3 Or the Home Assistant official recently launched Home Assistant Voice Preview Edition
Sorry, I had a problem talking to OpenAI is displayed when I talk to OpenAI
Hi George, first make sure the API key is filled in correctly, and remember to top up before you can use it! API calls and subscriptions to ChatGPT are separate
If the API key is not filled in correctly, it should not be configured into the integration. It seems that it may need to be stored in value.
Please tell me, when I set up Google Generative AI and tried to set the device On/Off or other functions appeared, sorry I had a problem talking to google generative ai:500 An internal error has occurred. Please retry if this part is still there Do I need to make other settings?
When I try to get the device status and currently turned on lights the reply information is stable.
Thanks!
Hi Yean, I checked and the 500 error refers to "Your input context is too long." (The input background information is too long). Reduce the number of authorized devices and try again.
Please tell me that after I completed the settings and wanted to control the device On/Off or other functions through Google Generative AI, I was prompted with the message "sorry i had a problem talking to google generative ai: 500 An internal error has occurred. Please retry this part" Are there any other settings that need to be done? Thank you!
By the way, do you need to pay to use Google Generative AI?
Hi Richard, Google has a free (Free of charge) plan to choose from. Of course, there are still usage restrictions, but it is enough if you try it. If you like it, consider paying.
Hi Neil~ I just checked to see if the API services of GOOGLE AI and OPEN AI are free as long as I use them within the traffic limit. If you exceed the traffic limit, you will have to pay. Is that true? Sorry for the many questions~Thank you
Hi Richard, OpenAI should have a billing plan set up so that the API can be opened, and it must be recharged before it can be used.
Or you can also read the official one Pricing page
It turns out that this is the case. My OpenAI has not set a billing plan, so no wonder an Error Code appears. So if I use Google AI, is it as I mentioned above that it is free within the traffic, and it will ask you to pay if it exceeds the traffic, or do I need to go What about choosing a payment mechanism? It's a bit messy~
Hi Richard,
I choose the free plan with Google. My understanding is that it is free within the quota and cannot be used when the quota is exceeded.
That's what I understand. Thank you Neil for taking the trouble, thank you~~
No problem, come on👍
Hi Neil:
I currently follow your instructions and successfully use Google Generative AI as an assistant. However, when using ChatGPT as an assistant, the dialogue shows OPEN AI Error Code: 429. Check the OPEN AI error code comparison table, which means that my frequent use has exceeded the usage limit. Yes Are there any charges?
Hi Richard,
Look at the official oneillustrateIt's probably because the calls are too frequent. You can try again every other day. OpenAI's API usage also requires payment. Please check your OpenAI bill to avoid expiration.
Got it, thank you Neil~~