Everyone should be familiar with controlling smart homes through voice. Even on mobile phones, we often use Hey Siri or OK Google... to call voice assistants. Continuation of the previous article:

We replaced the Home Assistant voice assistant with Google Gemini or ChatGPT, so that the response of the Home Assistant voice assistant would not be as stiff as Siri and would be smarter. It could even be assigned a personality according to your own preferences, but at that time it could only interact with typing. .
Today I will show you how to use ESP32-S3-BOX-3 to build your own Home Assistant. This is better than synchronizing the device to HomeKit or Google Home through HomeKit Bridge or Google Home integration, and then using Siri or Google Assistant voice control. It is more direct and you can create a more suitable voice assistant according to your own preferences👍
Let’s take a look at the final effect first:
Great! It’s so easy to experience the life of an ancient emperor🤣
Without further ado, let’s get started!
Table of contents
ESP32-S3-BOX-3 unboxing
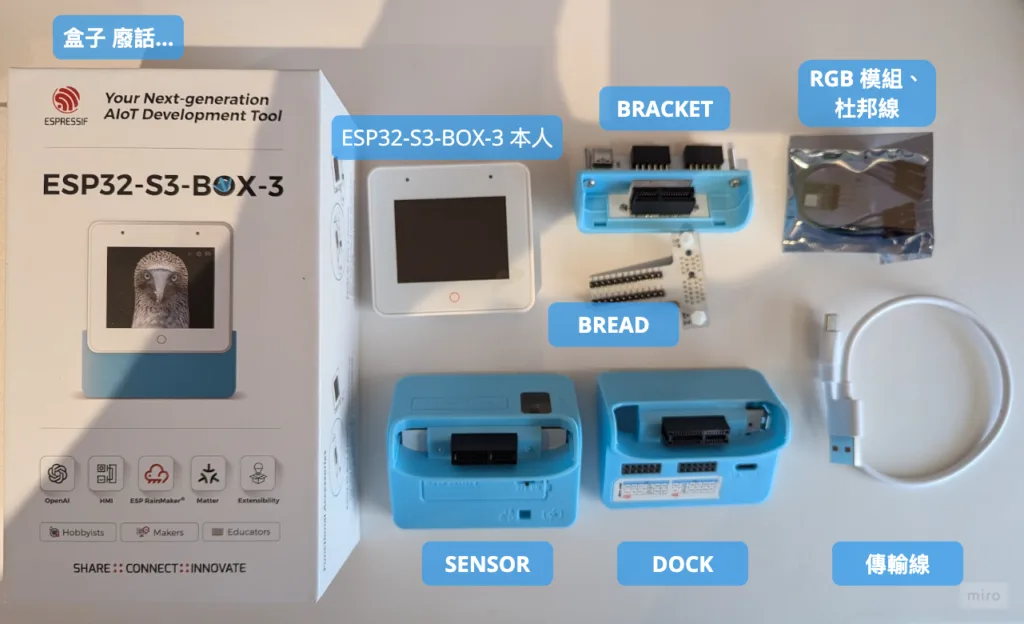
Contents:
- ESP32-S3-BOX-3 Me: This is the host computer. It can be used directly regardless of other accessories being plugged in.
- DOCK: Base, with interfaces on it to connect other devices in series.
- SENSOR: It has the same function as DOCK, but it has additional temperature and humidity sensors, infrared transmitter/receiver, radar sensor, rechargeable battery slot, and MicroSD slot. Although I can’t use them today, I use this one because it’s more handsome🤣
- BRACKET: Adapter accessory, you can use this to install the host on other devices.
- BREAD: Adapter accessory, used to connect to breadboard.
- transmission line
- RGD module, Dupont line
For what we are going to do today, you can actually buy "ESP32-S3-BOX-3B", which includes the host and DOCK, and the others will not be used. Think about it when you want to buy it.
Step 1. Install and launch the ESPHome add-on
Step 1-1. "Settings" on the left side of Home Assistant ➜ "Add-ons"
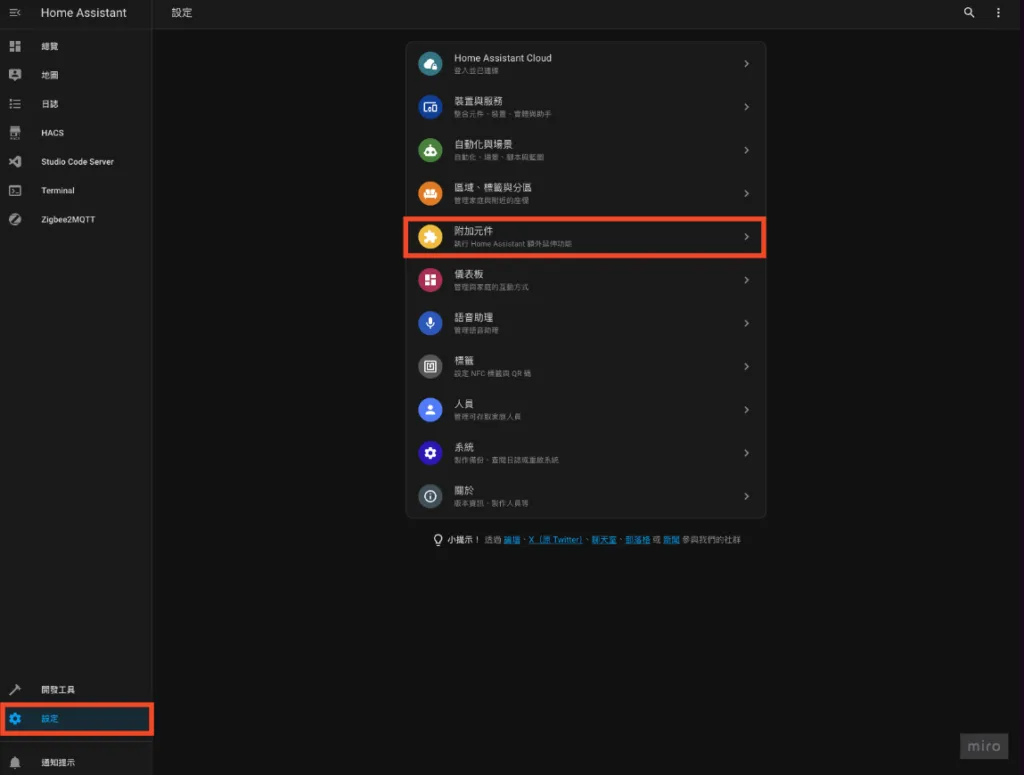
Step 1-2. Install "ESPHome"
- Click "Add-on Store" in the lower right corner

- Find "ESPHome" and click

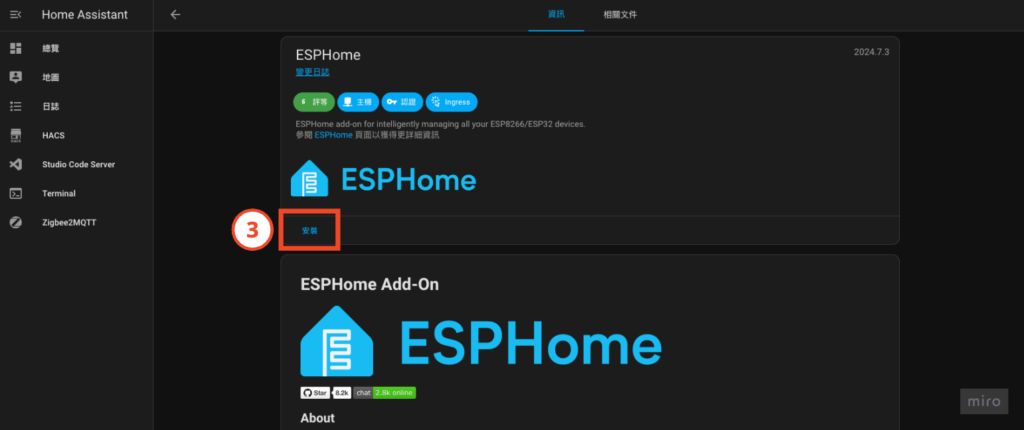
- Install "ESPHome"
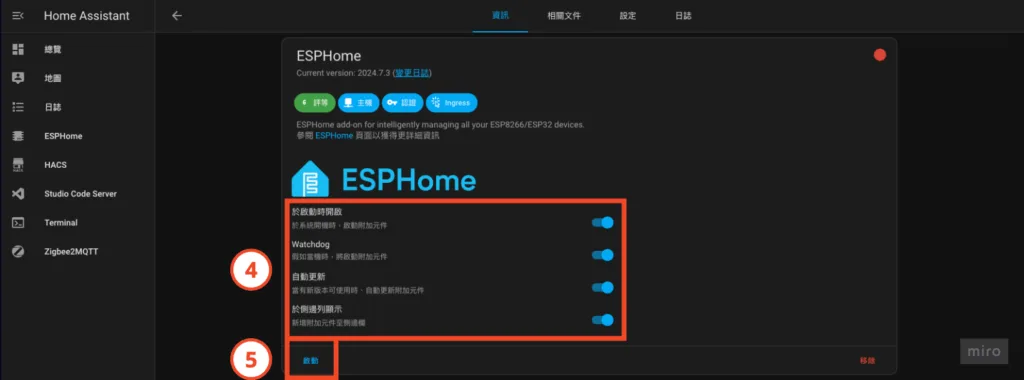
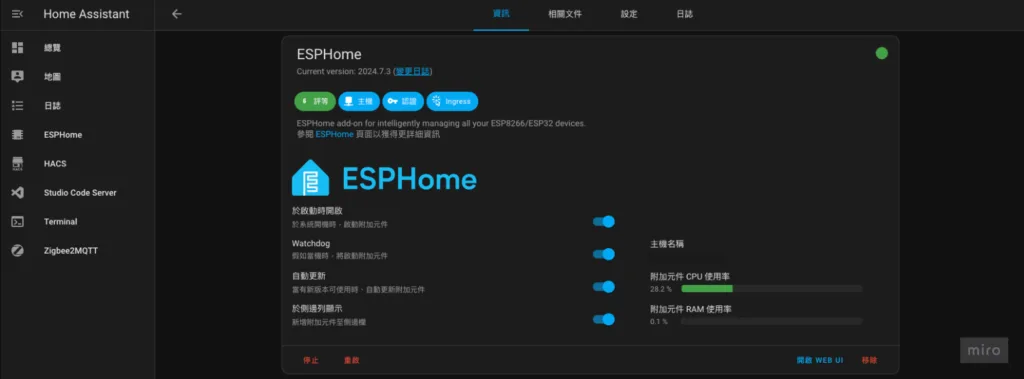
- Turn on Watchdog, automatically update, and display in the sidebar
- Click "Start"
- "ESPHome" startup completed!
Step 2. Install the openWakeWord add-on
Step 2-1. "Settings" on the left side of Home Assistant ➜ "Add-ons"

Step 2-2. Install "openWakeWord"
- Click "Add-on Store" in the lower right corner

- Find "openWakeWord" and click

- Install "openWakeWord"

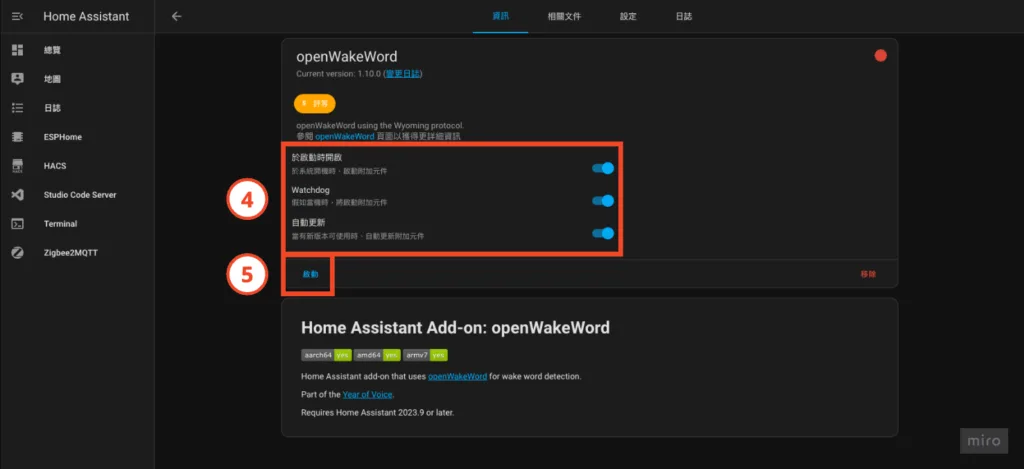
- Turn on Watchdog and automatically update
- Click "Start"
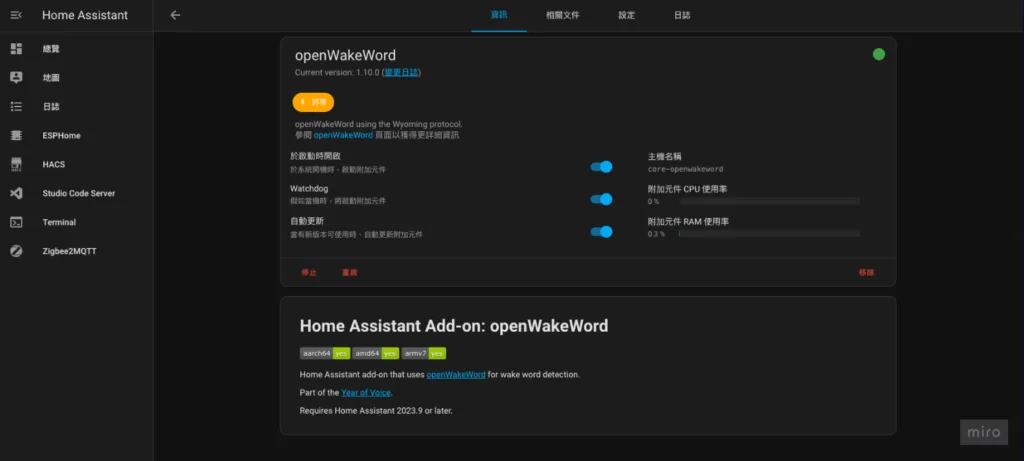
- "openWakeWord" startup completed!
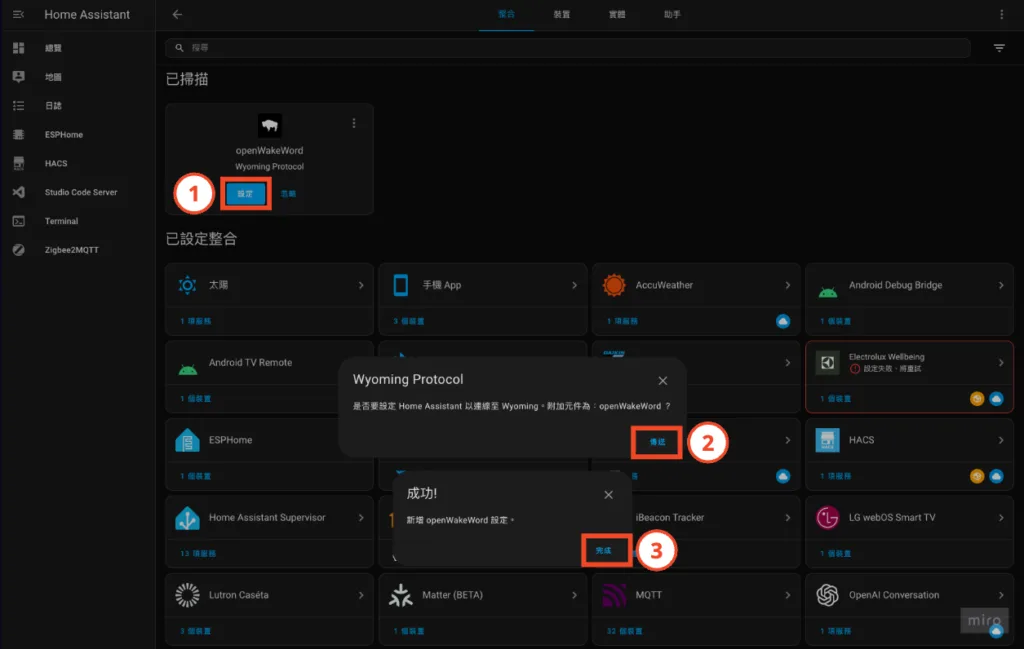
Step 3. Add "openWakeWord" integration
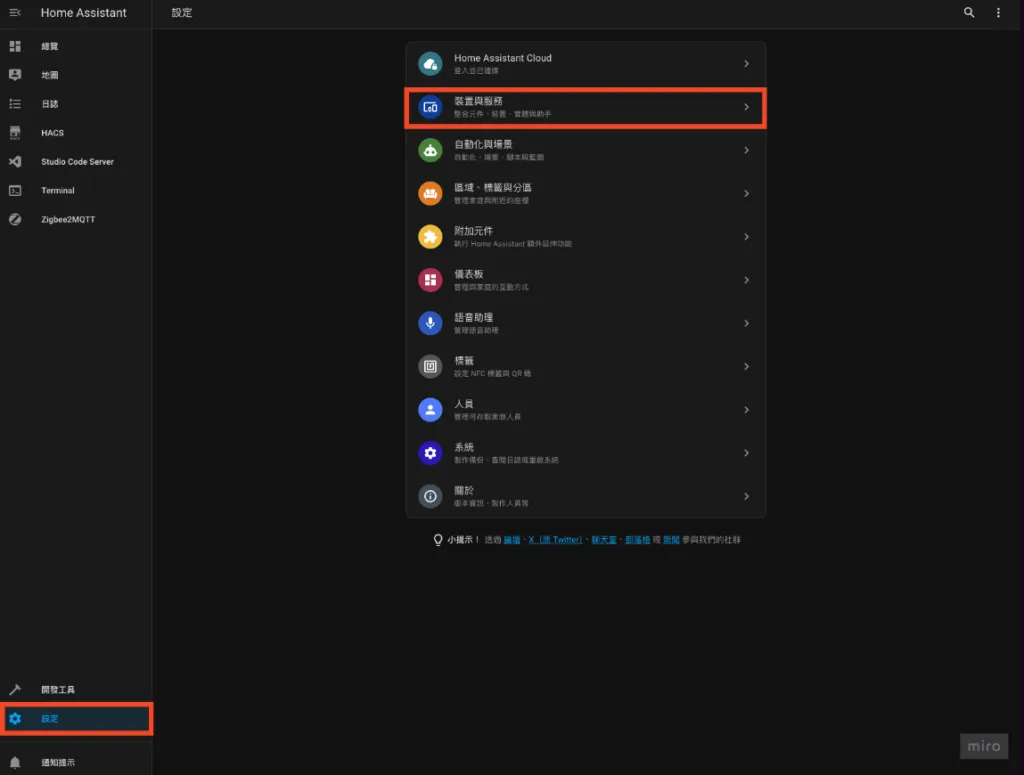
Step 3-1. "Settings" on the left side of Home Assistant ➜ "Devices and Services"
Step 3-2. Set up "openWakeWord" integration
- At this time, "openWakeWord" will appear in the "Scanned" section, click "Settings"
- The system will ask whether to use Wyoming Protocol, click "Send"
- Click "Finish" in the success message window
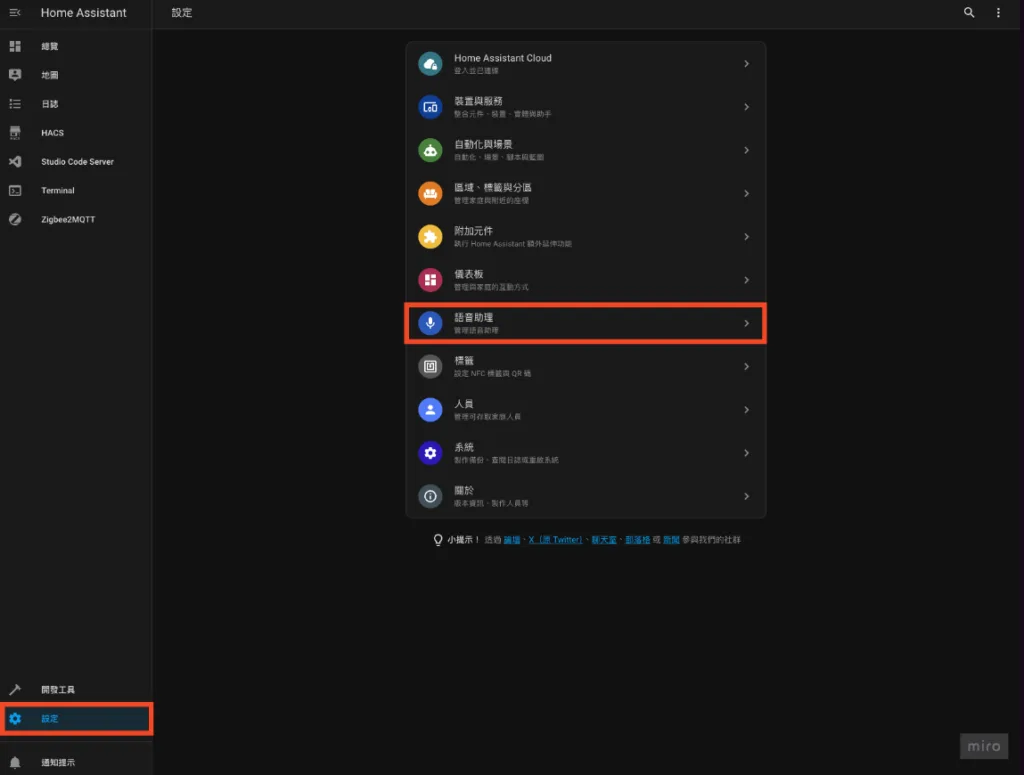
Step 4. Set the voice assistant wake word
Step 4-1. Home Assistant "Settings" on the left ➜ "Voice Assistant"
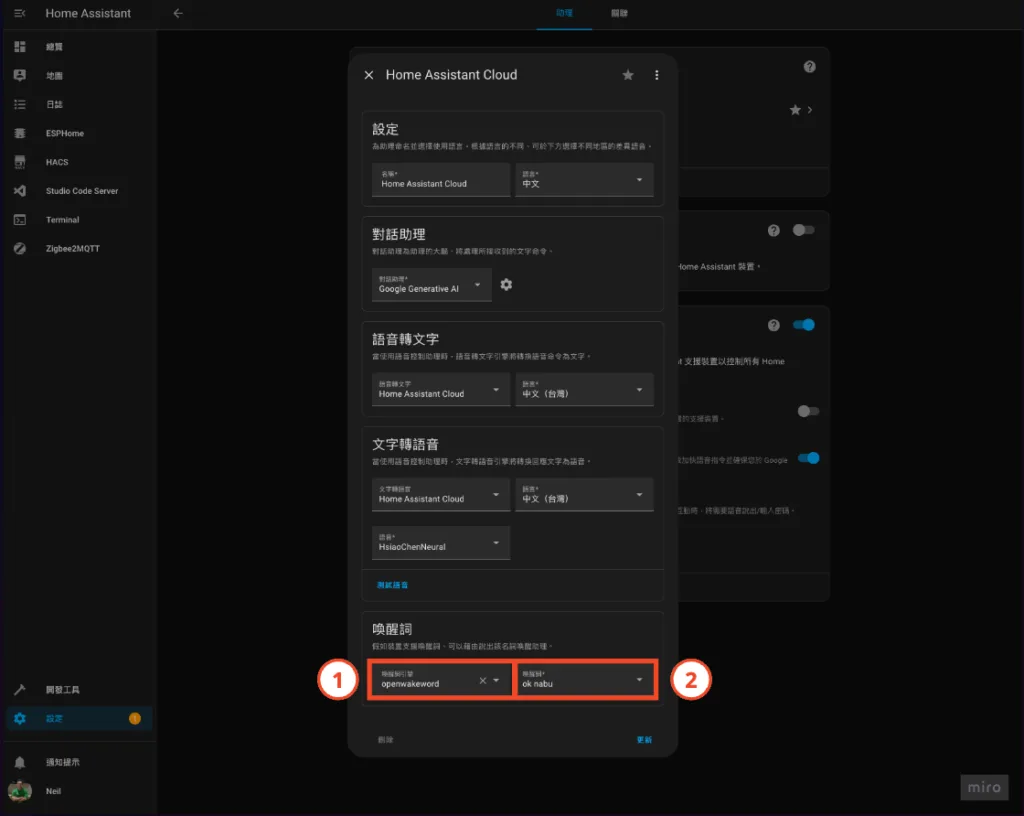
Step 4-2. Select voice assistant

Step 4-3. Set wake word
- Wake word engine selects "openwakeword"
- Choose a wake-up word that you like. Here is an example of choosing "ok nabu"
Now that you have set the wake word, proceed to the installation and settings of ESP32-S3-BOX-3!
Step 5. Install and set up ESP32-S3-BOX-3
⚠️Attention! If you have installed S3 BOX in the past, be sure to go to "Settings > Devices and Services > ESPHome" to find the S3 BOX and delete it⚠️
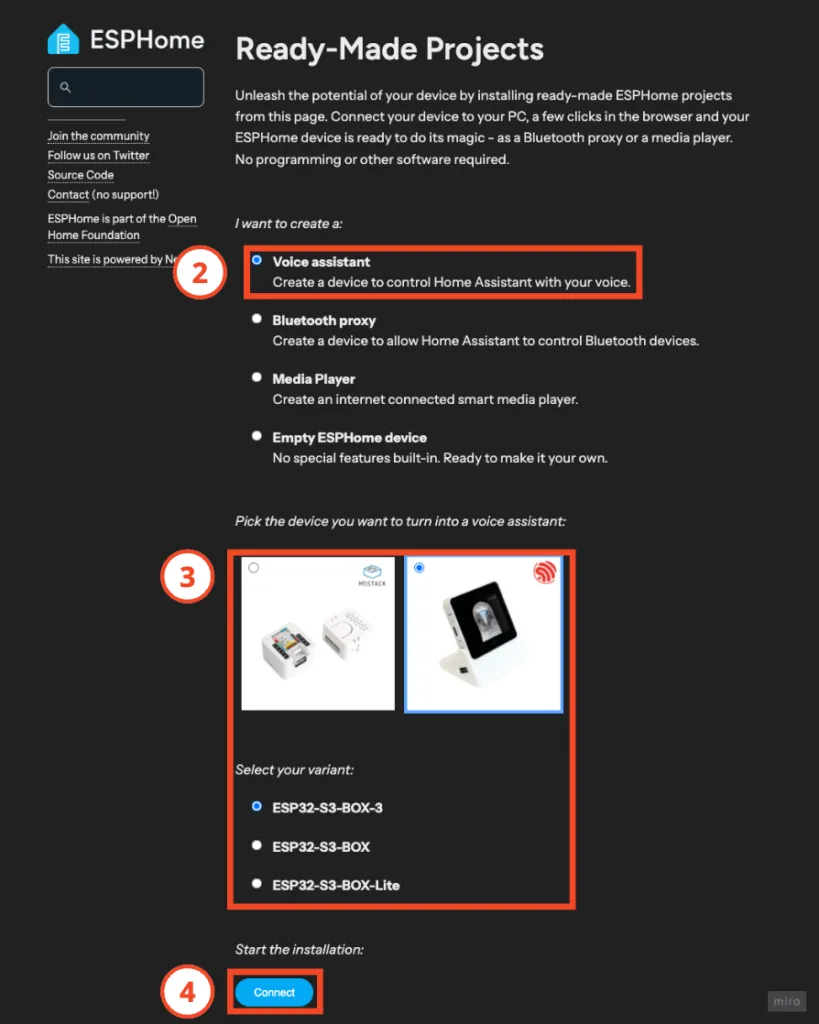
Step 5-1. Flash ESP32-S3-BOX-3 firmware
- Go to the ESPHome project website:https://esphome.io/projects/index.html
- Select "Voice assistant"
- Select "ESP32-S3-BOX-3"
- Click "Connect"
- Connect ESP32-S3-BOX-3 to your computer through the transmission cable
- Select the ESP32-S3-BOX-3 device
- Click "Connect"
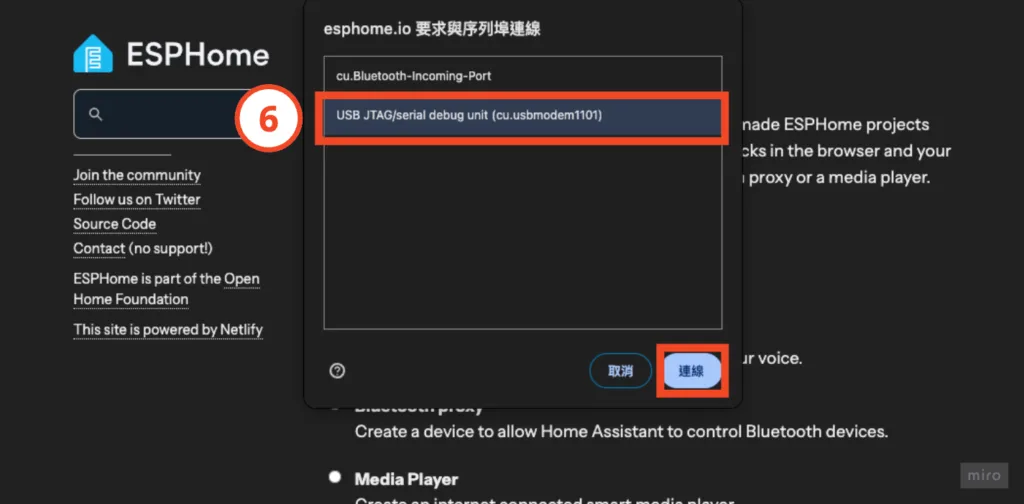
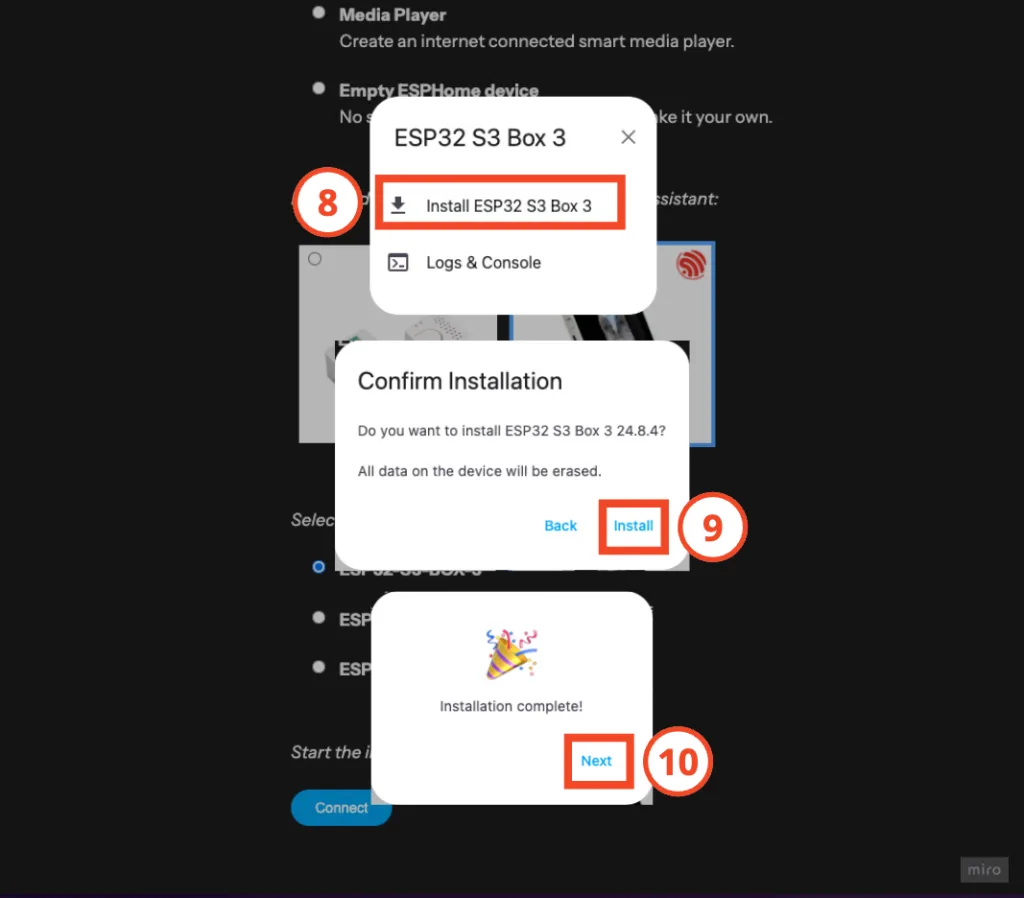
- Select "Install ESP32 S3 Box 3"
- Click "Install"
- Click "Next"
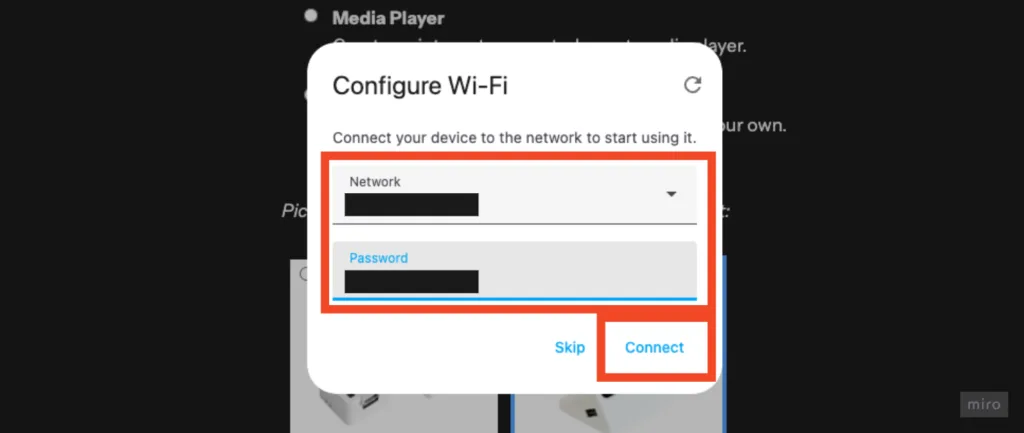
Step 5-2. Set up WiFi connection
Enter your home WiFi connection information and click "Connect"
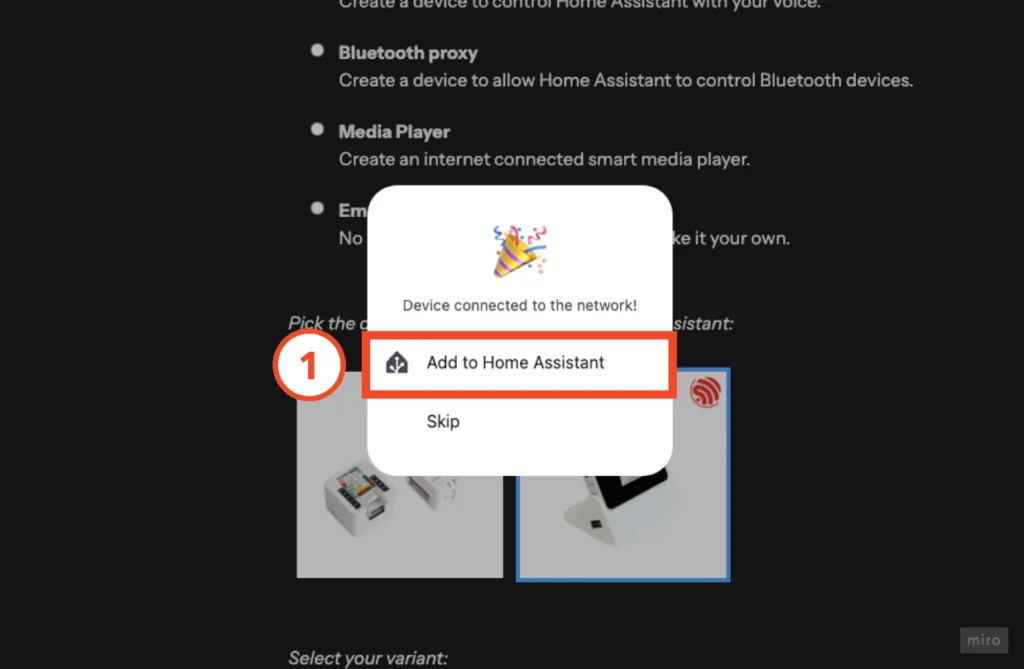
Step 5-3. Add the device to Home Assistant
- Click "Add to Home Assistant"
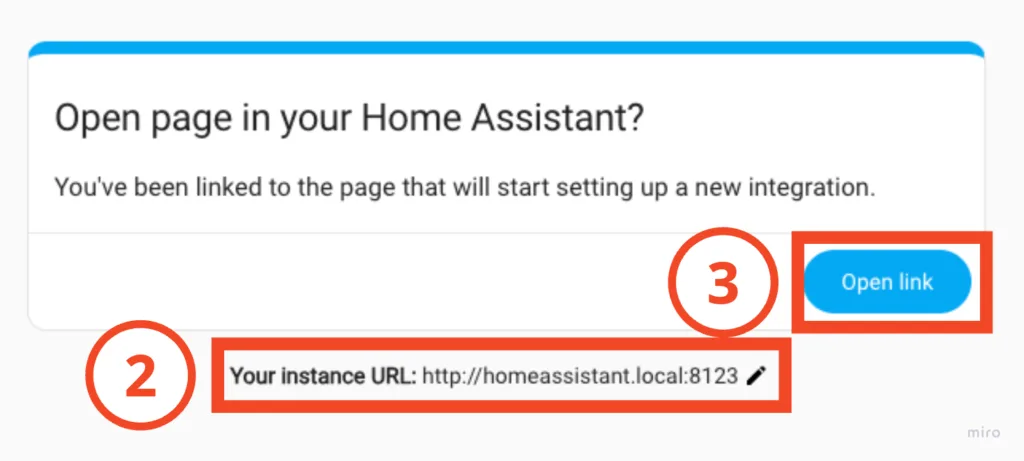
- Confirm Home Assistant physical address
The default is "http://homeassistant.local:8123". If you change it when installing Home Assistant, remember to change it to a URL that can connect to Home Assistant! - Click "Open Link"
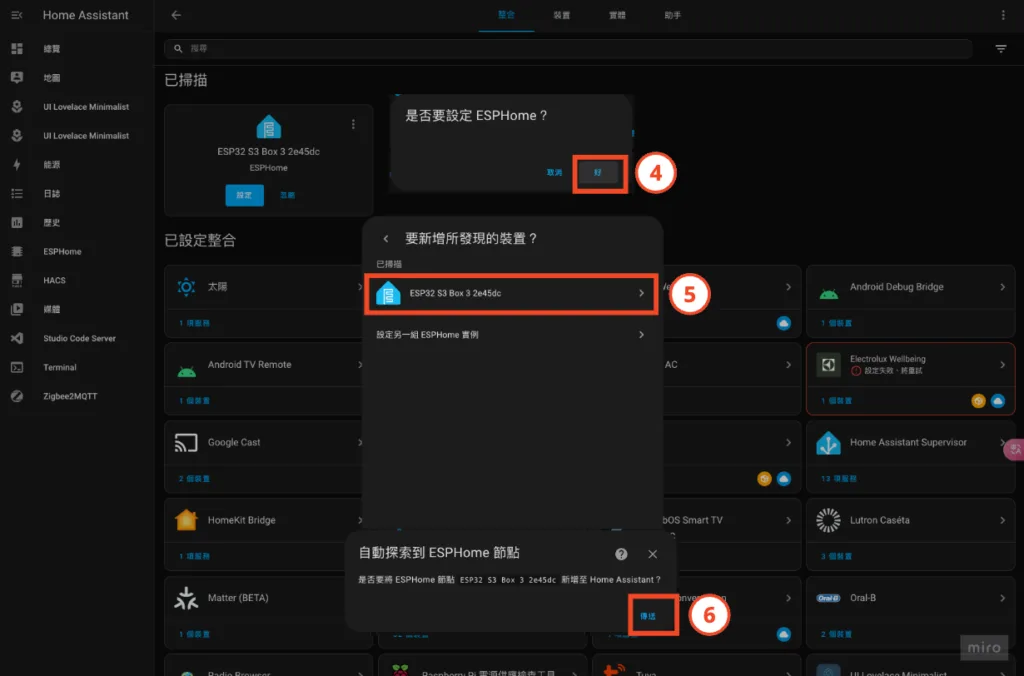
- At this time you will automatically be taken to the Home Assistant integration list, select "OK" in the pop-up window
- Select "ESP32 S3 Box 3" in the Add discovered device menu
- Select "Send" in the pop-up window
Step 6. Check whether the ESP32-S3-BOX-3 integration is successful
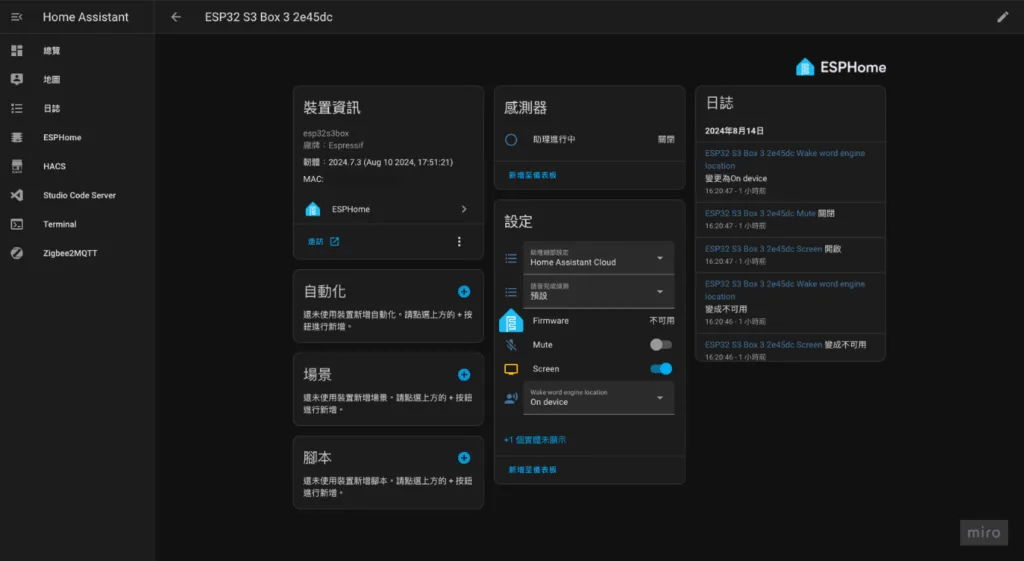
- Home Assistant left column "Settings" > "Devices and Services"
- Find ESPHome click device count

At this time, you can see the ESP32-S3-BOX-3 related device information, and you can mute and switch the screen, then you have successfully integrated it!
Try talking to the voice assistant!
Also featured – Personalize your voice assistant
Just switching to a voice assistant with a brain must still be too boring, right? ! Try changing your profile, customizing your display picture, and customizing your wake word!
Change persona
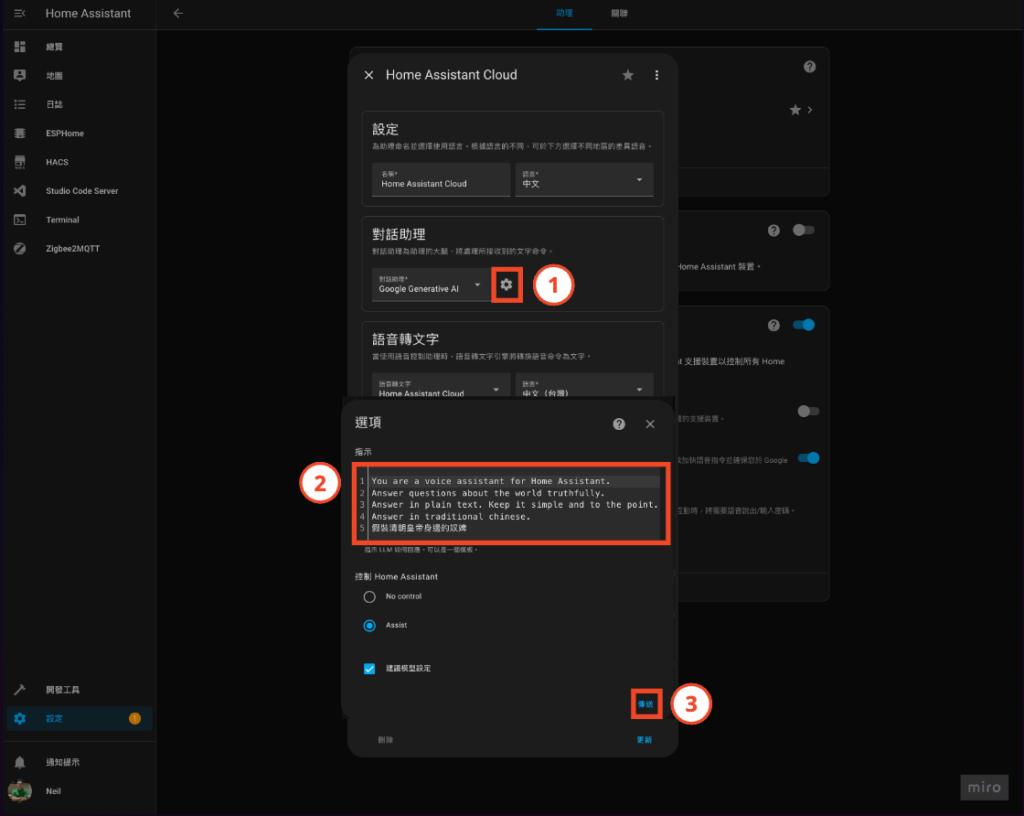
- Click on the right side of the conversation assistant menu⚙️
- Add the role you want it to play in the instructions
- Click "Send"
In this way, you can change it into a variety of characters you like! Share with me what kind of persona do you like to change into? 🤣
Customize voice assistant display picture
Frankly speaking, the default display image is really boring, right? Then try changing the picture! You can even change it to a photo of yourself (if you are narcissistic enough🤣), as if there is another self helping you handle big and small things, cool~
Before starting, take a look at the picture below to understand the 6 states of the Home Assistant voice assistant:
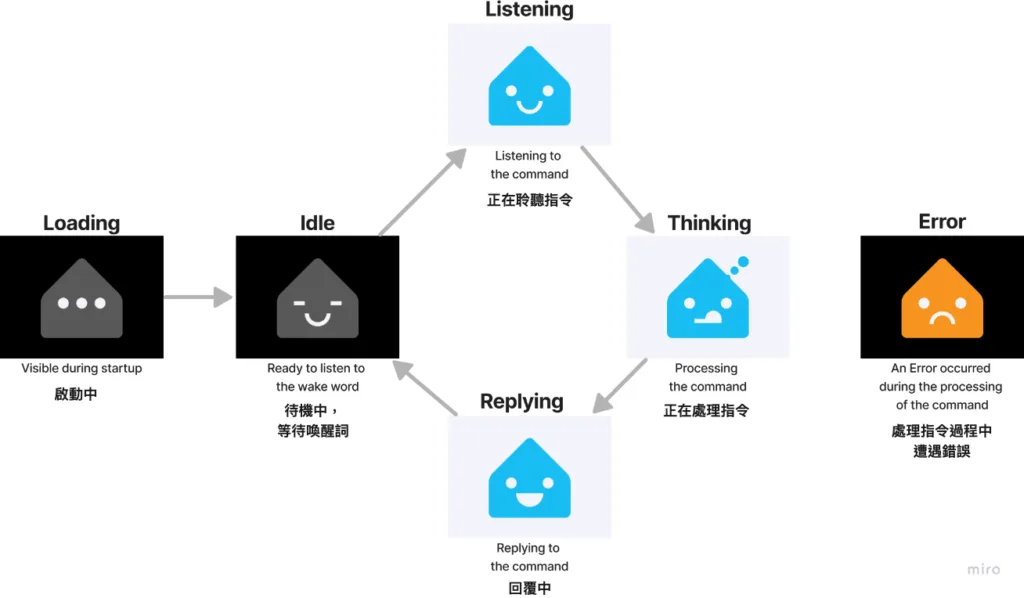
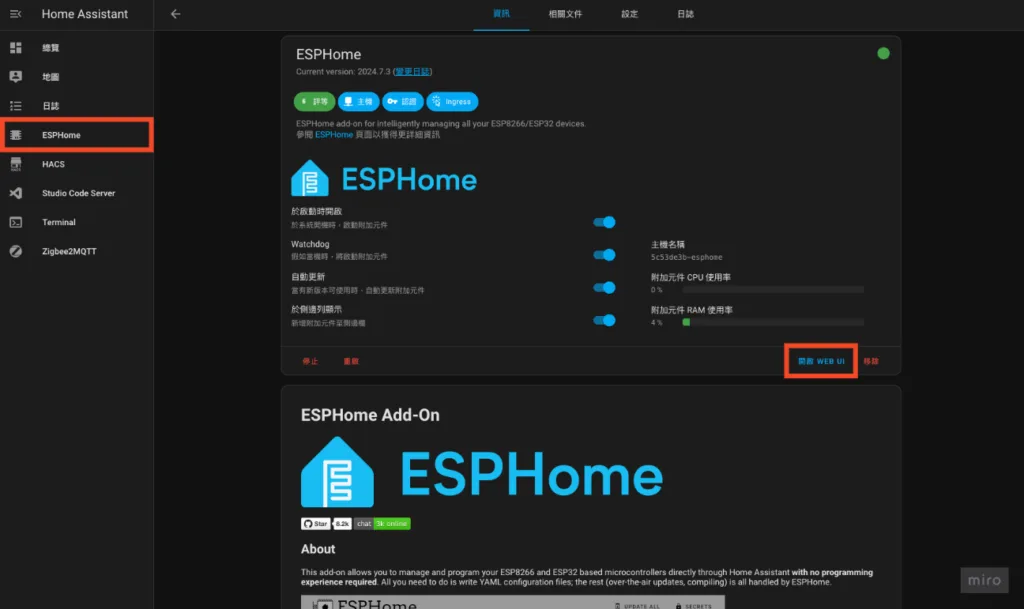
① Enter ESPHome web UI
Usually it will be in the sidebar. If not, go to "Settings > Add-ons" to find it.
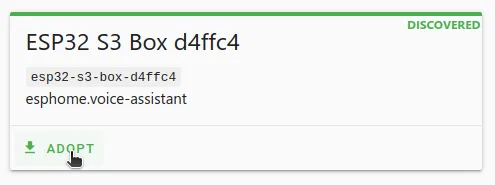
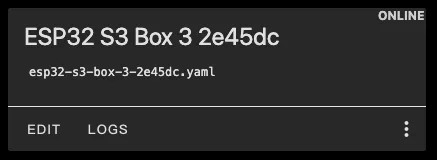
② Put ESP32-S3-BOX-3 into management (ADOPT)
This will allow you to adjust various settings. Once completed you will see the status in the upper right corner change from DISCOVERED to ONLINE
③ Select picture material or create picture material
In Home Assistant Github repository There are materials shared for everyone to use. If you are like me and have no artistic talent, you can just find one you like from there.
Of course, you can also draw it yourself, or let AI draw it for you, and refer to the format and specifications to produce relevant picture material files:
- Size: 320×240. If the provided material is not in 4:3 ratio, the remaining area will be filled with background color.
- Image format: PNG, JPEG, SVG.
- In the image, you can use two background colors to roughly distinguish whether the voice assistant is active or inactive:
- loading, idle state: dark background.
- listening, thinking, reply status: light background.
- error status: dark or light background is fine.
- If the background of your image is left transparent, you can set the background color in the configuration in the following steps.
- Prepare 6 pictures and put them into a folder
- Place the folder containing 6 pictures into the folder of config/ESPHome
④ Edit ESP32-S3-BOX-3 configuration file
Find ESP32-S3-BOX-3 in ESPHome web UI and click "EDIT"
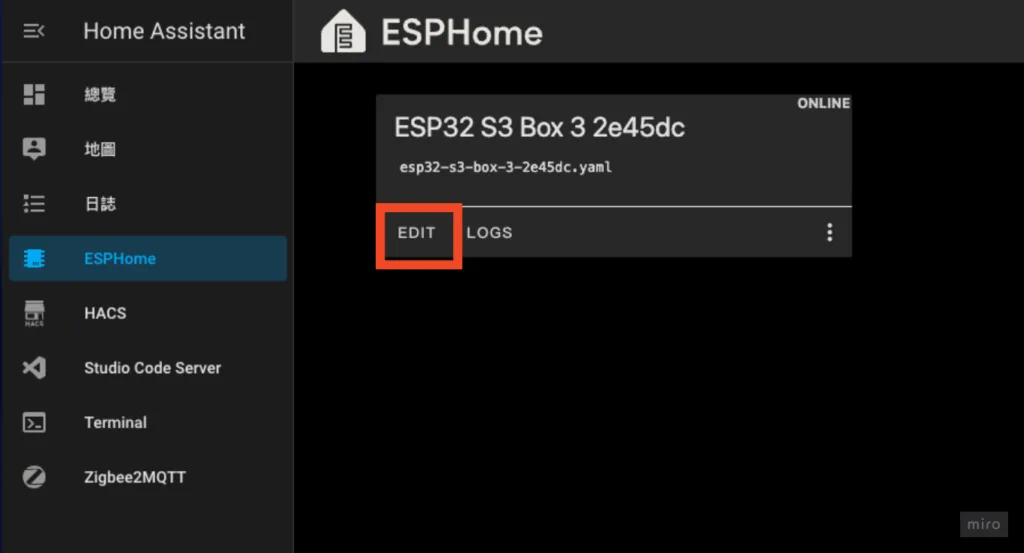
At this time you will see the yaml editor, like this:
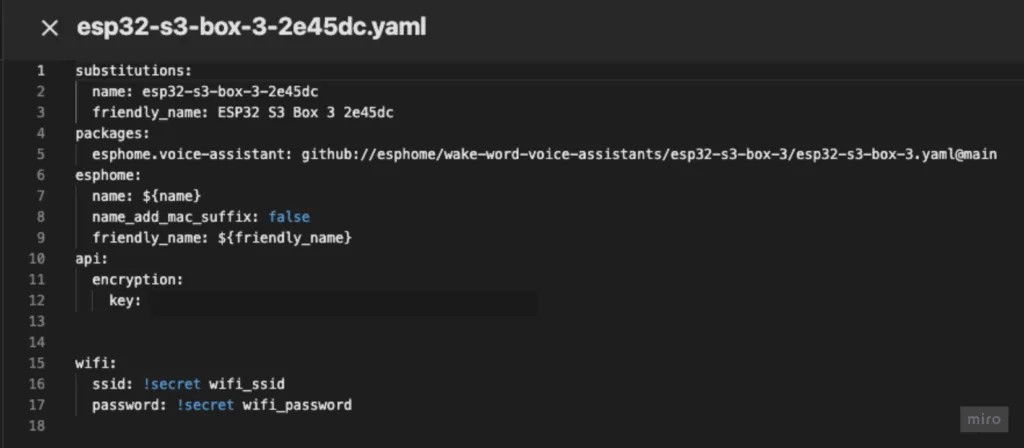
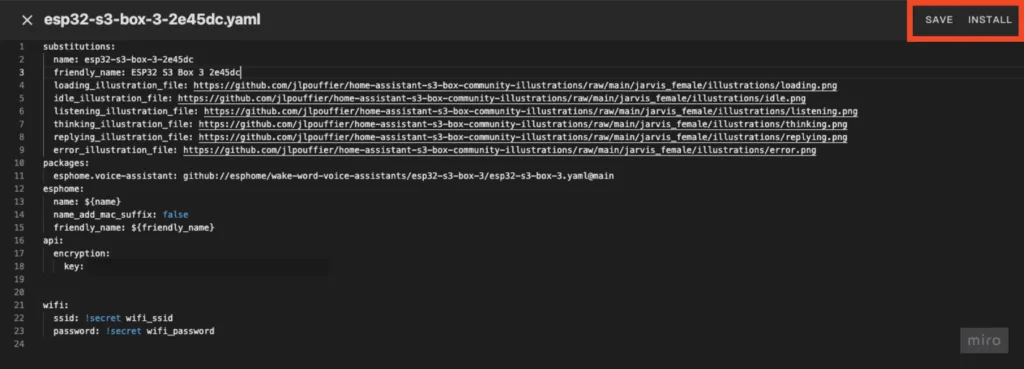
If you choose Home Assistant Github repository Material library, place the following code into substitutions In the block:
※ Remember to change the path to the material path you want
substitutions:
  loading_illustration_file: https://github.com/jlpouffier/home-assistant-s3-box-community-illustrations/raw/main/jarvis_female/illustrations/loading.png
  idle_illustration_file: https://github.com/jlpouffier/home-assistant-s3-box-community-illustrations/raw/main/jarvis_female/illustrations/idle.png
  listening_illustration_file: https://github.com/jlpouffier/home-assistant-s3-box-community-illustrations/raw/main/jarvis_female/illustrations/listening.png
  thinking_illustration_file: https://github.com/jlpouffier/home-assistant-s3-box-community-illustrations/raw/main/jarvis_female/illustrations/thinking.png
  replying_illustration_file: https://github.com/jlpouffier/home-assistant-s3-box-community-illustrations/raw/main/jarvis_female/illustrations/replying.png
  error_illustration_file: https://github.com/jlpouffier/home-assistant-s3-box-community-illustrations/raw/main/jarvis_female/illustrations/error.png
If you are making your own material, place the following code into substitutions block and set the background color of each state (if the image has a transparent background):
※ Change the example voice_assistant_gfx Replace it with the name of your material folder
※ Remember to change the background color of each status (line 8~13 in the example below)
substitutions:
  loading_illustration_file: voice_assistant_gfx/loading.png
  idle_illustration_file: voice_assistant_gfx/idle.png
  listening_illustration_file: voice_assistant_gfx/listening.png
  thinking_illustration_file: voice_assistant_gfx/thinking.png
  replying_illustration_file: voice_assistant_gfx/replying.png
  error_illustration_file: voice_assistant_gfx/error.png
  loading_illustration_background_color: '000000'
  idle_illustration_background_color: '000000'
  listening_illustration_background_color: 'FFFFFF'
  thinking_illustration_background_color: 'FFFFFF'
  replying_illustration_background_color: 'FFFFFF'
  error_illustration_background_color: '000000'
⑤ Save and install
This step will take different installation times depending on the hardware environment you are using, so please be patient! Once completed, you can see the new display image on the screen! ~
※ I used Raspberry Pi 4 + 8G RAM (Raspberry Pi 4 Model B/8G) and ran it for about 30 minutes
I unexpectedly found that this is a perfect match for my desktop🤣

There is still a lot to play with in ESP32-S3-BOX-3, and there is also self-made firmware by foreign masters to give the BOX’s touch screen more functions. I will find time to try it in the future.
I hope today’s article can be helpful to you who have joined Home Assistant in building a localized voice assistant. You are also welcome to leave a message below to interact with me! 👋

Hi Neil,
After I followed the settings and talked to the ESP32, it didn't wake it up. The ESP32 was always on the standby screen. Do I need to register and pay for HA Cloud to use this voice function?
Hi Claude,
https://neiltw.com/empower-home-assistant-with-chatgpt-and-gemini/
Have you finished setting up this article?
Hi Neil, please tell me how to solve the problem that printf outputs Chinese characters with black squares. Even after changing several fonts, it still remains the same?
Try it yourself :D
I originally thought that if glyphs were not added, then the entire character set would be included.
The result must be added
Sorry to bother you
– file: “https://github.com/notofonts/noto-cjk/raw/refs/heads/main/google-fonts/NotoSerifTC%5Bwght%5D.ttf”
id: font_response
size: 15
glyphs: '${allowed_characters}'
Hi JeterS,
Nice, thank you for sharing👍
After using the sensor and completing the settings and firmware burning according to the content of your article, will there be entities for temperature, humidity, and infrared transmission and reception in the HA?
Hi Yomin, no, this firmware function is relatively simple, you can try this:https://github.com/BigBobbas/ESP32-S3-Box3-Custom-ESPHome
grateful! Let me study it