Home Assistant must-install HACS plug-in installation steps detailed explanation – Home Assistant step-by-step tutorial EP 17

When talking about Home Assistant (HA), we have to mention HACS (Home Assistant Community Store), which is a platform that allows developers to publish self-made components (plug-ins) and allows general users to install these customized components. It includes four types of components: Dashboard, Integration, Template, and Theme. The most commonly used of them are Integration type packages. For example, the integration of third-party platforms such as Xiaomi, Tuya, Aqara, etc., before obtaining official support from HA, you can obtain self-service integration developed by netizens through HACS to connect various smart home devices; the second is Dashboard type packages. The most popular Mushroom, mini-graph-card, button-card, etc. can help you build your own smart home control panel.

In short, HACS will be one of the most important add-ons you need to use HA. For other recommended add-ons, please refer to:

After several years, I tried to install HACS again and found that it is so simple now. Even if you don’t understand IT and don’t know how to put the files in the right place, just follow the steps and click through. Let’s get started!

Installing HACS

  1. Open HACS official website (https://www.hacs.xyz/)
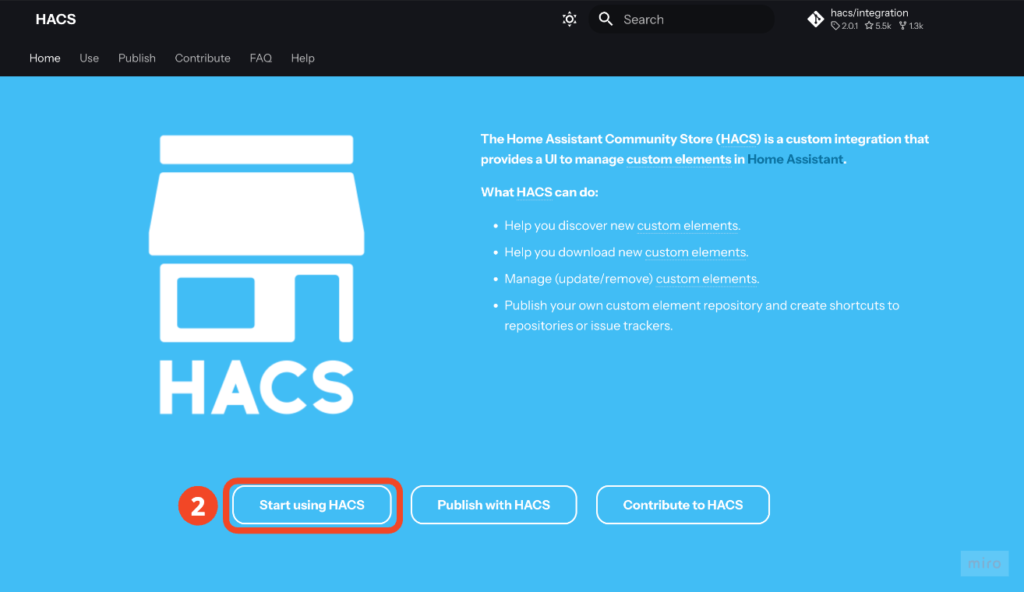
  2. Click "Start using HACS"
HACS 官網
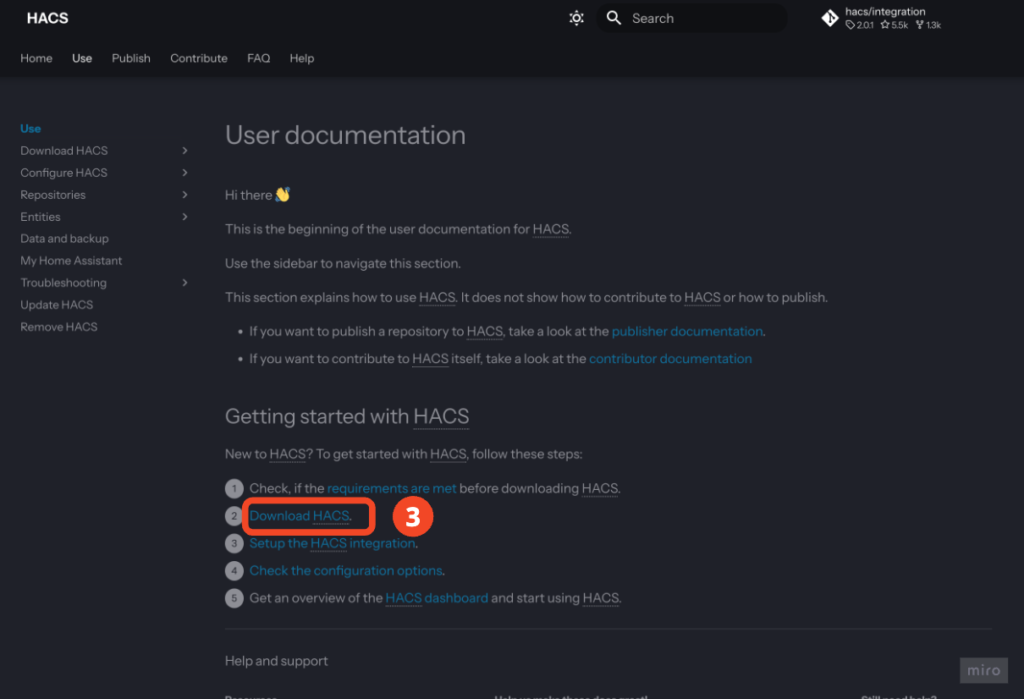
  1. Click "Download HACS"
Download HACS

⚠️ Attention!
The following installation steps are for HAOS or HA Supervised versions. If you are using HA Container or HA Core version, please follow the instructions on the HACS official website to complete the installation, and continue to refer to the settings and usage instructions in this article after the installation is complete.

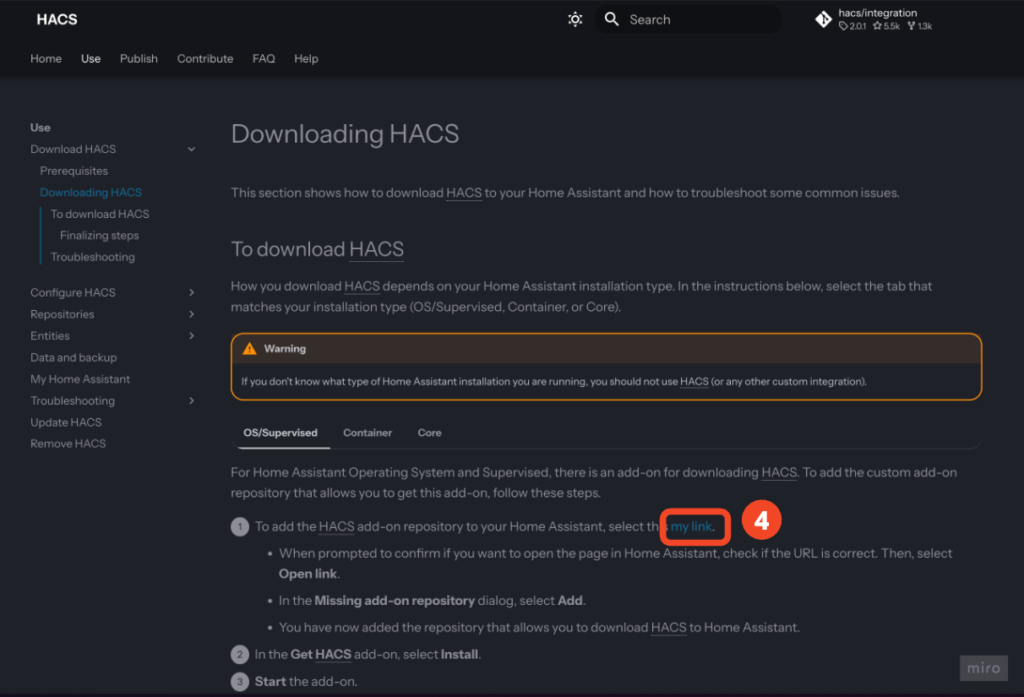
  1. Click "my link"
Download HACS

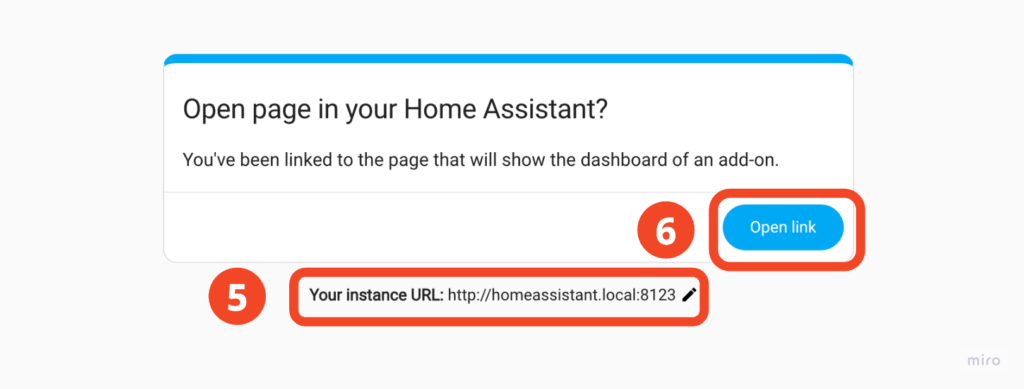
A confirmation screen will appear, which means that this link will take you to your Home Assistant and ask you to confirm the address of the Home Assistant entity.

  1. To determine the physical address of Home Assistant, there are several possibilities:
    1. If you are in the same local network as Home Assistant, you can use the default "http://homeassistant.local:8123" in most cases.
    2. If you are on the same LAN as Home Assistant and know that you are not using the default address, you should usually know how to change the link here.
    3. If you are outside, replace this with your external network link
  2. Click "Open link"
Open HACS in Home Assistant
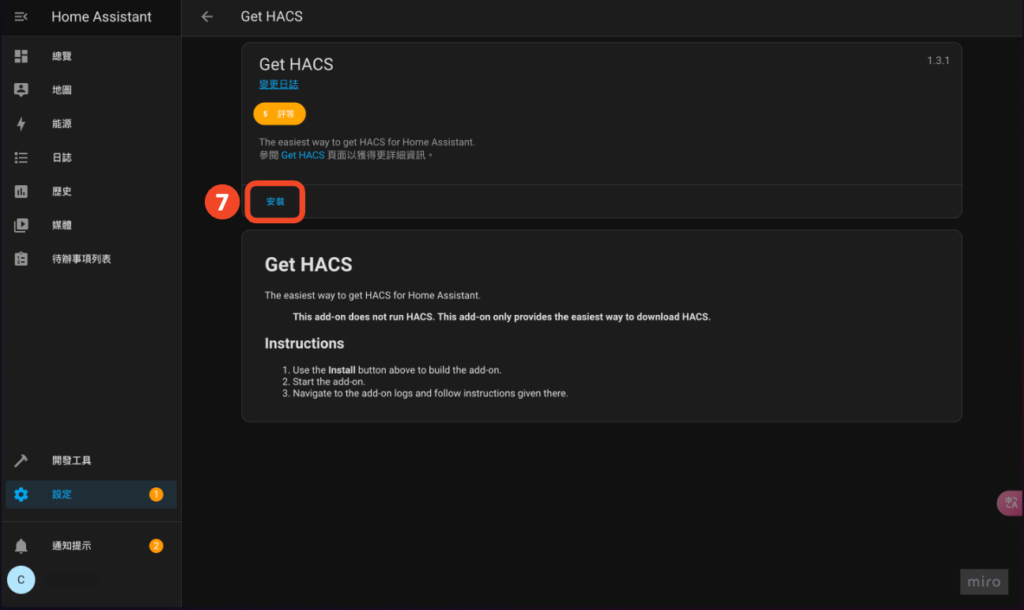
  1. Click "Install"
安裝 HACS
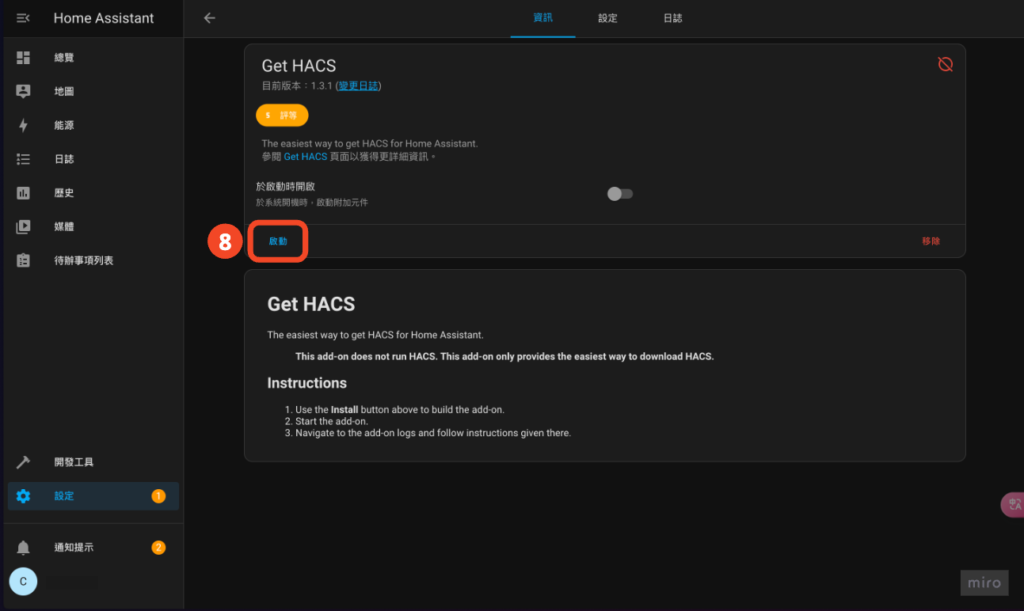
  1. Click "Start"
啟動 HACS

This is just to download HACS! Please continue with the following steps to complete the installation

  1. Go to Settings > Devices and Services
  2. Click on "Add Integration" in the lower right corner
  3. Search "HACS"
  4. Click "HACS"

If you cannot find HACS here, try restarting HA and then try again.
(Thanks Jerry for the report 😍)
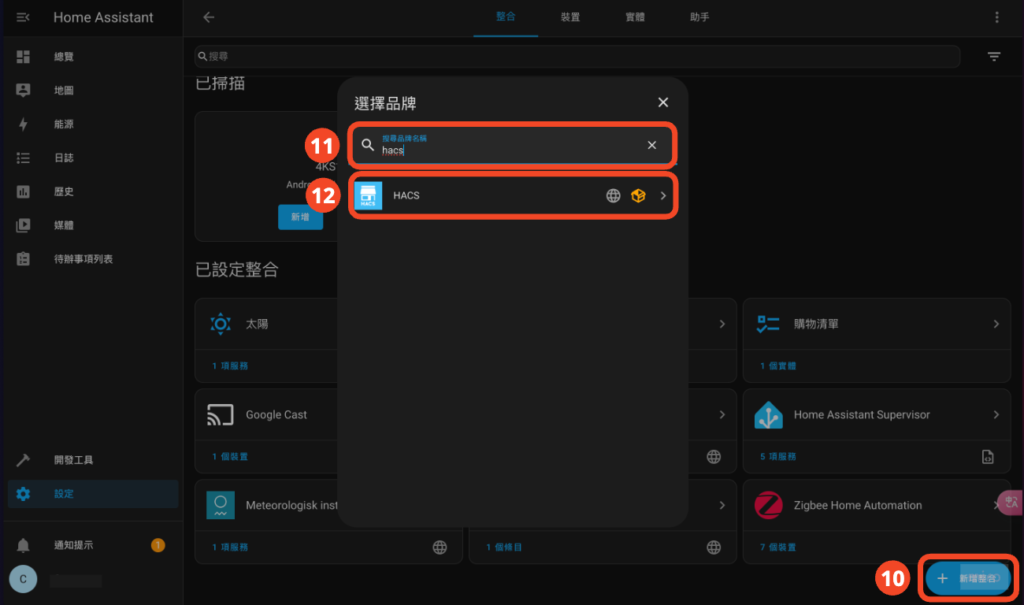
新增整合 HACS
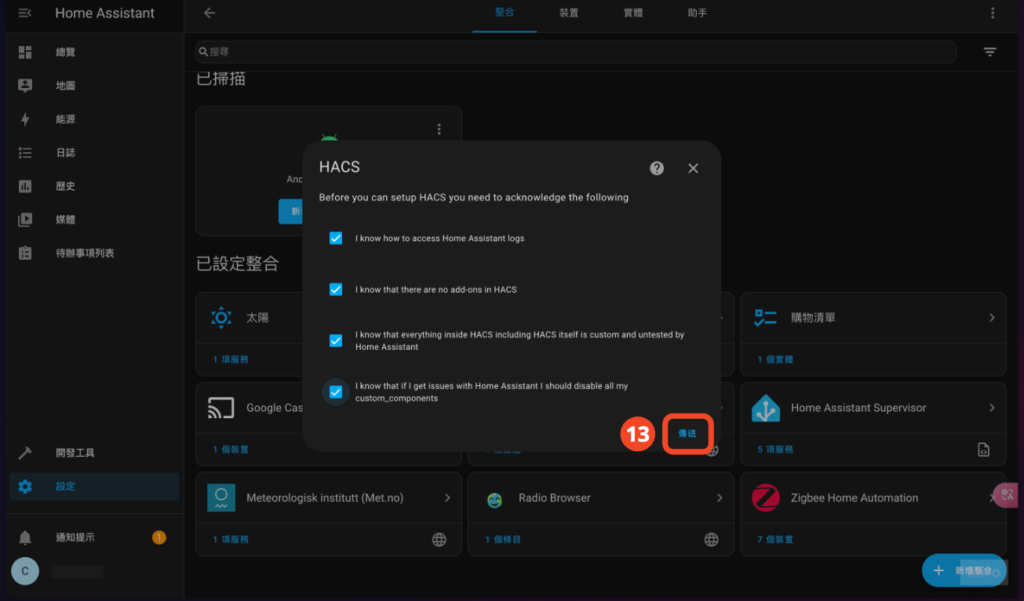
  1. Click "Send"
新增整合 HACS
  1. Click "https://github.com/login/device"
  2. Copy the serial number on the screen for later use
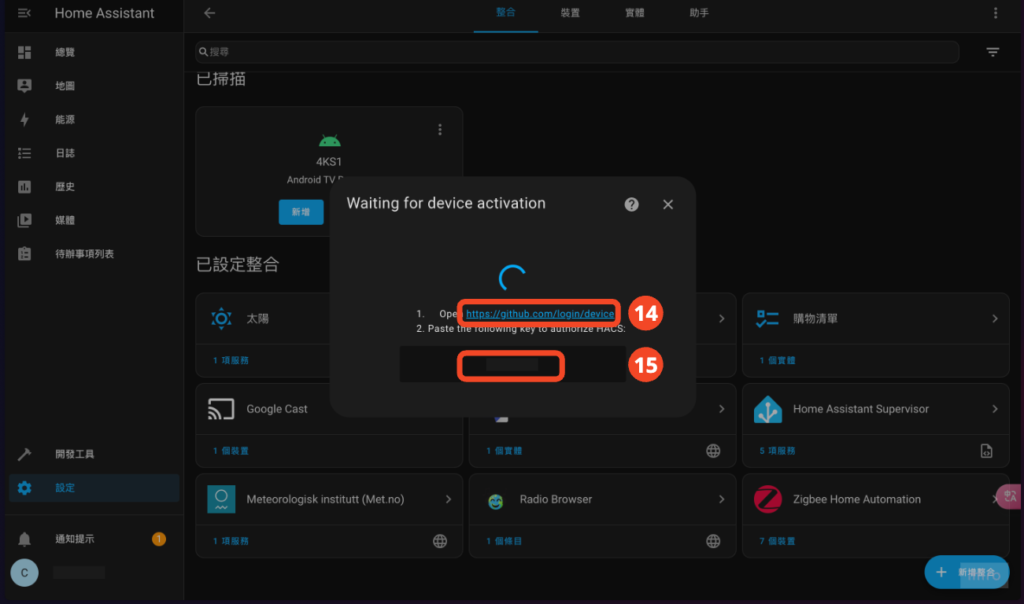
登入 Github
  1. Log in to Github (never used it? Then register)
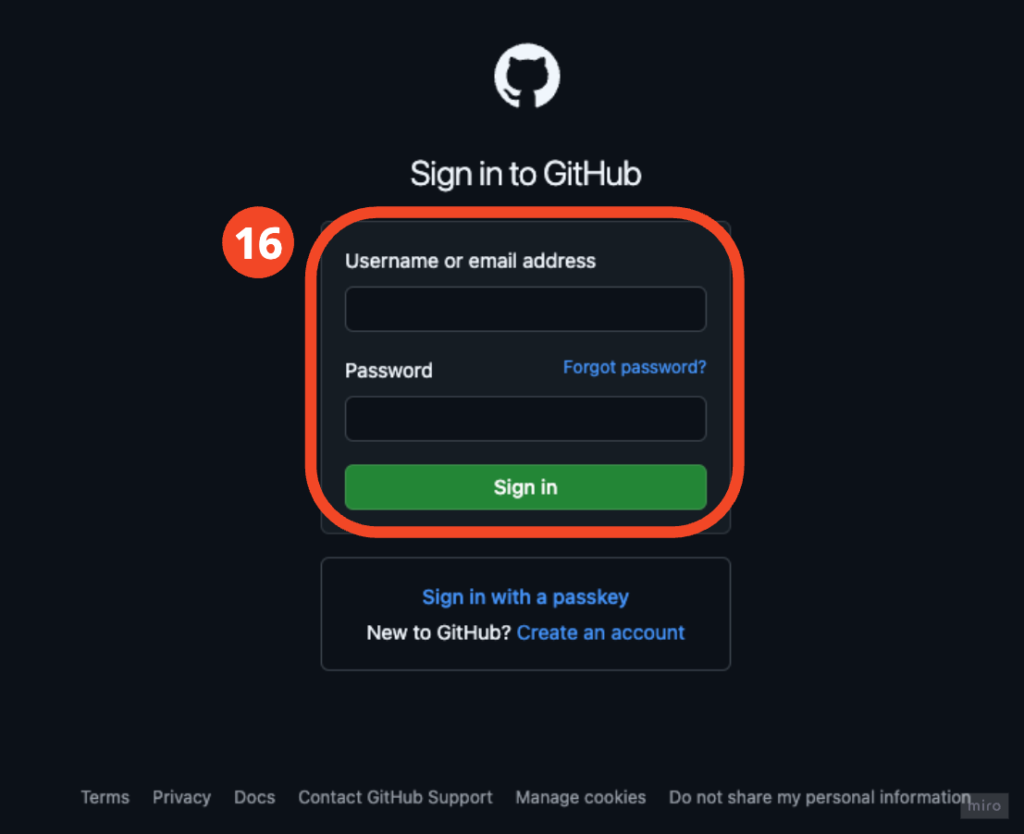
登入 Github
  1. Confirm your Github account and click "Continue"
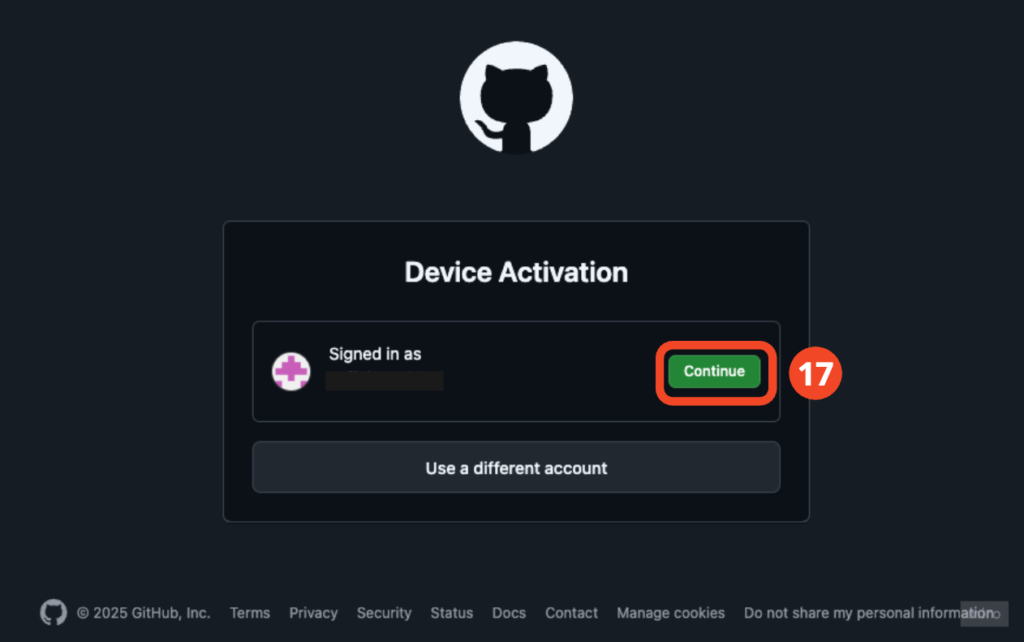
登入 Github
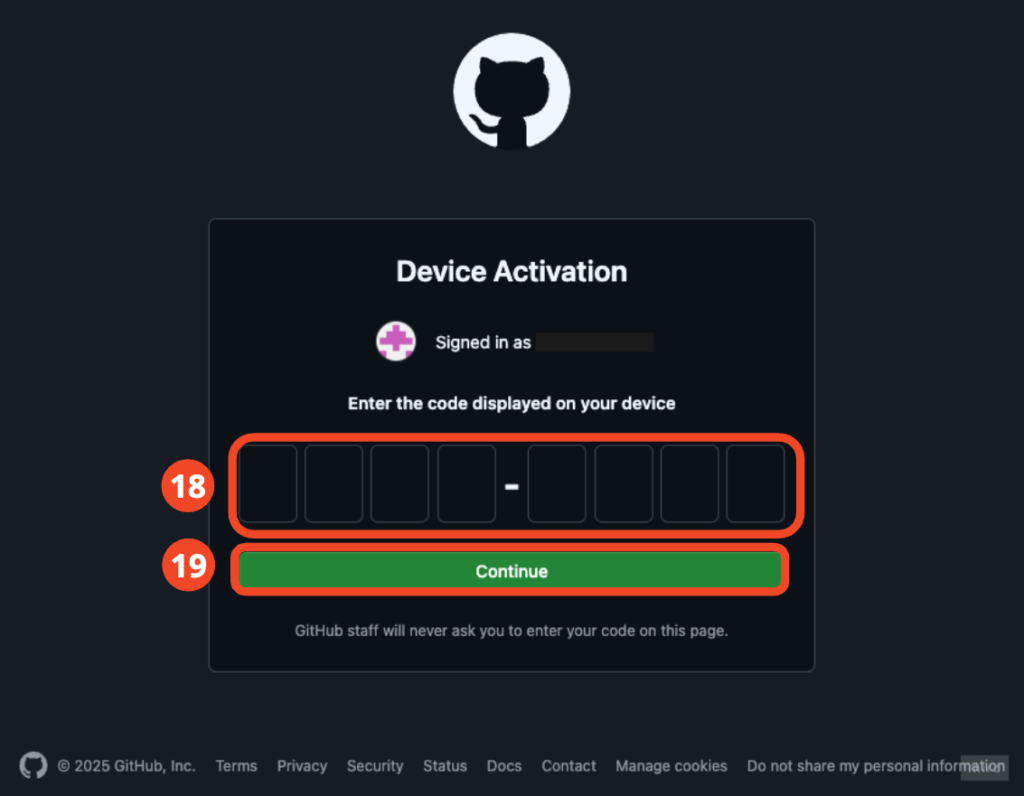
  1. Paste (enter) the serial number obtained in step 15
  2. Click “Continue”
輸入裝置序號

This completes the HACS installation!

HACS Interface Introduction

Enter HACS

After the installation is complete, you can find "HACS" in the left column
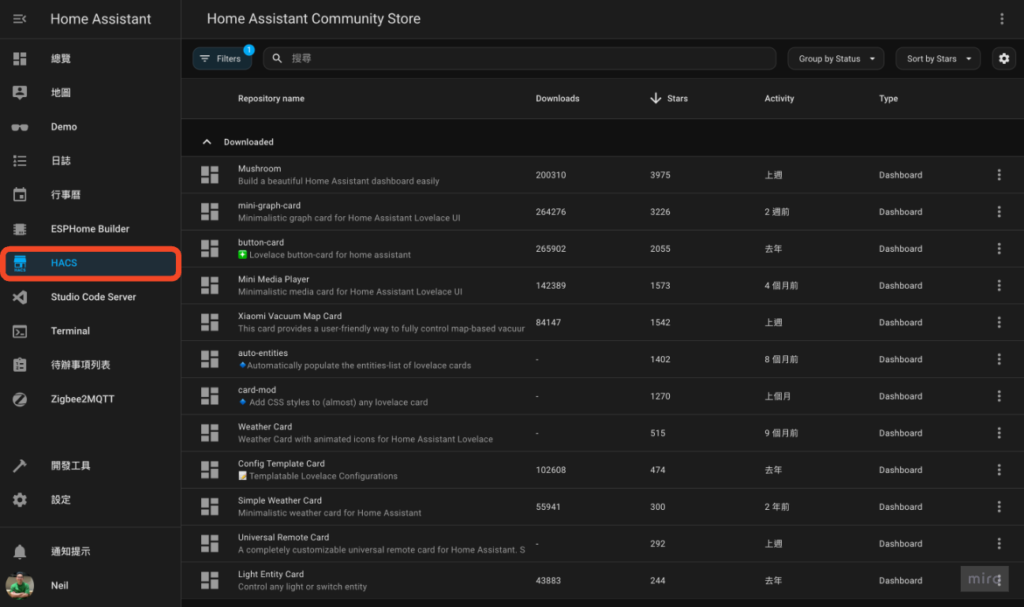
進入 HACS

Interface and function introduction

  1. filter:Status, Type Filter
  2. search
  3. Group display: Optional grouping display by status or type
  4. Sorting: You can choose to sort by name, number of downloads, number of stars, update time, download version, available version, status, type
  5. Display column adjustment
  6. More Features: The most commonly used one is probably "Custom repositories" which is used to load plugins that are not officially included in HACS.
  7. External operation: You can view detailed information, link to Github to view, download, etc.
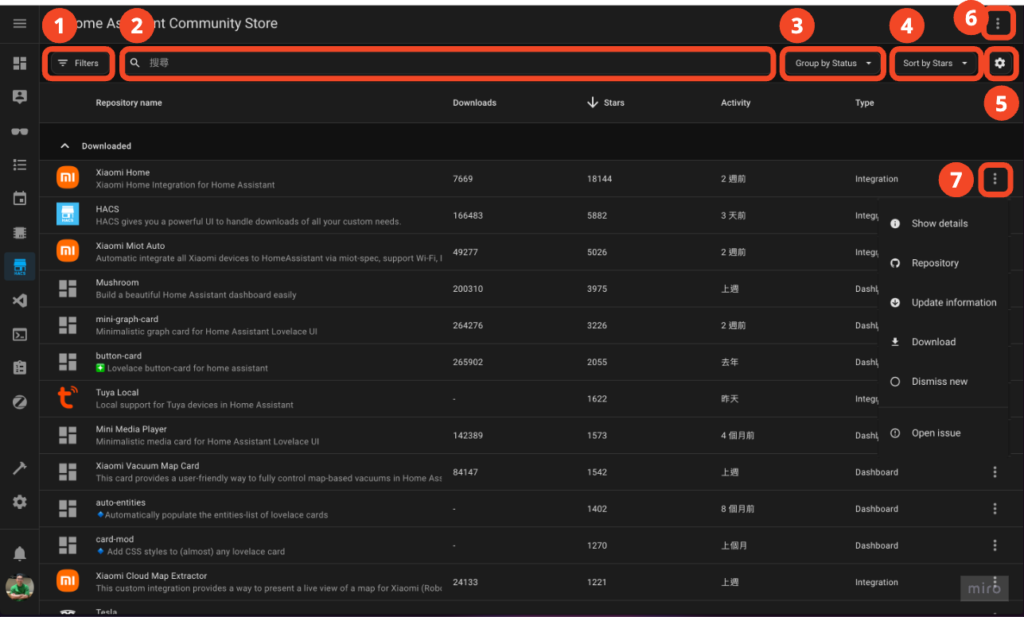
HACS 介面功能介紹

Congratulations! You're done!

In the future, if you want to connect Home Assistant to a certain brand of smart devices or home appliances, or want to make your Home Assistant more beautiful, you can look for plug-ins developed by various great developers in HACS!

Recommend a few HACS plugins that I use myself

Dashboard beautification

  • Universal Remote Card: Control Google TV and Apple TV directly in HA Dashboard, be sure to try it!Open your Home Assistant instance and open a repository inside the Home Assistant Community Store.
  • Mushroom: The Dashboard plugin with the highest star rating on HACS. Needless to say, just try it!Open your Home Assistant instance and open a repository inside the Home Assistant Community Store.
  • Xiaomi Vacuum Map Card: If you have a sweeping robot from brands such as Xiaomi, Roborock, Dreame, etc., then you must try this.Open your Home Assistant instance and open a repository inside the Home Assistant Community Store.

Integration

  • Local Tuya: Although Tuya has polarized reviews, choosing a product with good quality is indeed a good choice with good CP value. Tuya Local allows you to control Tuya devices locally without going through the Tuya cloud. Open your Home Assistant instance and open a repository inside the Home Assistant Community Store.
  • Xiaomi Home: The HA integration plug-in officially launched by Xiaomi at the end of 2024, the official support is great.Open your Home Assistant instance and open a repository inside the Home Assistant Community Store.
  • Xiaomi Cloud Map Extractor: Paired with Xiaomi Vacuum Map Card, the map status of the sweeping robot can be visually displayed.Open your Home Assistant instance and open a repository inside the Home Assistant Community Store.
  • Electrolux Wellbeing: Electrolux home store integration 👍 Open your Home Assistant instance and open a repository inside the Home Assistant Community Store.
    Refer to my installation instructions:
3 COMMENTS
  1. Xiaomi Home currently does not support Taiwan. For now, you can only use Xiaomi Miot Auto
    As for the 2FA issue that Xiaomi Cloud Map Extractor is currently facing, there seems to be no simple solution, and I haven’t tried it successfully yet.

  2. Reporting the situation I encountered, after starting HACS, I couldn't find HACS when adding integration directly. Finally, I restarted HA and it was successfully found^^

LEAVE A REPLY

Please enter your comment!
Please enter your name here

you might like
recent discussions
  • Lokous 2025/05/15Neil, I would like to ask you, I have set up HA on NAS through VirtualBox. Because my home is a townhouse, the smart home I want to realize is on different floors. The NAS is currently placed on one floor and connected to the data base of Chunghwa Telecom. The other mesh ports of Chunghwa Telecom are connected to the Switch, and the network routes are pulled to other floors. The other floors all have their own Wifi Routers and their own Wifi. At present, I only want to realize the smart home for a certain floor. I would like to ask, 1.) Do I need to buy a corresponding gateway for each floor for the Z2M gateway?! Is the required location to connect to the NAS (with HAOS installed)?! Or is it on the Router of each floor (all belong to the same domain)?! 2.) I have purchased Aqara M2 and G3, mainly hoping to control home appliances (such as fans, air conditioners, TVs, etc.) through the infrared function of M2 / G3. How can the "infrared control part" and "G3 monitoring and AI recognition" and other parts be integrated into HA?! Please guide me again, thank you very much! ^^Home Assistant Connect ZBT-1 + ZHA The most brainless native Zigbee gateway connects (almost) all Zigbee devices – Home Assistant Step-by-Step Tutorial EP 16
  • Neil 2025/05/15Hi Willson, 1. First confirm whether the NAS detects the USB: Use dmesg or lsusb to see if there is a new device. If not, try another USB port or check if there is any problem with the driver. 2. Check whether the NAS has passed USB passthrough to HA: This depends on how you set up HA. If you use Docker, try adding –device=/dev/ttyUSB0 –privileged to the container settings, or manually mount it in the devices section of docker-compose.How to connect Home Assistant to (almost) all Zigbee devices through Zigbee2MQTT – Home Assistant Step-by-Step Tutorial EP 2
  • Willson 2025/05/14Hello Neil, I use NAS to set up HA. I bought the USB version and plugged it into the NAS. However, when I checked all the hardware in the system, I did not see any new devices. What could be the possible cause of this problem?How to connect Home Assistant to (almost) all Zigbee devices through Zigbee2MQTT – Home Assistant Step-by-Step Tutorial EP 2
  • V3 game 2025/05/12Thanks for sharing such detailed installation steps! I’ve always wanted to try building a smart home, and this article gave me more confidence to start. Looking forward to ep 2!Home Assistant installation steps detailed, quickly build a smart home – step-by-step tutorial EP 1
  • Neil 2025/05/07Hi Lulu, it depends on whether you want to control the switch intelligently. I usually don't recommend using traditional switches with smart lamps, because in this case the traditional switch can only be always on so that the lamp can be powered and connected to the line. In short, if you want to use smart lamps, it is recommended that the switch be equipped with a neutral line. After the neutral line is pulled, there are two ways: 1. Use a zero-fire switch with a decoupling function with smart lamps, set the switch to decoupling mode (the lamp is always powered, only for remote control), and set the switch to link the lamp in HA. 2. Use a zero-fire switch with smart lamps, directly connect the live wire and the control wire at the switch (the control wire does not enter the switch), and finally set the switch to link the lamp in HA.A complete analysis of smart home lighting control solutions: smart switches, smart bulbs, smart relays, there is always one that suits you!
  • Lulu 2025/05/05Hello Neil, I would like to ask, the current smart lamps already have recessed lamp types, do I still need to pull a neutral wire?A complete analysis of smart home lighting control solutions: smart switches, smart bulbs, smart relays, there is always one that suits you!
  • MINECRAFT APK 2025/04/26Very detailed installation steps! This article helped me successfully complete the setup of Home Assistant. I look forward to the follow-up tutorials! Thanks for sharing!Home Assistant installation steps detailed, quickly build a smart home – step-by-step tutorial EP 1
  • Jerry 2025/04/14Thank you very much Neil for your selfless sharing. The websites you provided are of great help to me. I will save it first and digest it slowly^^ I also look forward to Neil's industry news and teaching articles in the futureHome Assistant Floor plan A new experience in smart home control with visual floor plan! – Home Assistant step-by-step tutorial EP 6
  • Neil 2025/04/13Hi Jerry, I usually get information about HA from these places: Website: – Home Assistant official Release notes – Automata – Home Automation Community – Weijia Home Intelligence FB Group: – Taiwan Home Assistant enthusiasts exchange – Home Assistant YouTube channel: – Smart Home Solver – Everything Smart Home – Home Assistant Programming language: Strictly speaking, YAML is not really a programming language (let me make this clear in case some people mind 🤣), but if we include these data formats or style languages that “look like” programming languages, and sort them by depth of use in HA (the deeper the bottom, the deeper the bottom): – YAML (data format): a language for configuration files used in many places in the HA environment. – CSS (style language): used to adjust the interface style (font size, color, image, position, etc.). – JSON (data format): If you use Node-RED, you will probably come across it. – Jinja2 (Python template syntax): You may encounter it when you explore automation or Dashboard in depth. ※ But in fact, even if HA does not know the above, it can still make a smart home complete. You don’t have to put so much pressure on yourself, but if you are interested, it is also good to know more. It is actually difficult to generalize about the support of devices. Now, even if the home appliances themselves do not support it, there are still many different ways to connect traditional home appliances to HA. In addition, cases like Haier do require in-depth research. What I usually do is to crawl a lot of information on the Internet, and usually find attempts made by others. It just so happens that when I was looking up other information recently, I saw someone sharing how Haier water heaters were connected to HA. But it is indeed like what you said, if you get involved for a while, you will understand these details more and more. 🤣Home Assistant Floor plan A new experience in smart home control with visual floor plan! – Home Assistant step-by-step tutorial EP 6
you might like