Following the previous article Plug and Play Home Assistant Green Setup Tutorial After that, today we will introduce Home Assistant Connect ZBT-1 with ZHA (Zigbee Home Automation), a native Zigbee connection solution that is also beginner-friendly.
With the combination of Home Assistant Green + Connect ZBT-1, you no longer need to be afraid of using Home Assistant as your smart home central system because "setting up Home Assistant seems complicated", nor do you have to succumb to other cloud central systems. "You want to HA after all, why not do it from the beginning?" Right🤣
If you want to know about Home Assistant Green installation-free plug-and-play Home Assistant, you can refer to:
Even if you don't use Home Assistant Green to set up Home Assistant, Connect ZBT-1 is also a good choice. Let's take a look at how to use Connect ZBT-1 to connect the Zigbee device in Home Assistant!
Table of contents
Glossary
After writing the preface, I found that there are many similar nouns. Considering that this article may be the first few that you come into contact with smart home, you will be confused. I will first make a simple explanation of the nouns and attach reference materials. I hope it can help you learn more. Understand soon😁
- Home Assistant: HA for short, an open source smart home hub system. Different from the common HomeKit and Google Home, Home Assistant provides a completely local construction solution and provides a high degree of privacy and customization. Related references:

- Home Assistant Green: Home Assistant officially launches a plug-and-play HA host that requires no self-installation system. Related introduction:

- Home Assistant ZBT-1:Old name Home Assistant SkyConnect, since 2024/06/13 announcementRenamed "ZBT-1" to allow Home Assistant to connect to Zigbee and Thread devices, commonly known as "gateway".
- Zigbee: A smart home device connection method, characterized by the ability to expand network coverage between devices through mesh topology. With proper configuration, a single gateway can open up a whole building.
- ZHA: Zigbee Home Automation is one of the Zigbee connection solutions in the Home Assistant environment. In addition to ZHA, Zigbee2MQTT is also a common connection solution choice. Reference:


The difference between ZHA and Zigbee2MQTT
ZHA and Zigbee2MQTT are both ways to connect Zigbee devices in Home Assistant:
- ZHA: It is part of Home Assistant and is jointly maintained by the Home Assistant development team and open source contributors. It prefers the official, built-in stable integration solution and mainly relies on the core technology and architecture of Home Assistant.
- Zigbee2MQTT: An independent open source project, also maintained by open source contributors and led by the open source community. It is powerful and flexible, but requires more manual settings and learning curve.
特性 | ZHA | Zigbee2MQTT |
安裝與設定 | Native to Home Assistant, no need to install additional services. | Additional installation of Mosquitto (MQTT Broker) and Zigbee2MQTT tools is required. |
易用性 | The user interface is simple and you can start using it directly through Home Assistant settings. | 需要更多手動設定,適合進階使用者。 |
裝置支持 | Supported devices are limited and depend on the integration provided by Home Assistant. | Supports more devices, almost all Zigbee devices can be supported (need to check官方支援清單)。 |
If you want to learn more about the devices supported by ZHA and Z2M, you can refer to the unofficial information jointly maintained by netizens:https://zigbee.blakadder.com/ ※ 注意!因為是非官方資訊,所以資訊更新未必即時。 | ||
協議靈活性 | Using the standard Zigbee protocol, functionality is limited by Home Assistant. | 提供更多細緻的功能,如固件升級、自定義裝置名稱、細節參數調整等。 |
穩定性 | 穩定性較高,適合家庭使用者和初學者。 | Relies on MQTT and external services, stability depends on environment, but powerful. |
操作界面 | Manage directly from the Home Assistant interface. | Through Zigbee2MQTT's web interface or command line management, the functions are more diverse. |
社群支持 | 官方社群提供基本支持,但資源相對較少。 | 擁有活躍的開源社群,提供詳細文檔和問題解決支持。 |
進階功能 | The functions are basic and mainly suitable for general Zigbee automation needs. | 支援進階功能(如群組控制、裝置指令測試、自定義訊息處理等)。 |
Home Assistant Connect ZBT-1 unboxing
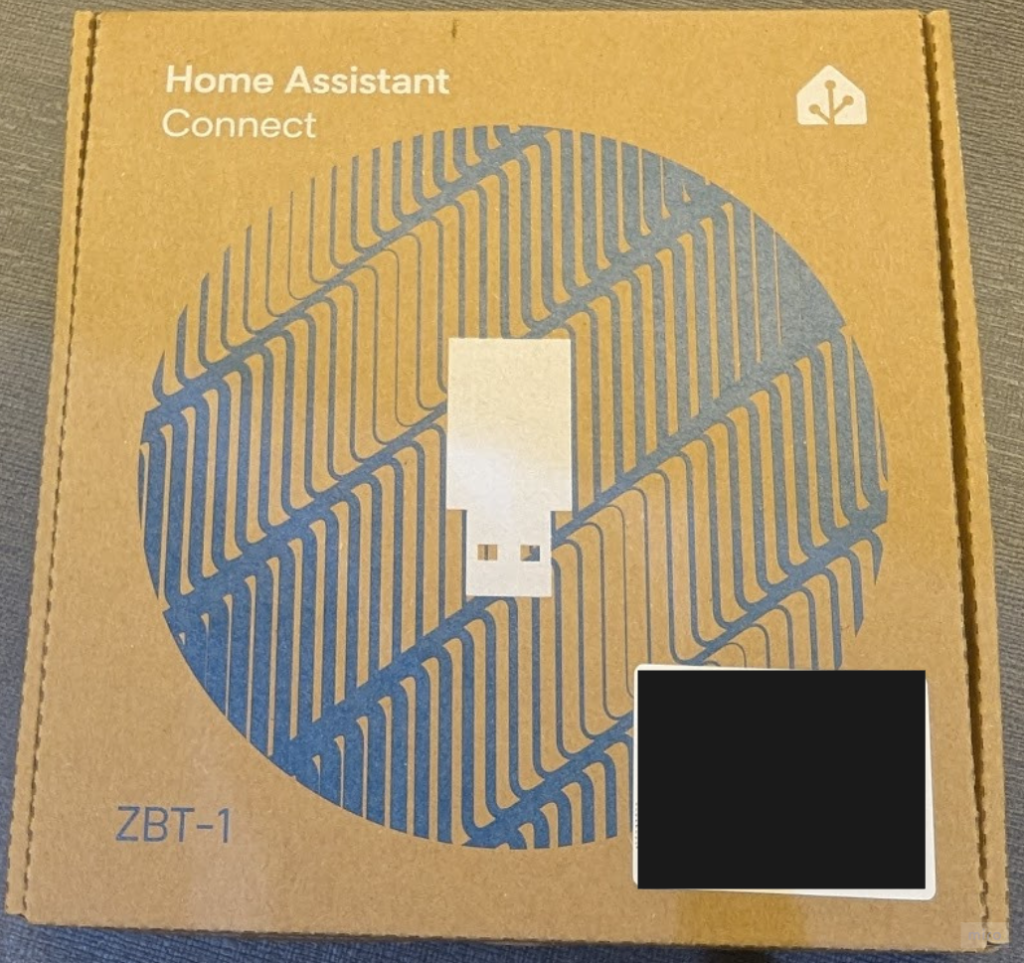

I'd like to apologize first, I only took the boxed version and forgot to take the actual one😅 But it's easy to imagine that what's inside is actually the Connect ZBT-1 body plus a transmission line. I'll explain why the transmission line is needed later.
Step 1. Installation
There is only one important point in the installation part (maybe one of the few shortcomings of Connect ZBT-1), which is that you cannot directly plug ZBT-1 into the host. Instead, you need to use an extension cable to keep ZBT-1 as far away from the host and the host as possible. Any WiFi 2.4 GHz device will cause mutual interference and is specifically noted in the enclosed manual.

Step 2. Configure Connect ZBT-1
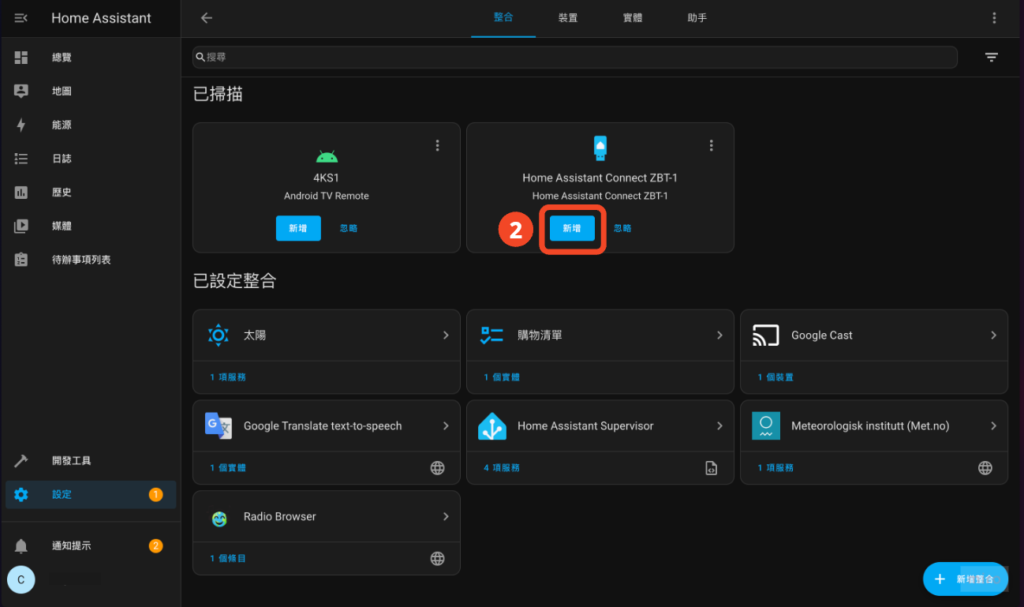
- Go to "Settings > Devices and Services"
- Find "Connect ZBT-1" and click "Add"
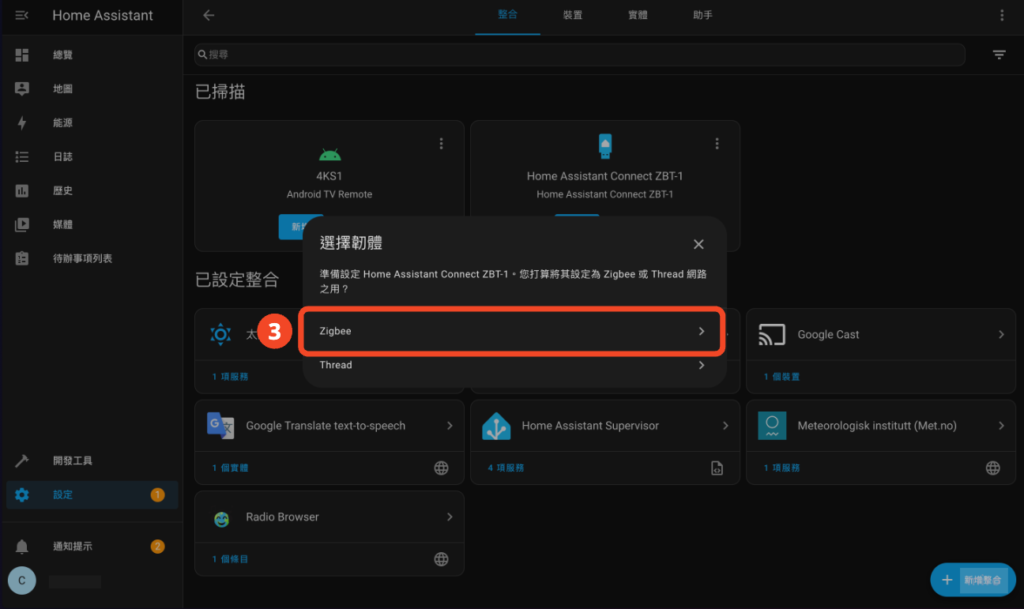
- Click "Zigbee" (I won't introduce the Thread connection today, I'll talk about it later😜)
- Click "Send" and "Finish"
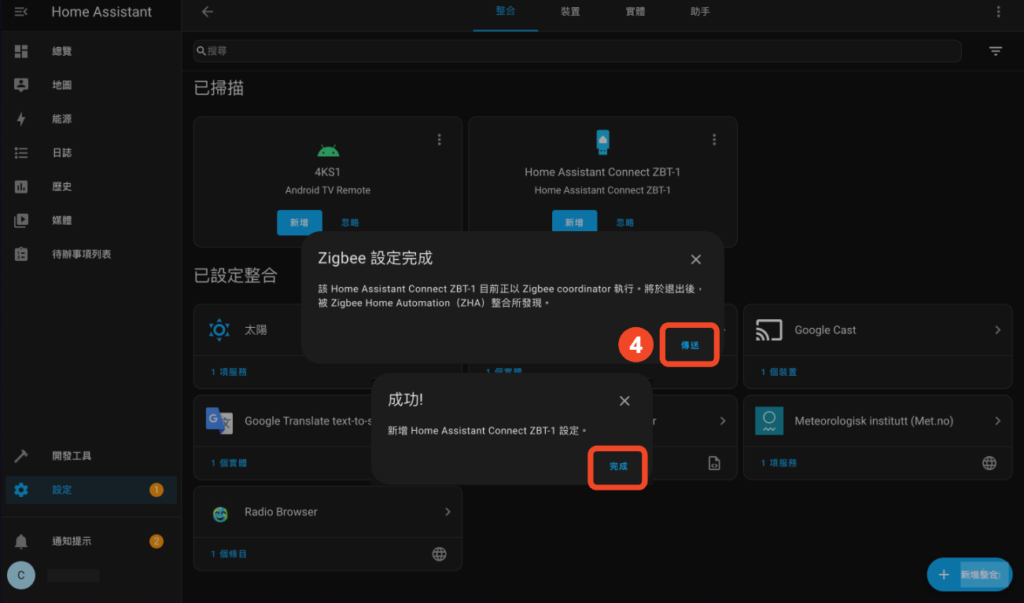
- Added "ZBT-1" to the integration
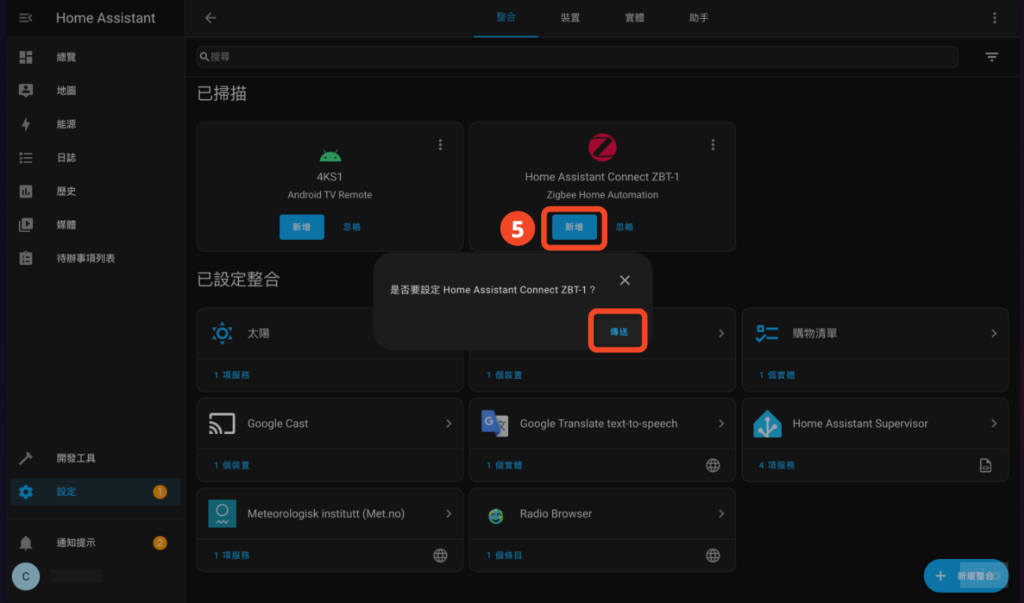
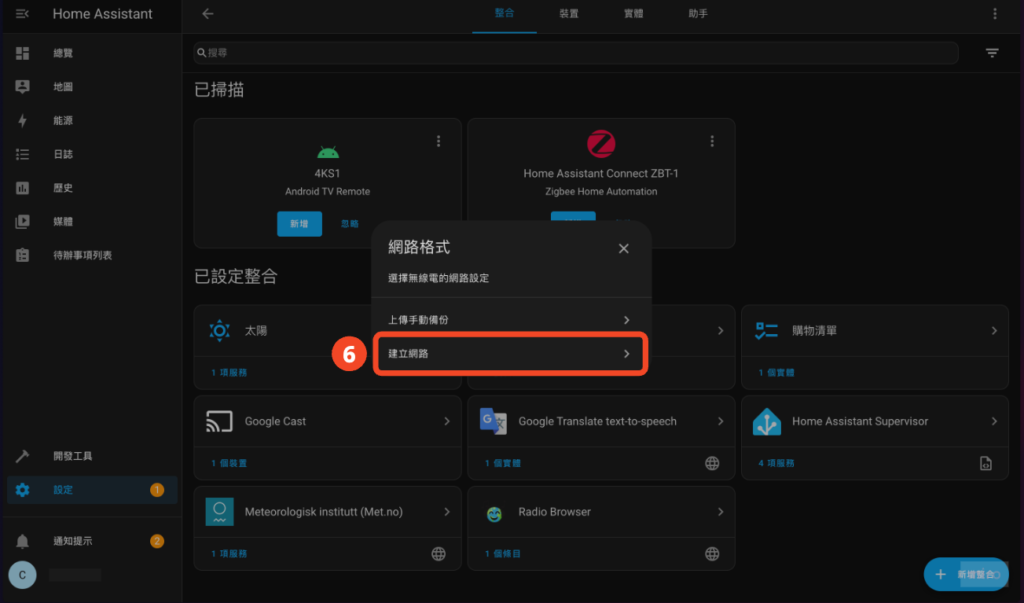
- Click "Create Network" (if you want to restore the original Zigbee network, select "Upload Manual Backup")
That’s it!
Step 3. Add Zigbee device
There are two paths to operate:
- Settings > Devices & Services > Integration > Zigbee Home Automation > Add Device
- Settings > Devices & Services > Devices > Add new device
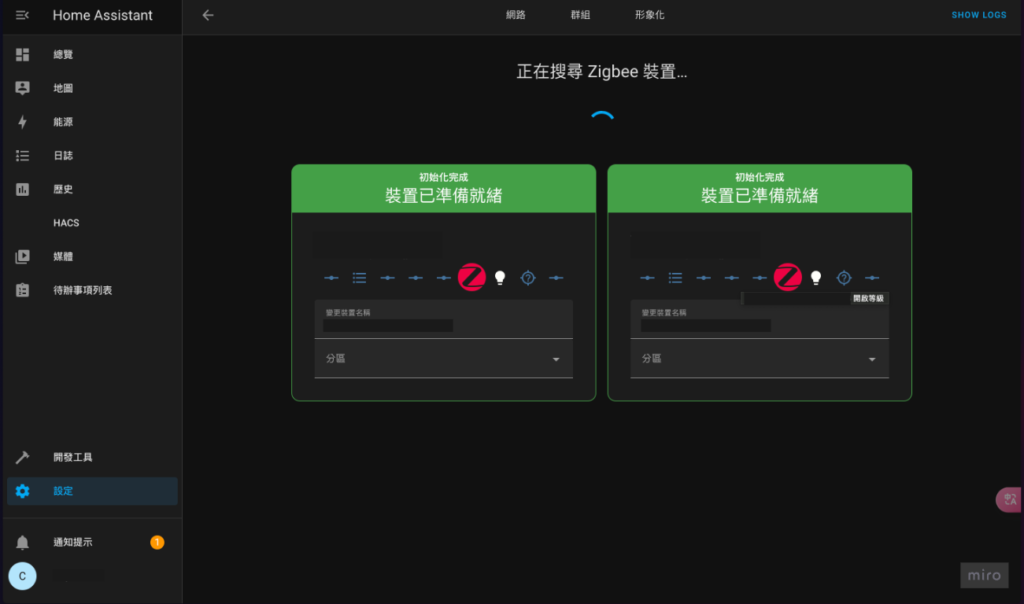
Remember to switch the Zigbee device to pairing mode, and then you can see the Zigbee devices that have not yet joined the network~
Conclusion
Although ZHA does not support as many devices as Zigbee2MQTT, the installation steps are much simpler, and it is officially supported by HA. Newly launched Zigbee devices are also adding support quickly. If you are not very confident in installing software and debugging yourself, Connect ZBT-1 would be a good choice.
Then you are welcome to join the smart home!
Recommend you to watch



Dear Neil,
I would like to ask, currently HA is set up on NAS via VirtualBox,
Because the house is a detached building, the smart home that we want to realize is on different floors.
Currently, the NAS is placed on a certain floor and connected to the data center of Chunghwa Telecom.
The other cells of Chunghwa Telecom are connected to the Switch, and the network lines are extended to other floors.
Other floors have their own Wifi Router and Wifi
At present, I just want to realize smart home for a certain floor
I want to ask,
1.) For Z2M gateway, do I need to buy a corresponding gateway for each floor?!
Should the connection location be on the NAS (with HAOS installed)?! Or on each floor’s own router (all belong to the same network domain)?!
2.) I have purchased Aqara M2 and G3, mainly hoping to control home appliances (such as fans, air conditioners, TVs, etc.) through the infrared function of M2 / G3.
So how do we integrate the “infrared control part” and “G3 monitoring and AI recognition” into HA?!
Please guide me again, thank you very much! ^^
Hi Lokous,
1. When buying a gateway, pay attention to the maximum number of devices. If the number of devices can be supported, one gateway is enough. Zigbee has mesh features that can be used through device topology.
2. It seems that you can access HA through Matter
Refer to Aqara official video:https://youtu.be/4XULASTc3KA?si=xefJO0djLx6orqlh
How to use zha or even z2m to access the device into HA
Will there be fewer functions?
For example, after my switch (Aqara z1) is connected to zha
The switch function cannot be set to lock the relay to switch to wireless switch mode, and the extra wireless switch cannot be used.
Is there anything else to set?
Thanks
Hi Ahong,
ZHA is more likely to lack features, but Z2M support is usually more complete.
I checked ZHA and it seems that it does not officially support Aqara Z1 yet, for reference:
https://zigbee.blakadder.com/zha.html
https://github.com/zigpy/zha-device-handlers/issues/3127
You can consider switching to Z2M, which already has official support and seems to have decoupling capabilities:
https://www.zigbee2mqtt.io/devices/ZNQBKG38LM.html