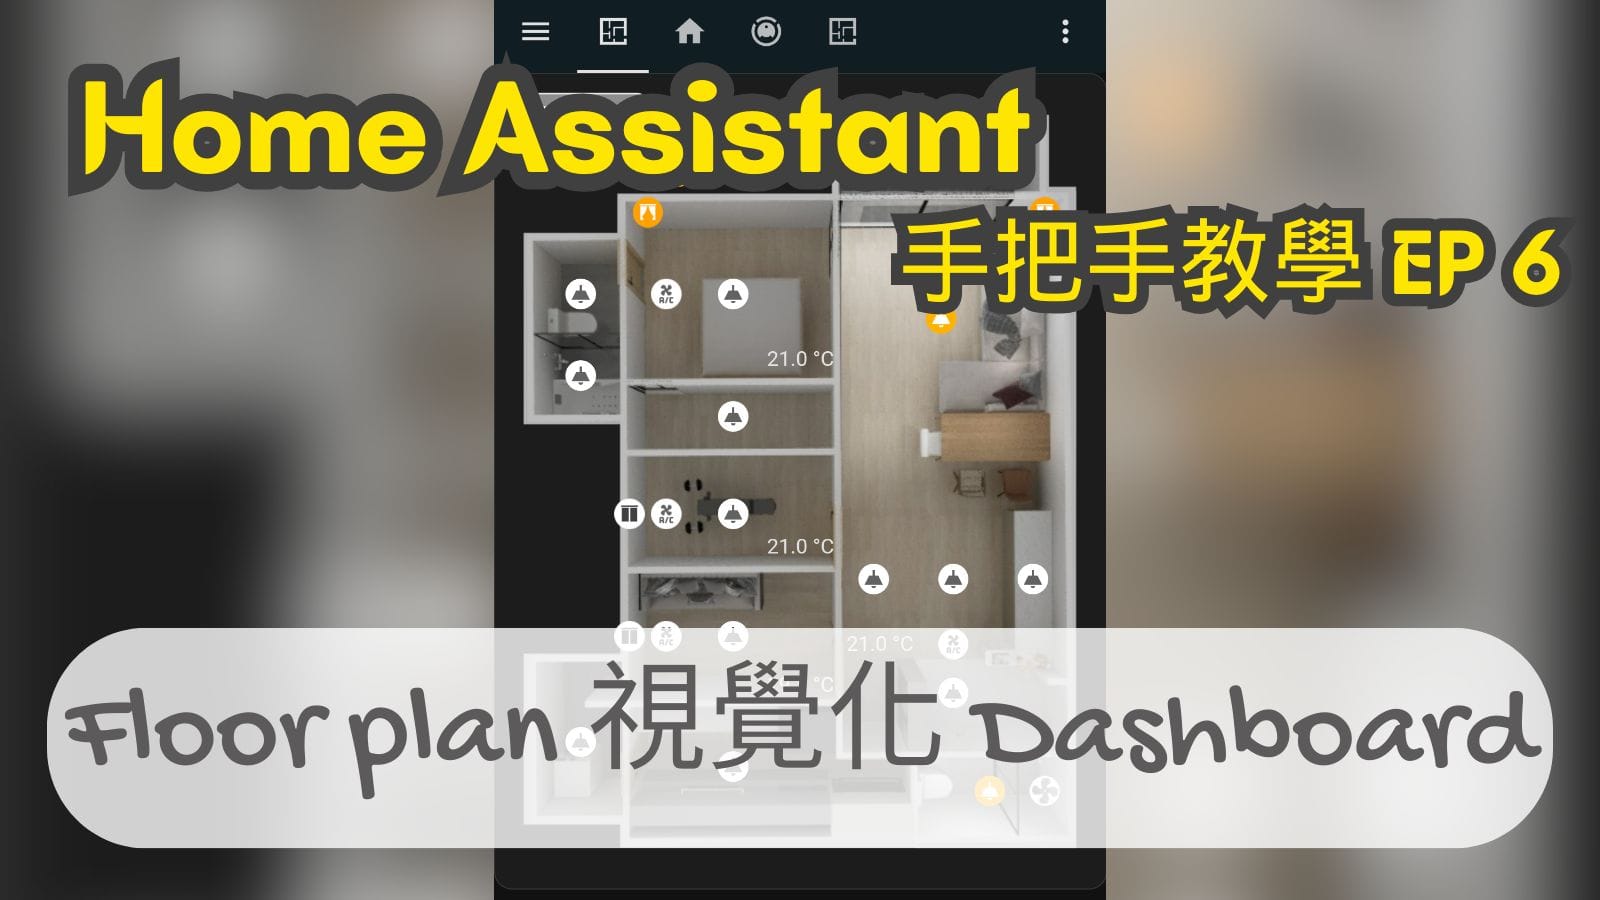
Without further ado, let’s go straight to the picture! Today I will teach you how to create a floor plan dashboard in Home Assistant, allowing your smart home to control "what you see is what you get", and also allow other family members who are not familiar with Home Assistant to enjoy the ultimate lazy life of a smart home.
Table of contents
Concept note
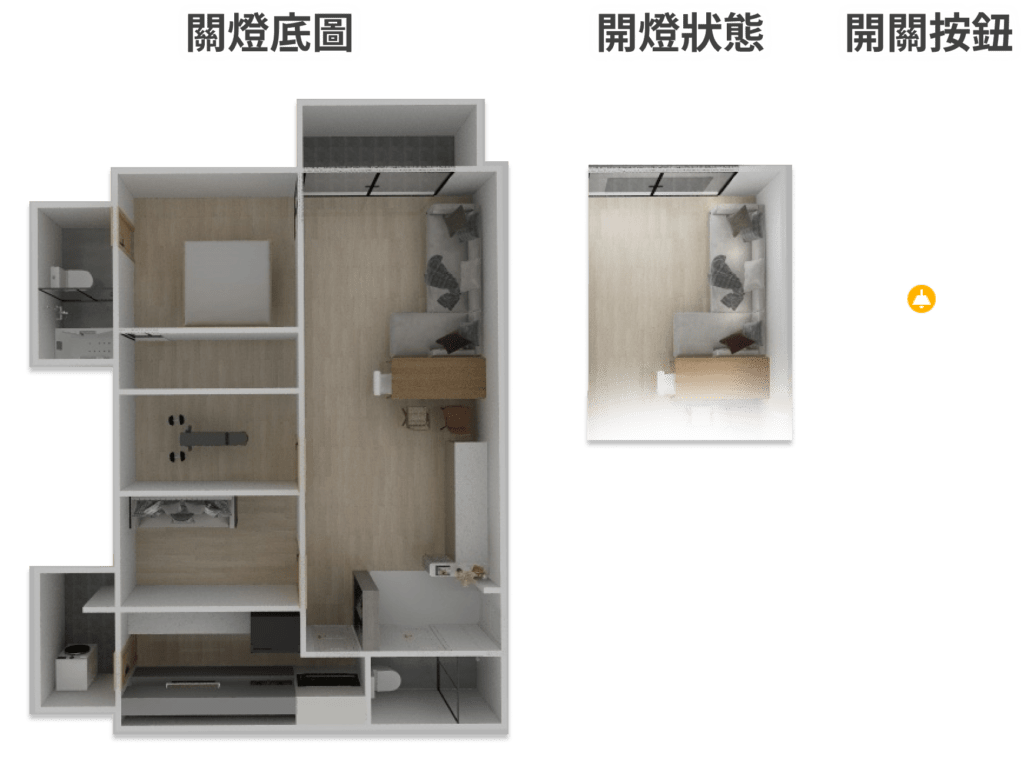
The concept of floor plan is actually very simple, just the stacking of layers. The bottom picture shows the light-off state, the top picture shows the light-on state, and then the control buttons are placed on the top layer.
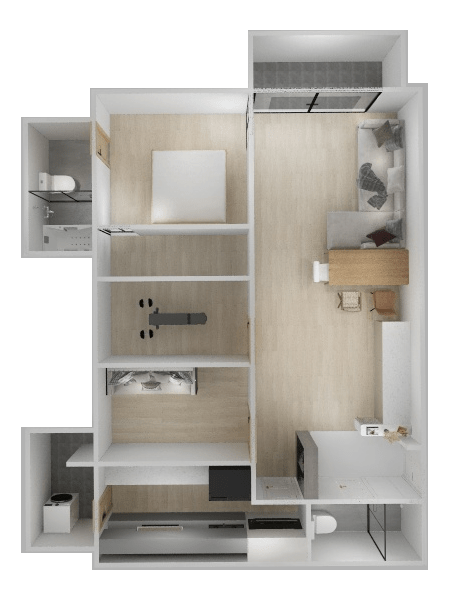
Today I will use the upper right living room area as a production demonstration, which is made up of the following three pictures:
Prepare in advance
1. Floor plan
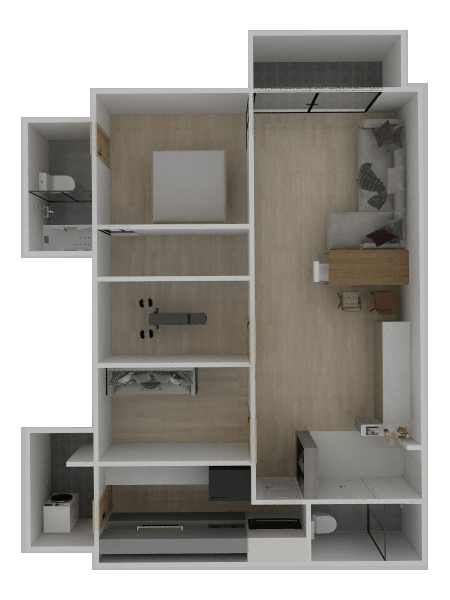
You will need to prepare a dark version (lights off) and a bright version (lights on) respectively. Here I useCool HomeTo make a floor plan, you can find a tool that is convenient for you to use to make a floor plan. In short, you can finally get two versions, dark and light. Please refer to the picture below:
Name the dark version "Plan Plan.png" and save it (generally speaking, it is not recommended to name it in Chinese, but for the sake of better understanding in teaching, I will use Chinese here).
2. Cut the bright color version of the floor plan into sections
I use Figma Cut the picture to get the lighting status of each area:
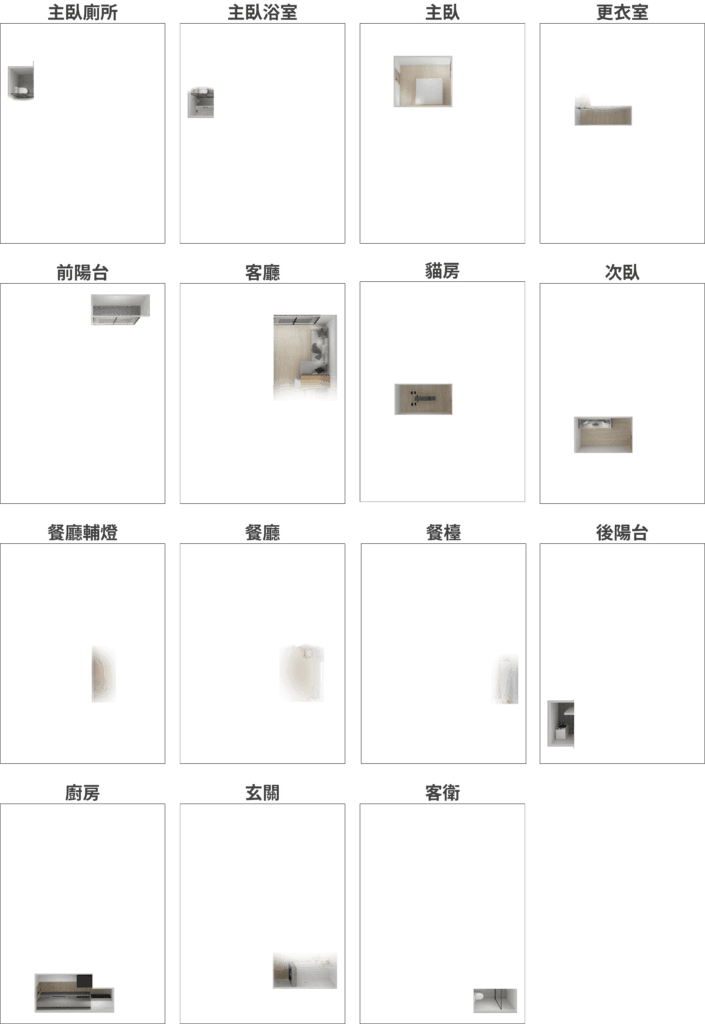
Taking the living room area as an example, name the bright version of the living room area above "living room.png" and save it.
💡 Tips
A little gradient processing on the edges of the open area will make it look more coordinated when the lights are on.
(Refer to the living room, dining room, and entrance hall above)
3. Prepare control buttons
Use any drawing software to create button icons for operating devices. You can first envision the states of the device you want to control. Generally, the most basic states are as follows:
- Light: off, on
- Fan: off, on
- Curtains: closed, opening, closing, opening
- Air conditioning: off, air conditioning, heating
You can make it according to your own situation. If you don’t have the usual drawing software, I recommend giving it a try. Figma.
Then name and save these button images in the same way. We will use them today. Those who are too lazy to do so can directly save the image files below (because they were made at different times, the file naming logic is a bit inconsistent, don’t blame me...😂):


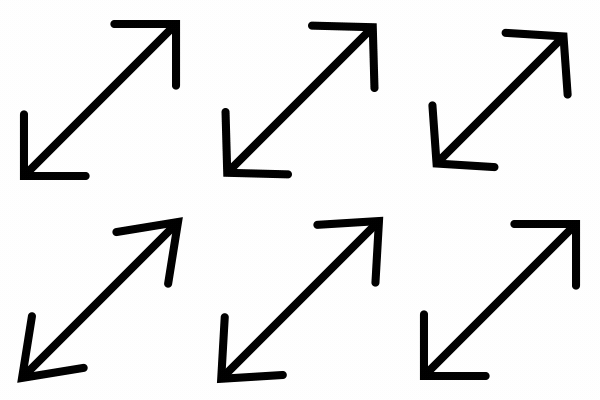
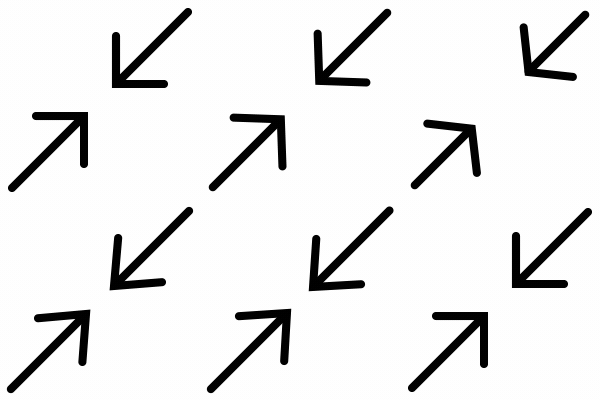


💡 Tips
You can make gif animations, such as curtain switches
4. Put the floor plan and buttons into Home Assistant
If you still don’t know how to put the file into Home Assistant, please Google to find the answer first, and put the floor plan and button pictures prepared above into Home Assistant. Here is my configuration for your reference:
⚠️ NOTE
You need to put the file in ../config/www/ and wait until you can get it from /local/
config
┕ www
    ┕ui
        ┕ Floor plan
            ┕ Floor plan.png
            ┕ living room.png
        ┕ icon
            ┕ light-on.png
            ┕ light-off.png
            ┕ curtains.png
            ┕ curtains-closed.png
            ┕ opening.png
            ┕ closing.png
            ┕ air-conditioner-off.png
            ┕ air-conditioner-on.png
            ┕ air-conditioner-heat.png
5. Added Home Assistant Dashboard for placing floor plans (can be skipped)
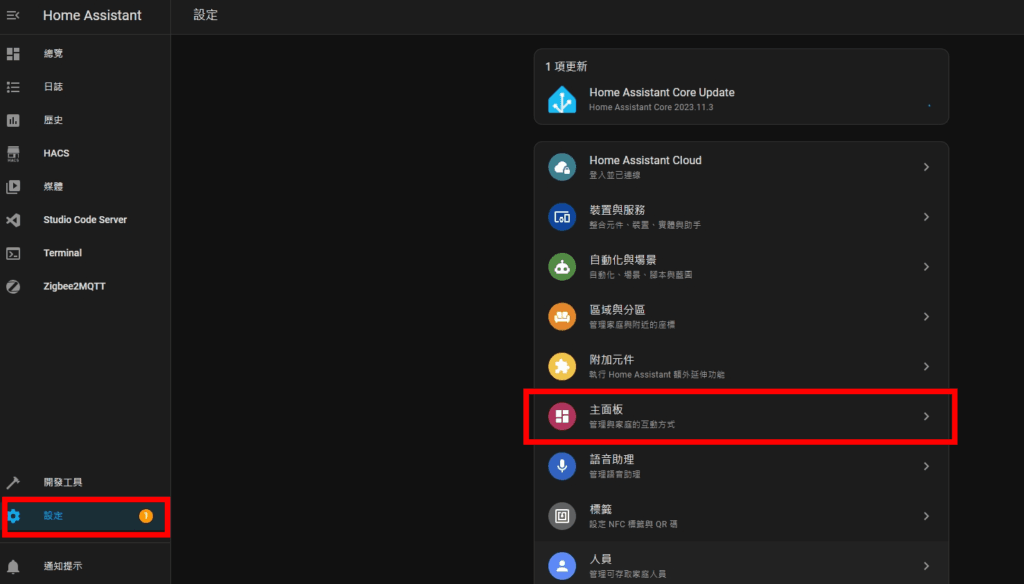
If you don't want to change the currently used Dashboard, you can enter the Dashboard list from "Settings > Main Panel" and add a new one.
6. Add new view
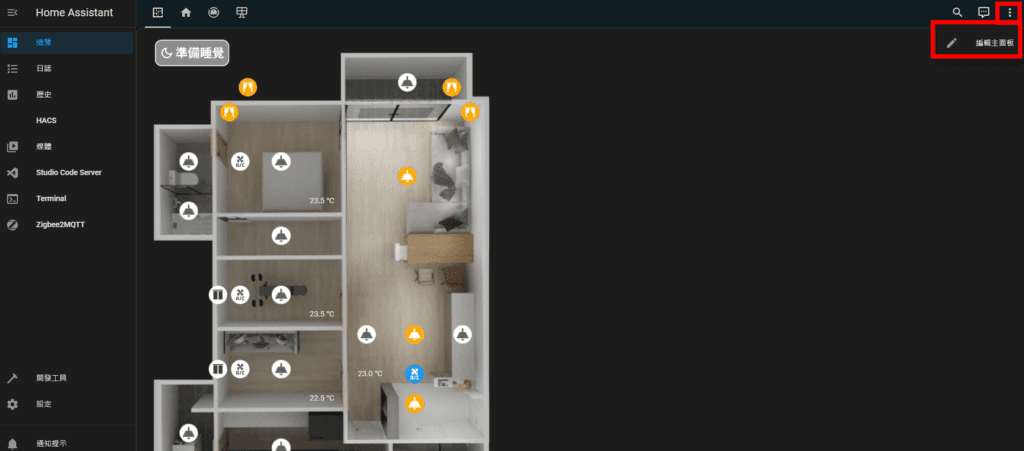
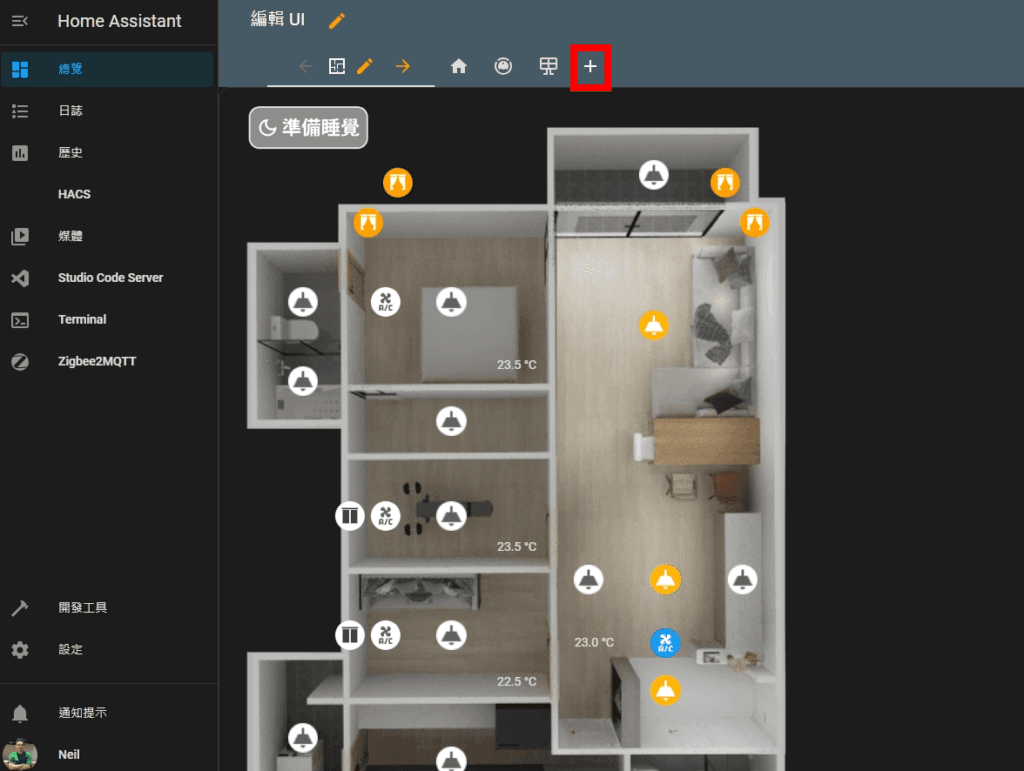
Select "Edit Main Panel" from the upper right corner of the Dashboard, and then add a new view.

Step 1. Add new panel
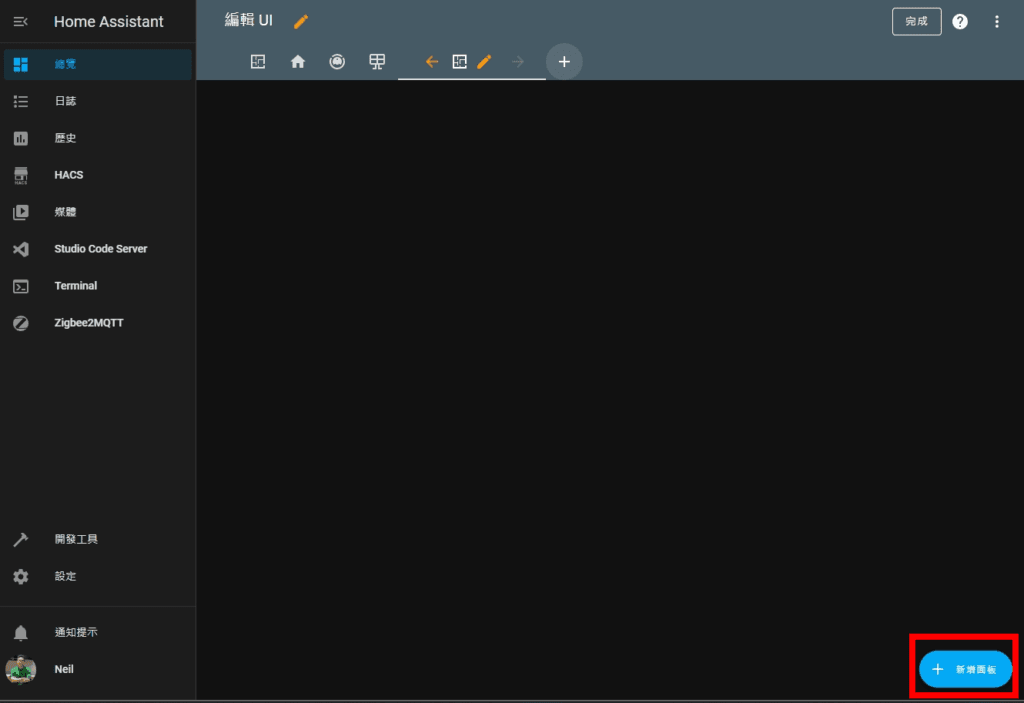
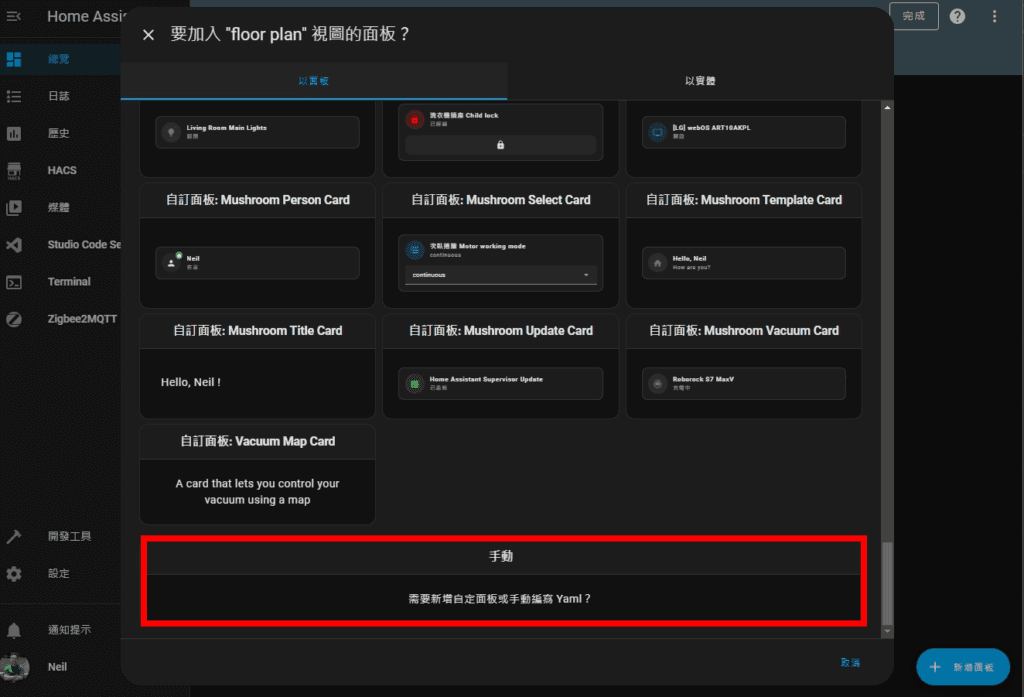
Click "New Panel" in the lower right corner, then click "Manual". That’s right, let’s start writing YAML! Don’t worry, YAML syntax is quite simple. Examples are also provided below for you to copy and paste, and then fine-tune it to meet your own needs!
Step 2. Put it into the template frame
Directly copy and paste the YAML code below. If you have coding ability, you should know how to complete it after a quick look at the following. If you don’t have much coding experience, just follow the steps first, and then slowly change it after you are familiar with it.
type: custom:config-template-card
entities:
  -
card:
  type: picture-elements
  image:
  style:
  elements:
    - type: image
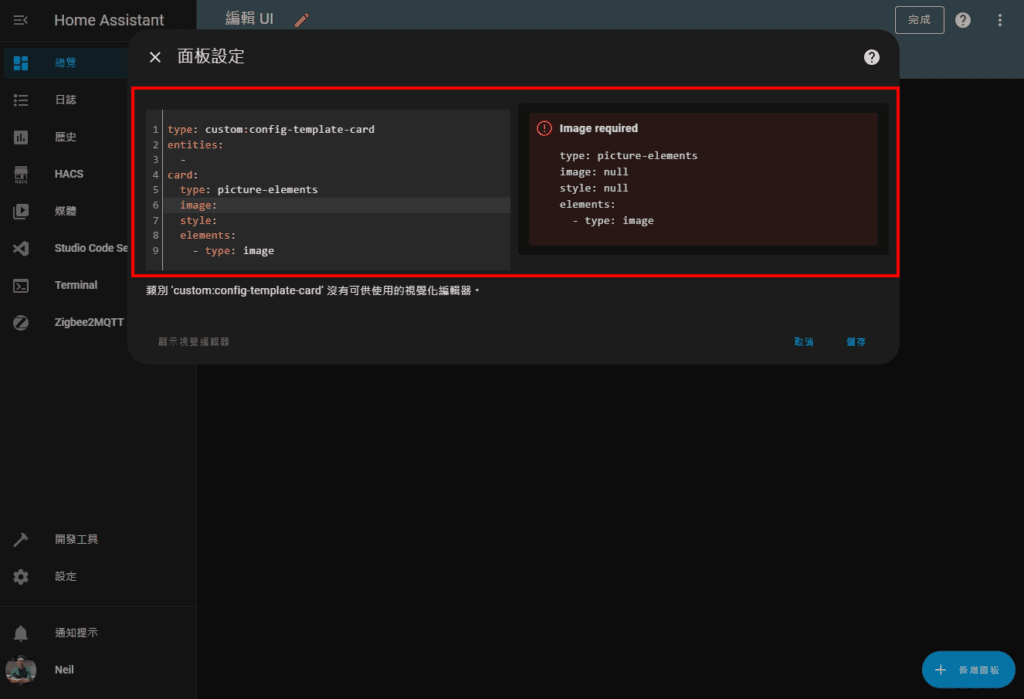
The above YAML code is the large framework used this time. This dashboard is made of custom:config-template-card (Line 1) This panel consists of;entities: (Line 2~3) etc. will be used later to declare the entity that will be used so that subsequent operation switches can respond faster; then card: (Line 4) is the main body of this panel, and the floor plan and various components will be filled in later.
After pasting the YAML code above, an error will appear on the right side. Don't worry, this just reminds us that some necessary values are not provided. Let's fill them in one after another.
Line 9 in the Template is temporarily placed in order to display the preview normally in the following steps, and will be replaced starting from the next Step 4.
Step 3. Insert the base image
Add the basemap path "../local/ui/floorplan/floorplan.png" after "image:" in line 6 of the original code (from here on,As long as it is related to the file path, you must replace it according to the situation where you place the file!)
⚠️ NOTE
The YAML syntax is quite strict. There must be a space between key (here it is "image") and value (here it is "../local/ui/floorplan/floorplan.png"). When combined, it looks like this:
image: ../local/ui/floorplan/floorplan.png
type: custom:config-template-card
entities:
  -
card:
  type: picture-elements
  image: ../local/ui/floorplan/floorplan.png
  style:
  elements:
    - type: image
At this time, the base image will be displayed on the right side. If it is not displayed, remember to check whether the file path and file name are correct.

Step 4. Overlay the light-on status
Next, we need to overlay the light-on status of each area. Below is a set of template code for "area on/off light display". Replace this template with the last line in the Step 2 YAML code template. At this time, the right No changes will be made to the preview.
    - type: image
      entity:
      tap_action:
        action: none
      style:
        pointer-events: none
        width:
        top:
        left:
      state_image:
        'off':
        'on':
- type: image (Line 1) Explain that the type of the element to be put into the dashboard now is "image", which is a "picture element". In this time, image elements are used to create the floor plan visual dashboard. I will not repeat the explanation when I encounter it later!
Line 2~12 are the various attribute settings of the image element. The settings are different for different purposes. We will introduce each template separately later. Here we first explain the "Light On State Template":
entity:It is the entity used in this element. It can be found in "Settings > Devices and Services > Entities" of HA. Fill in the example here.switch.xuan_guan_wu_kai_guan_2_l2(Don’t copy here! Please put your own entity in HA); Pay special attention here and put entity at the front.entities:section, so that the picture display state will be changed immediately when the light is turned on and off.tap_action:Here is the declaration of the action to be performed when this image element is clicked, because here it is just to display the light-on status, and there is no need to perform any action after clicking, so here is the settingaction: none.style:Used to set the display style of the image element. If you happen to be familiar with CSS, you can use any CSS property here:pointer-events: noneI put this paragraph here because in my practice, each area will be 100% overlaid on the original image. In order to allow the click event to penetrate, this line needs to be added to prevent the subsequent overlay from affecting the previous button click.width:Set the width of the image. Because the light-on image I used is the same size as the base image, so set it here.100%, the effect is that the light-on image is as large as the base image.top:andleft:The function is to set the position where the picture is displayed. Here, both top and left are set.50%, refers to pushing the image down from the top to the distance of "image height 50%", and then pushing the image from left to right to the distance of "image width 50%".state_image:Set the images to be displayed when the entity is in different states'off' :Because there is no need to display any picture, I put a transparent picture/local/ui/floorplan/transparent.png(Just put a transparent png here).'on' :Just put it hereFrontReady light-on status picture/local/ui/floorplan/living room.png
At this point, the overall code will look like this, let everyone do some homework:
type: custom:config-template-card
entities:
  - switch.xuan_guan_wu_kai_guan_2_l2
card:
  type: picture-elements
  image: ../local/ui/floorplan/floorplan.png
  style: null
  elements:
    - type: image
      entity: switch.xuan_guan_wu_kai_guan_2_l2
      tap_action:
        action: none
      style:
        pointer-events: none
        width: 100%
        top: 50%
        left: 50%
      state_image:
        'off': /local/ui/floorplan/transparent.png
        'on': /local/ui/floorplan/living room.png
At this time, you can manually turn the light on and off to verify the effect.
Step 5. Add a light switch button
Likewise, first put the following template at the end of the code.
    - type: image
      entity:
      tap_action:
        action: toggle
      style:
        width:
        top:
        left:
      state_image:
        'off':
'on':entity:Place the entity to be controlled in the part. Here we want to control the switch of the lights in the living room, so we use the same entity as before.switch.xuan_guan_wu_kai_guan_2_l2.tap_action:Set here toaction: toggleThe effect is to click to switch the entity on or off.style:part ofwidthCan control the size of the light switch button,topandleftJust like before, you need to decide the button position. Here, you can set it completely according to the situation of your home.state_image:'off' :Put a picture of the button when turning off the lights/local/ui/icon/light-off.png'on' :Put a picture of the button that turns on the light/local/ui/icon/light-on.png
Come! For homework, after adding the light switch button, the overall code looks like this:
type: custom:config-template-card
entities:
  - switch.xuan_guan_wu_kai_guan_2_l2
card:
  type: picture-elements
  image: ../local/ui/floorplan/floorplan.png
  style: null
  elements:
    - type: image
      entity: switch.xuan_guan_wu_kai_guan_2_l2
      tap_action:
        action: none
      style:
        pointer-events: none
        width: 100%
        top: 50%
        left: 50%
      state_image:
        'off': /local/ui/floorplan/transparent.png
        'on': /local/ui/floorplan/living room.png
    - type: image
      entity: switch.xuan_guan_wu_kai_guan_2_l2
      tap_action:
        action: toggle
      style:
        width: 5%
        top: 30%
        left: 73%
      state_image:
        'off': /local/ui/icon/light-off.png
        'on': /local/ui/icon/light-on.png
At this time, the light switch control in the living room has been completed! Just press that little button and give it a try!

Next, follow the same pattern and add the light switch status and buttons of each space in your home! Your Floor plan dashboard prototype is complete!
Additional screening on the same scene
Here we share templates for controlling other devices, so you can use them as needed!
curtain control
    - type: image
      entity: cover.zhu_wo_sha_lian # Change your curtain entity
      tap_action:
        action: toggle
      style:
        top: 12%
        left: 30%
        width: 5%
      state_image: # Because the status value of each device may be different, you need to adjust it according to which status your curtain control entity can distinguish.
        open: /local/ui/icon/curtains.png
        closed: /local/ui/icon/curtains-closed.png
        closing: /local/ui/icon/closing.gif
        opening: /local/ui/icon/opening.gif
Air conditioning control
    - type: image
      entity: climate.ci_wo_leng_qi # replace your air conditioner entity
      tap_action:
        action: more-info
      style:
        top: 69%
        left: 28%
        width: 5%
      state_image: # also needs to check which states your air conditioner can distinguish and make adjustments.
        cool: /local/ui/icon/air-conditioner-on.png
        heat: /local/ui/icon/air-conditioner-heat.png
        'off': /local/ui/icon/air-conditioner-off.png
        fan_only: /local/ui/icon/air-conditioner-fan.png
Share your results!
Congratulations on completing your Floor plan dashboard! Leave a message to share your results!
If you have tried different methods, please share them with everyone in the message area!
Home Assistant tops!

I have a question for you, Neil. I have made some minor changes to my image and have re-transferred it to the host through samba. However, the system seems to have a temporary storage mechanism. I have to change the file name before it can read the new image. Restarting the host doesn't help. Is there any way to improve this?
Hi Jerry,
Adding/changing the query string after the link you reference the image will allow the browser to ignore the cache
Like originally:
image: ../local/ui/floorplan/floorplan.pngIf you update the "floor plan.png" image, then in the YAML you would change:
image: ../local/ui/Planet/Planet.png?20250404It doesn’t matter what’s in the query string, just change the query string content every time you change the image.
Once the entire floor plan is set up and stable, just remove the query string (it doesn't matter if you don't remove it, it depends on whether you care about it or not)
It worked. Thanks Neil. It's great to have you^^
At present, when testing, two new switches are added, the switching is normal. When the third one is added, the first two cannot be used, and the third one can be used.
I also encountered a similar problem. The copied code was exactly the same, but when I moved the mouse over on the old device, the mouse originally switched to one hand, indicating that it could be pressed. Now it doesn't work, but the newly added one has no problem.
Did you solve your problem?
The host was updated to the latest version today, and it seems that this situation occurred after the update.
Hi douglas,
Check it out
entities:Is this entity announcement released?
Hi Neil, sorry to bother you again.
I tested and encountered a similar problem as douglas. I will share the screenshots on Google Cloud. Can Neil help me find the problem?
https://drive.google.com/file/d/1AtGsdycbzWgAdAVZTqc1e_p_7txQ_LqF/view?usp=sharing
In my environment, I used a Xiaomi fan and an Electrolux air conditioner as temporary lights to test the functionality of the floor plan.
I found that the Xiaomi fan with a blue frame at the back is working normally. I can press it when I move the mouse over it, but the air conditioner with a red frame at the front cannot be pressed.
If you swap the blue frame and the red frame, the status of the two devices will be opposite, that is, the device at the end of the code will be normal, and no matter how many devices are in the front, they cannot be controlled.
Jerry,
It seems that the click action cannot penetrate because of the overlapping images.
In the part of the picture change style add
pointer-events: noneGive it a try
The problem is solved. Thanks again to Neil for his help^^
I would also like to ask two more questions about concepts. Neil, please tell me if I have any misunderstandings.
1. I connected Xiaomi and Electrolux devices to HA through HACS. Is it still connected through WiFi? Before connecting, I need to obtain API key and Access Token from the official. This means that the communication between HA and the device still needs to go through the official. It just replaces the official APP and integrates all into the HA APP for control?
2. After testing, the HA app cannot synchronize the device status through physical operation or the original official APP, but it can. Is this normal? For example, the Xiaomi electric fan at home is turned on by someone physically before going out, but the person outside cannot know through the HA app that the device was forgotten to be turned off. Only by connecting to the Xiaomi app can you know!?
Hi Jerry,
1. This method is through cloud integration, which is actually using HA to call Xiaomi/Electrolux to control the device
2. Not quite normal. If this happens, you may want to check whether the entity you display on the floor plan can truly represent the status of the device. If not, you may want to try another entity of the same device.
Thanks Neil for clarifying this. I tested it later and found that when using the "button panel" to control the switch of the Electrolux air conditioner (the same model as Neil), the device will respond to turning on or off in about 1 second, but the "status icon" for turning on is much slower, and it takes about 30 seconds. The "status icon" for turning off is normal, and the "status icons" of other negative ion switches and the "status icons" of the monitoring light switch are also normal, which made me think there was a problem with the synchronization. I'll test it again, maybe it's caused by the wrong setting.
Hi Jerry,
I tested it myself and it was fine, but please note that because it is controlled through the cloud, there is an extra layer of brand mediation, so it is not suitable for fast switching. I tested it myself and it took about 1 second to complete the synchronization after clicking. Remember to put the entity in entities, otherwise there may be problems with the status display
Hello Neil:
After observing it for 1 or 2 days, everything seems to be normal. Maybe it was because the system was not stable during the initial setup period!?
The more I play, the deeper the water seems to be. I also find that I still have many shortcomings. I wonder if Neil can share and teach everyone how to fish?
For example, can you recommend some good websites, forums, FB groups, youtube videos, or give me some guidance? In addition to YAML language, would it be helpful to know some CSS syntax? Do I need to know other languages?
I can even start a new teaching direction. When seeing non-big-name products (such as products from mainland China) that claim to have supported APPs, I can teach everyone how to determine whether they can be connected to HA and how to ask customer service. Where can I find supporting articles or platforms? I think this kind of experience sharing will be very helpful to everyone.
I want to buy a heat pump water heater from Haier. Haier is a big company in the world and has its own APP. I also found a Haier kit from HACS, but it doesn't seem to support heat pump water heaters. Does that mean it can't be connected to HA? Or is there any way to find out?
There are also many flat panel lights with fan functions on the other side of the strait, which also claim to support APP connection, but they are all from small manufacturers and it is difficult to tell whether they can be connected to HA. These are the problems I am facing now. If the home appliances I buy are different from what Neil shared, I don’t know where to start.
Maybe I'm still too inexperienced. If I play for a few more months, maybe the above problems won't be a problem anymore, haha^^
Hi Jerry,
I usually get information about HA from these places:
website:
– Home Assistant official release notes
– Automata – Home Automation Community
– Weijia Home Intelligence
FB Group:
– Taiwan Home Assistant enthusiasts exchange
– Home Assistant
YouTube Channel:
– Smart Home Solver
– Everything Smart Home
– Home Assistant
Programming language part:
Strictly speaking, YAML is not really a programming language (I’ll state this first, in case some people mind 🤣), but if we include all these data formats or stylesheet languages that “look like” programming languages, sorted by the depth used in HA (the lower the deeper):
– YAML (data format): A language used in many places in HA environments.
– CSS (style language): used to adjust the interface style (font size, color, image, position, etc.).
– JSON (data format): If you use Node-RED, you will probably come across it.
– Jinja2 (Python template syntax): You may encounter it when you explore automation or Dashboard in depth.
※ But in fact, even if the current HA does not know the above, it can still make the smart home very complete. You don’t have to put so much pressure on yourself, but if you are interested, it’s also good to learn more.
About device support
It is actually difficult to generalize. Even if the home appliances themselves do not support HA, there are still many different ways to connect traditional home appliances to HA.
In addition, cases like Haier do require in-depth research. What I usually do is to search a lot of information on the Internet, and usually find attempts made by others. I just happened to see this when I was looking for other information recently.Someone shared how to connect Haier water heater to HA
But it is indeed like you said, if you use it for a while, you will understand these details more and more🤣
Thank you very much Neil for your selfless sharing. The websites you provided are of great help to me. I'll save it first and digest it slowly^^
I also look forward to Neil’s industry news and teaching articles in the future.
Neil, I am stuck at step 2. After pasting the code, the system displays an error message "Error parsing YAM: duplicated mapping key (row: 5, column: 1)". Did I miss any step?
Hi Jerry,
I need you to share a screenshot of the error screen so that I can determine where the problem is.
This platform doesn't seem to support posting pictures. I'll upload them to Google Cloud. Thanks Neil.^^
https://drive.google.com/file/d/1-5AUVNNGVbkFR9WTGdWDNI2ldReuBrUu/view?usp=sharing
Jerry, it looks like an indentation problem. YAML is very strict about indentation rules. YAML uses indentation to identify dependencies.

Solved, it was indeed an indentation issue, thanks to Neil for his help^^
Neil, I would like to ask you about action: toggle, but in fact only a few pictures can be actually clicked. Where is this part written wrong?
Hi Paul,
What type is your entity? Could it be that your entity does not have the toggle function?
Use Figma to cut the picture and get the lighting status of each area => Is there any simple steps or concept description? No talent 😂, I tried but couldn't meet Neil's requirements QQ, how to use edge gradient, please teach me
Hi Darren,
For the edge gradient method, you can search the keyword "musk" and give it a try.
I would like to ask if there is any homework for the temperature display in each area that I can copy XD
Hi Darren, I will sort it out and update it~
Hi! Neil: Recently, I successfully added Dyson and air conditioner to HA, and used home bridge to connect these devices to HK for use. I have encountered two questions that I would like to ask:
1. Some useful switches in HA have become numerous and complicated after being integrated into HK. I just want to pick a few useful ones and control them in HK. Is there a way to solve them? (For example, in HA, the air conditioner can be controlled by nanoe and smart sensor. In HK, it becomes switch 1, switch 2..., I don't need these)
2. The HA overview part is extremely messy after adding a bunch of new devices. At this stage, I can't use the floor plan like you do, but I want to categorize it. How should I organize it? Searching for multiple articles is unavailable…..
Please feel free to give me some advice on the above, or if you have any teaching articles, you can introduce me to the HA APP….
Hi Richard,
1. From "HomeKit Bridge Integration Entity > Settings > Transfer" you can set the device entities to be excluded.
2. You can first use the built-in panel to create your own overview Dashboard. A common method is to divide it into blocks by room area, or by device type (switch, air conditioner...etc)
Okay, I'll try it again, thank you Neil
By the way~ HA mobile phone or computer APP can only be used within the same network domain. Regarding remote operation of HA (using the 4G network connection of the mobile phone), Neil, what is your solution? Can it be used as a reference for my younger brother? At this stage, I connect all the switches to HK and use HK to operate them.
Hi Richard, you can consider subscribing to the Home Assistant Cloud service directly. This is the easiest way at present. You can subscribe and enable it from "Settings > Home Assistant Cloud"
Great, I have seen a lot of DDNS on the Internet... I find it troublesome, this is much more convenient, thank you~~~
Hello Neil:
I would like to ask about VIZO’s zero live switch for dual switching. I saw on the official website that it requires setting it using the app ( https://vizo.com.tw/vizo-wifi/#c ) I would like to ask if you can connect to HA directly without using his app to set up dual cut?
Hi Geo, that’s right, it uses the automation function of HA to link the two switches.
Thanks for sharing~ But after pressing the button, the icon on my floorplan will not change. I must turn off the HA leaves and reopen them and it will change. May I ask which side of this needs adjustment?
Hi Louis, has the top entity declaration been made?
I would like to add that when placing the floor plan (Step 2. Putting in the template frame), you must first download the Config Template Card from HACS before you can use it.
After downloading, the www folder will be automatically generated (equivalent to /local(?), I was confused about this for a while XD)
Good~ Thank you for your addition, it will definitely be helpful to those who want to do it XDD
Neil, I would like to ask about the problem of setting double switching after VIZO smart switch is connected to HA. Currently, Node red is used to arrange the double switching process of two smart switches. The problem is that if the button of VIZO smart switch is pressed twice in succession very quickly, Afterwards, an infinite loop of turning on, off, and on again will be triggered. @@The house becomes Disco. I would like to ask if you also have any applications that use double-cutting at home? Thank you~
Hi Jason, I use this blueprint and it handles it pretty well. You can give it a try.
https://my.home-assistant.io/redirect/blueprint_import/?blueprint_url=https%3A%2F%2Fgist.github.com%2Fmatrix2669%2Fbb539014fb5ca8e6279a41c1121be677
If you don’t know how to use blueprint, you can refer to this article:https://neiltw.com/home-assistant-blueprint-automation-setup-guide/
Please tell me how to register Kujiale. Now you need a mainland phone number.
I use QQ to log in. It also has Weibo login. Give it a try.