Too many people worry that they can’t do Home Assistant when they hear that they need to install the system and write programs, etc. Often, their first choice is to “use HomKit first, and then build HA after I’m familiar with it.” Do you think so too?
Not to mention the extra costs that may be incurred, it is more likely that the whole home will have to be reconfigured during the conversion process, which will make you overwhelmed. "If you want HA eventually, why not do it from the beginning?" Right!
In fact, installing a HA system is not as difficult as you think. Don't worry too much about what top-notch hardware to use in the early stages. Starting with the Raspberry Pi will definitely greatly lower your entry threshold. Today, let me walk you through the steps to install Home Assistant on the Raspberry Pi! Let’s get started!
Table of contents
What is Home Assistant?
Home Assistant is an open source smart home system with the main features of scalability and customization. It can be used to control various smart devices, including light bulbs, smart sockets, smart switches, smart door locks, smart cameras, temperature sensors, etc. At the same time, Home Assistant also supports multiple communication protocols, including WiFi, Zigbee, Z-Wave, Bluetooth, NFC, Thread, Matter... and so on. Therefore, it can be connected to almost all smart home devices on the market without being limited to a single brand, allowing users to easily control and manage them and achieve automated control. With Home Assistant, you no longer need to control different devices separately through the APPs of various brands (eg Xiaomi, Yeelight, IKEA, Philips, etc.), but all can be controlled in Home Assistant.
Another feature of Home Assistant is "automation". We can create automation rules through Home Assistant, such as turning on lights at a certain time, controlling home entertainment equipment, or setting regular home cleaning schedules. In addition, Home Assistant also supports linkage control between devices, such as automatically turning on lights when the door lock is opened, etc.
The advantage of Home Assistant is that it is a completely open source platform with extremely high scalability and a rich plug-in library. Anyone can expand its functions by developing and sharing their own plug-ins, and ordinary people can also use it and share it with others. Use plug-ins to combine your own smart home system to achieve more functions and control methods.
At the same time, Home Assistant also supports a variety of voice assistants, including Google Assistant, Amazon Alexa, Apple Siri, etc. In addition to remote control and automated control, you can also control home devices through voice commands to achieve a more intelligent and convenient control experience.
If you are still hesitating whether to use Home Assistant as your smart home hub, welcome to read my analysis:
How to install Home Assistant
There are two common installation methods for Home Assistant:
- Home Assistant Operating System (hereinafter referred to as Home Assistant OS): This should be a relatively simple and easy-to-start installation method. It is usually installed on the Raspberry Pi. This is also the method I chose. The steps for this method will be disassembled below. untie.
- Home Assistant Container: If you have a NAS or other idle Windows or Mac computers at home, you can consider installing the Home Assistant Container through Docker. However, NAS and general computers consume more power than the Raspberry Pi, unless they are used at home. NAS needs to store large-capacity files, otherwise this method is not recommended.
In addition to the above two installation methods, there are other more advanced installation methods, which will not be expanded here. Those who are interested can refer to:
Next, I will explain step by step how to install "Home Assistant OS" on "Raspberry Pi", let's get started!
Step 1. Prepare in advance
- Raspberry Pi:Raspberry Pi Raspberry Pi official websiteYou can search for certified dealers by region, or you can search for trustworthy stores on major e-commerce sites.
- Suitable transformer and power cord: It is really necessary to make sure that the ampere number meets the needs of the Raspberry Pi, otherwise it will cause damage to the host. It is best to buy it together with the Raspberry Pi, and don't plug it in by yourself.
- Micro SD card: According to official recommendations, it should be at least 32 GB and Class 2 or above. If you have special storage needs, buy a larger one.
- SD card reader: The next step is to plug in your original computer through the card reader to burn the OS image file to the SD card.
- Ethernet route: Although the Raspberry Pi you bought may support WiFi connection, in order to provide Home Assistant with a stable network and considering the need for a fixed IP for remote control in the future, it is recommended to use a wired network. suitable.
Here are the specs of the device I'm using:
Raspberry Pi 4 Model B/8G SanDisk 32G microSD card Official original red and white case (with Case Fan) Official original 5.1V/3A power supply Official original HDMI cable (1M)
Step 2. Assemble Raspberry Pi
Home Assistant installation tutorials on the Internet usually skip this step. It seems that assembling a Raspberry Pi is something everyone knows. However, I encountered a little problem when I was assembling it (although looking back it was quite stupid😂), so I still Here are a few tips to share, which may be helpful if you encounter the same situation as me:
To install the heat sink, just peel off the adhesive tape and stick it on.
I see that the kits sold online are different from each other. The one I bought comes with a heat sink with a red frame as shown below.
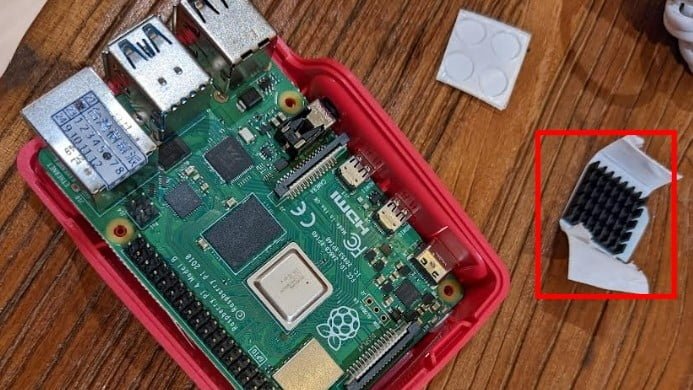
According to the official component introduction (picture below), peel off the adhesive on the heat sink and stick it to the "Processor" position
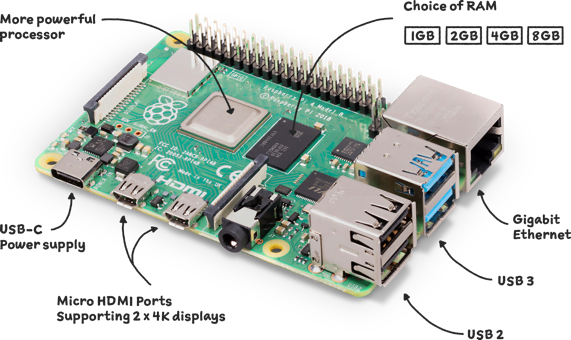
The official case assembly has no screws
The installation of the official case is actually very simple, but at first I thought there were missing screws. After asking the customer service, I found out that there are no screws and I just need to snap them on. You can refer to the following video for official case assembly:
Step 3. Burn the image file (image) to the Micro SD card
Format Micro SD card
Refer to the following settings to format your Micro SD card:
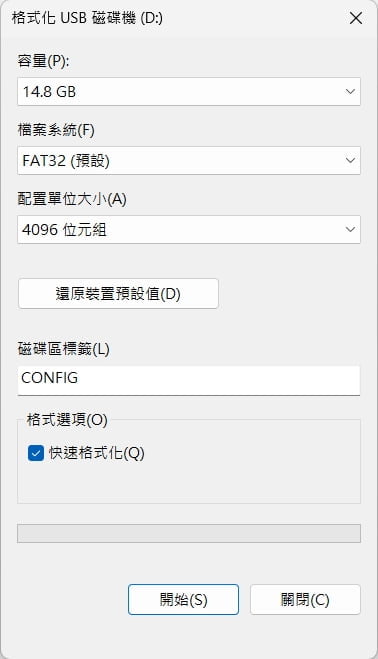
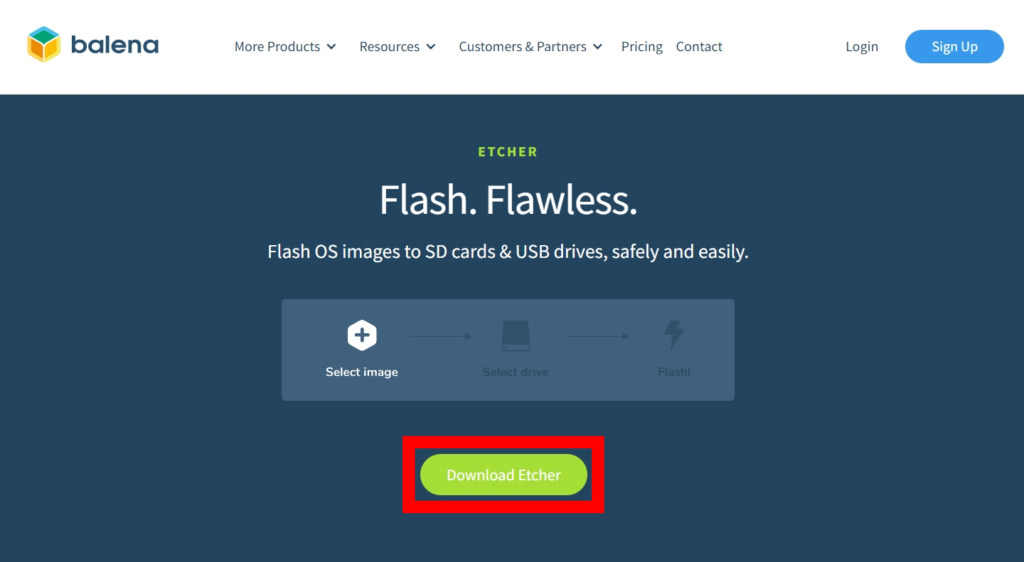
Install Balena Etcher
This is an image 1. file burning software, enter Balena Etcher Click the Download button after the official website to download and install
Burn Home Assistant OS image file (image)
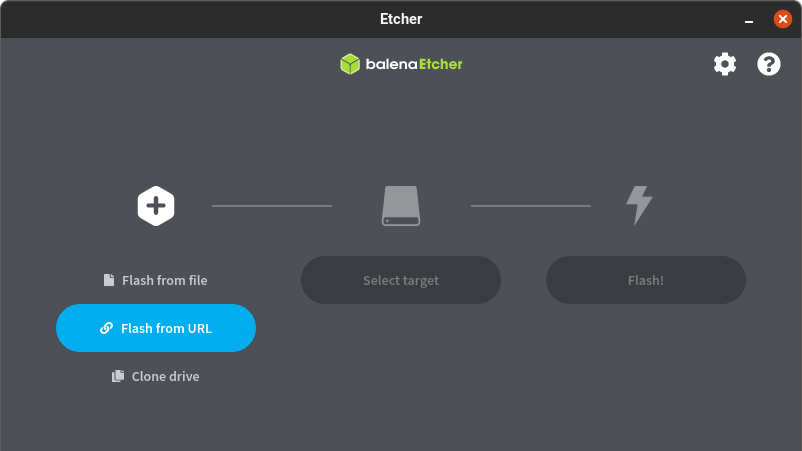
- Launch Balena Etcher
- Select "Flash from URL"
- arrive Home Assistant official website documentationCopy the Home Assistant OS for Raspberry Pi image file URL (check which version of your Raspberry Pi you have!)
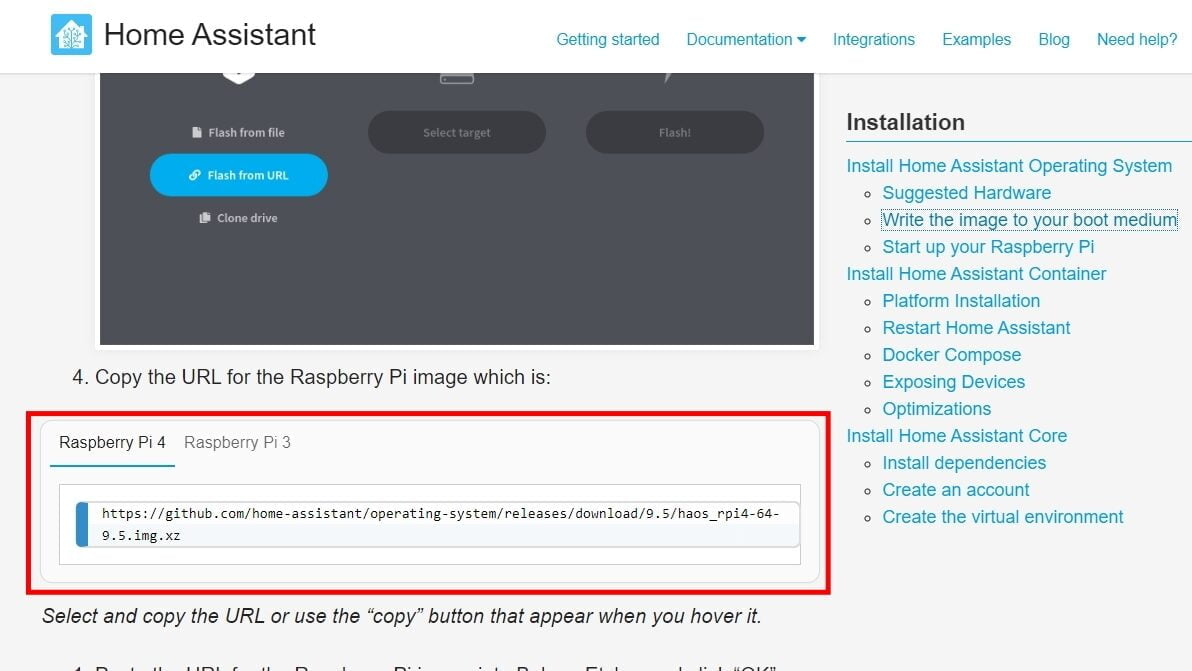
- Go back to Balena Etcher and start burning the Home Assistant OS image file (image)
- Post the video URL
- Select target Select the previously formatted Micro SD card
- Click "Flash"
- After the burning is completed, the following picture will appear, and you can remove the card and use it for later use.
If you encounter file decompression related problems here that cause burning errors, try downloading the image file to your computer and using "Flash from file" to burn it
(Thanks Jerry for the report 😍)

Step 4. Install Home Assistant OS on Raspberry Pi
- Insert the burned Micro SD card into the Raspbeery Pi
- Raspbeery Pi Plug in the power cord and network cable (the installation process will automatically download the necessary files through the Internet)
- At this time, Raspbeery Pi will automatically install Home Assistant OS. The entire installation process takes about 20 minutes.
- Open a browser on your computer and type "homeassistant.local:8123"You will see the following screen. If you have never seen such a screen, try to find the IP location of homeassistant in the router settings, enter "http://XXXX:8123" in the browser (XXXX is replaced by homeassisatnt IP location)
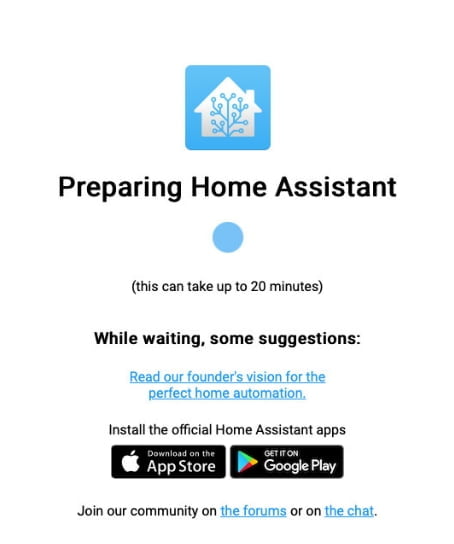
- When you finally see this screen, it means Home Assistant has been installed! congratulations! The most troublesome part of the entire Home Assistant setup is completed!
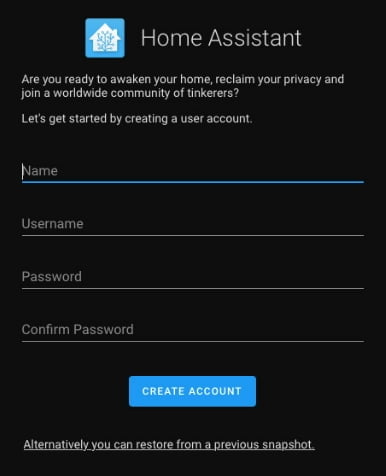
Step 5. Home Assistant Basic Settings
Set your account, password... and other related information in the above screen. This account will have the highest authority of Home Assistant. Remember not to leak it, and don't use an account or password that is too easy to guess. Be sure to save it carefully!
Then follow the system instructions to complete the setting step by step. During the process, you can set the geographical location of your home. If there are already smart devices in your home, they will automatically connect to Home Assistant.
After all basic settings are completed, you can go to "Settings > Devices and Services" to see all connected devices
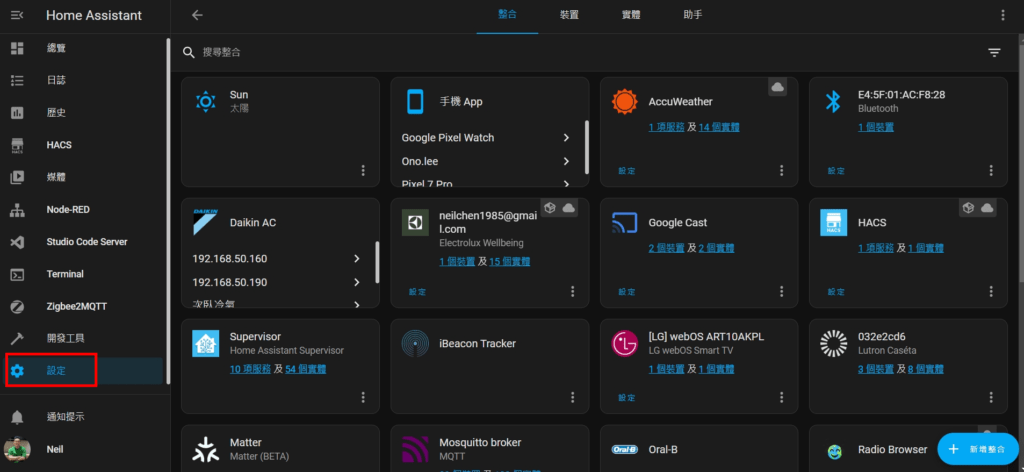
If there is already a device that can be accessed at home, Home Assistant will automatically detect it and display it as "Discovered" on this page (as shown below)

You're done!
Welcome to the world of Home Assistant! Installing Home Assistant is much easier than imagined! I hope this installation tutorial will be helpful to you. Next, I will also introduce the various function settings of Home Assistant, from various plug-in installations to Dashboard settings, situation settings, automation settings, etc. Thank you for reading. If you have any questions here, please leave a message! I will try my best to answer 😁
Next step
It is recommended to connect most smart devices with Zigbee
Next, you will need to add various devices in your home to Home Assistant. The method I recommend most is to use Zigbee connection. Low power consumption and mesh topology make the connection more stable. For reference:


Required add-ons (plug-ins)
The reason why Home Assistant is so useful is that you can expand it completely according to your needs. In addition to relying on official add-ons, you can also install add-ons developed by various experts. Here is a list of recommendations I have prepared:

Setting up automation
Automated setting is also a very important part of smart home, it can make you even more lazy👍 Please refer to these two articles:
Take your smart home control panel one step further
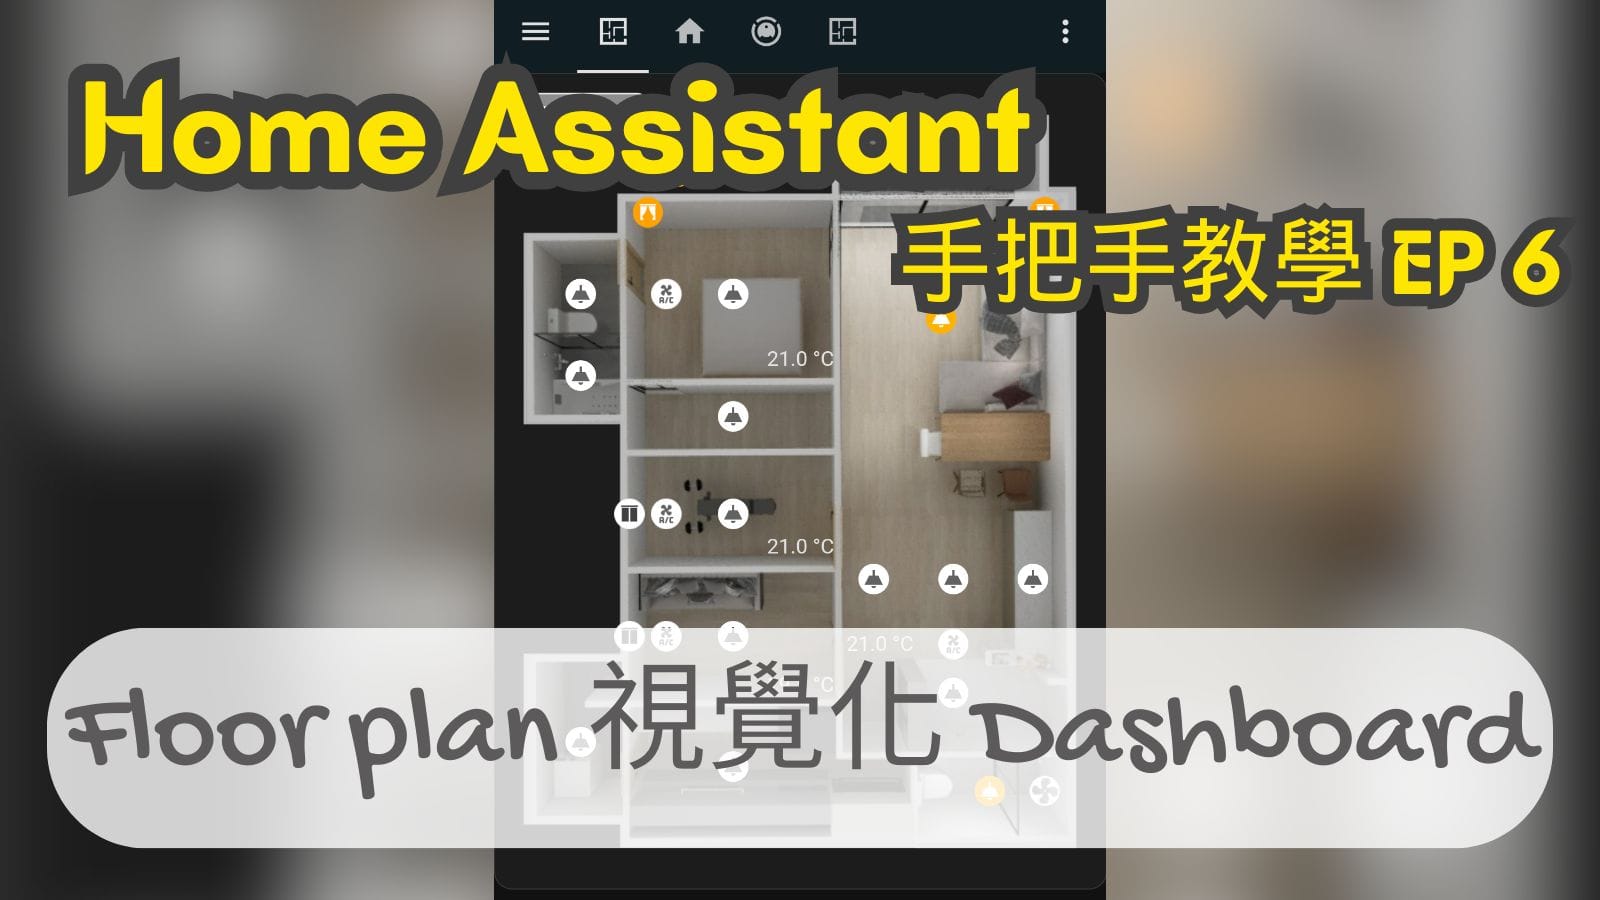
What I recommend most is to use Floor Plan to visualize the main controls in your home. This is the most intuitive way to control a smart home. You can do it by following this step by step!
Congratulations again on getting into Home Assistant! Trust me, you will never regret it! 👍
FAQ
Does Home Assistant have to use a Raspberry Pi?
In addition to Raspberry Pi, many people also recommend installing it on an industrial computer or NAS. If you have similar devices at home, you can give it a try. However, it may involve the setting up of a virtual machine, and the overall construction difficulty will be higher than using a Raspberry Pi.
Home Assistant is complicated and difficult to install. Is there an easier way?
have! You can purchase Home Assistant Green, which is the official host of Home Assistant. The Home Assistant system has been pre-installed. You can directly start your Home Assistant smart home life by plugging in the power supply and network cable!
https://neiltw.com/plug-and-play-home-assistant-green-setup-guide/


This article is written in great detail and is very helpful for those who want to get started with smart home! Looking forward to your follow-up tutorials, thank you for sharing!
Does the Home Assistant registration account have to be the same as the Apple Home Creator account?
(Because after I set up the virtual home assistant on my computer, the smart devices at home did not automatically appear in it)
Hi Nichole,
Home Assistant and Apple Homekit are different systems, so they do not need to be the same account. If you want to connect a device that has been set up in Homekit to Home Assistant, you can Google to check "Homekit unlink to Home Assistant"
Thanks for sharing such detailed installation steps! I’ve always wanted to try building a smart home, and this article gave me more confidence to start. Looking forward to ep 2!
Very detailed installation steps! This article helped me successfully complete the setup of Home Assistant. I look forward to the follow-up tutorials! Thanks for sharing!
That’s great! Welcome to Home Assistant👍
I'd like to report a situation I just encountered. When burning HA to the SD card, if you use the URL image file method, an error message will pop up after the final verification stage, saying that there is an error in the decompression process and asking us to check the source file. Later, I downloaded the image file first and then used the specified file method to successfully create it.
Thank you for your return
I would like to ask how to find the HA IP location, because it keeps saying that I cannot connect to this website, thank you ~
Hi BEN,
If they are in the same area network, you can http://homeassistant.local:8123 Connect
But if you want to connect to the HA at home from the external network, it is more complicated. Usually, you need to set the internal fixed IP of the HA on the router at home, and then do port forwarding (port forwarding, or "port mapping" through the router). "Forwarding"), but only if your network provider (Chunghwa Telecom...or others) allocates you a fixed IP. If these are too complicated for you, then just pay to subscribe to Home Assistant Cloud
The above internal and external methods are all under normal conditions. If you use NAS, NUC or other hardware to install through a virtual machine, the situation may be different.
When burning the Home Assistant OS image file, the message "You need to format the disk in the disk drive before it can be used" keeps popping up and cannot be burned smoothly. How can I solve this problem? I am using a 32G micro SD card
Hi Jack,
Have you completed formatting the micro SD first?
If you haven’t already, you can refer to this step:https://neiltw.com/home-assistant-installation-and-onboarding-guide/#Step_3_%E6%8A%8A%E6%98%A0%E5%83%8F%E6%AA%94_image_%E7%87%92%E9%8C%84%E5%88%B0_Micro_SD_%E5%8D%A1%E8%A3%A1
After completing the formatting, proceed to the next steps!
I would like to ask if there are not many devices (within 10), is 2g enough? Or is it better to be big than small? ? ?
Kate, 2G seems a bit too small. Do not use it smaller than the official recommended 32G no matter what.
Hello, I would like to ask about the equipment specifications of Raspberry Pi. There is an HDMI cable. When will it be used?
It should be used when some OS will directly display the screen, but Home Assistant cannot use it.
Hello, I would like to ask if the specifications of the Raspberry Pi you purchased here include an HDMI cable. When will it be used?
Looking forward to continued updates😀😀😀
Let me share with you how to set up devices to connect to HA, such as gateways, and aqara and Tuya, which often have access problems.
Tutorial on connecting Zigbee devices to Home Assistant is here! ~
https://neiltw.com/how-to-use-zigbee2mqtt-to-intergrate-zigbee-devices-in-home-assistant/
I would like to ask if Neo will introduce infrared controlled products~
Also, are you still using Vizo’s smart switches? Do you have any recommended products?
My experience with infrared control devices is not very good. I tried to use the Aqara M1 gateway for infrared control of air conditioners before, and found that there are many physical space restrictions. As long as the middle is blocked, it cannot be accurately controlled, so unless there is no other choice, otherwise I don't really recommend using the infrared control solution.
We currently use Vizo Zigbee zero-fire switches at home. It’s true that Vizo was the choice that relatively met our needs in terms of appearance and functionality at the time.
The next episode should officially get into equipment selection?
I wonder if Neo has considered Shelly?
The price is quite different from Vizo.
I'm planning to decorate recently and I'm so hesitant...
Relay type? I chose to directly use the switch to repair and replace it, which is more convenient.
https://neiltw.com/my-smart-home-devices/
Here are my equipment selections! For your reference
Super clear! Neil really explained step by step! ! "Assembling a Raspberry Pi is something everyone knows" is what often comes to my mind when watching players share their installations... I hit the nail on the head, haha, thank you very much! My house is still being decorated, and I will be able to follow the step-by-step instructions shared by Neil to complete HA in the second half of the year. I hope I can also create my own Dashboard and automation by then😁😁😁
Thank you! Hope it helps you