Electrolux home appliance integration joins Home Assistant tutorial – Home Assistant step-by-step tutorial EP 13 

The most fascinating thing about Home Assistant is that it can integrate almost all home appliances on the market and let various devices in your home move according to your habits through automation and scenarios! Today we will help you integrate Electrolux home appliances into Home Assistant!

Step 1. Download and install Electrolux Wellbeing from HACS

Search "Electrolux Wellbeing" on HACS and install it
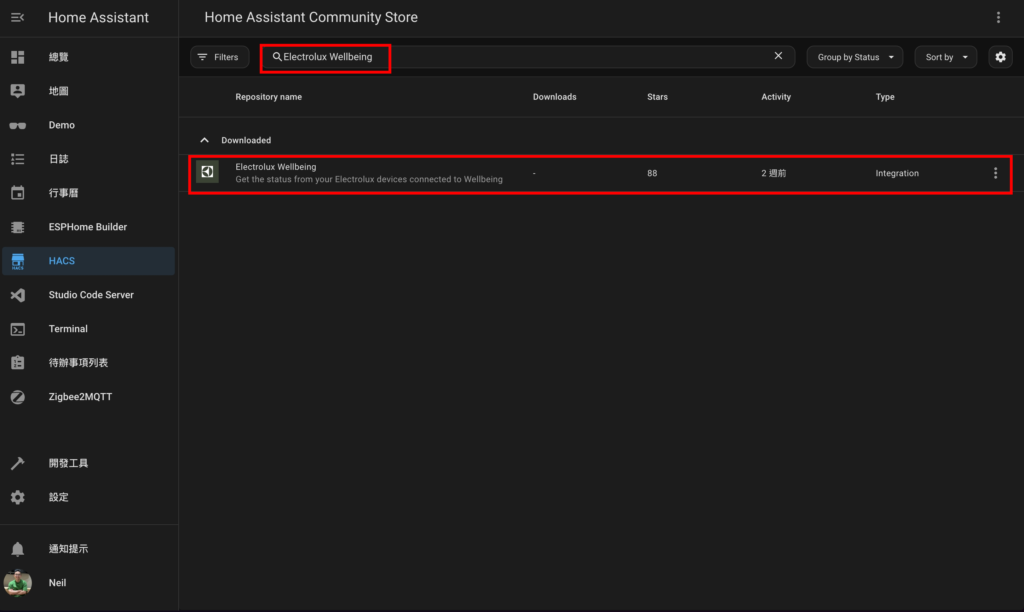
image 11

Step 2. Add new integration with Electrolux Wellbeing

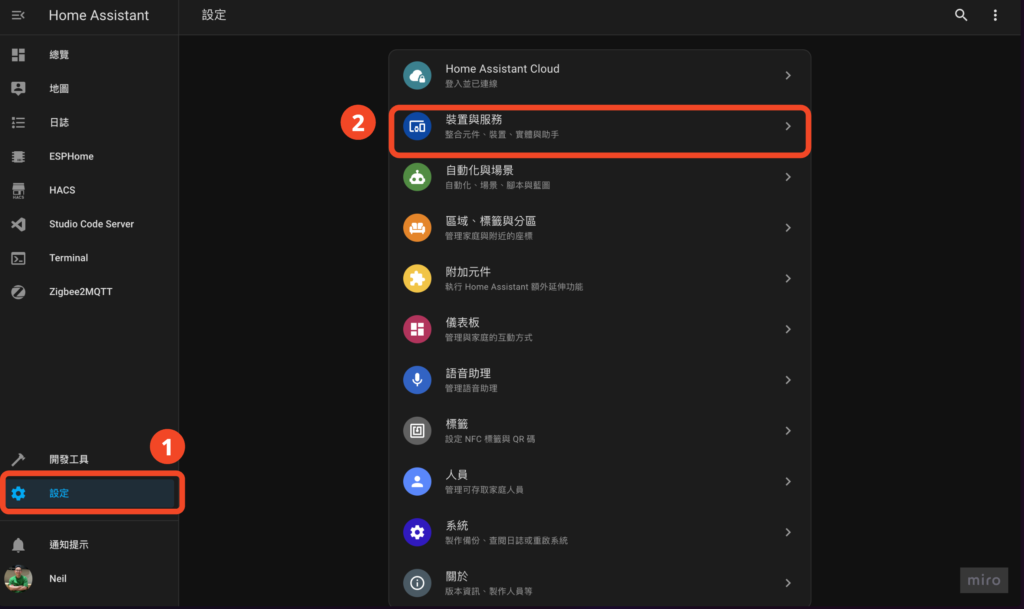
  1. "Settings" on the left
  2. Click "Devices and Services"
左側「設定」、點選「裝置與服務」
  1. Click "Add Integration" on the lower right
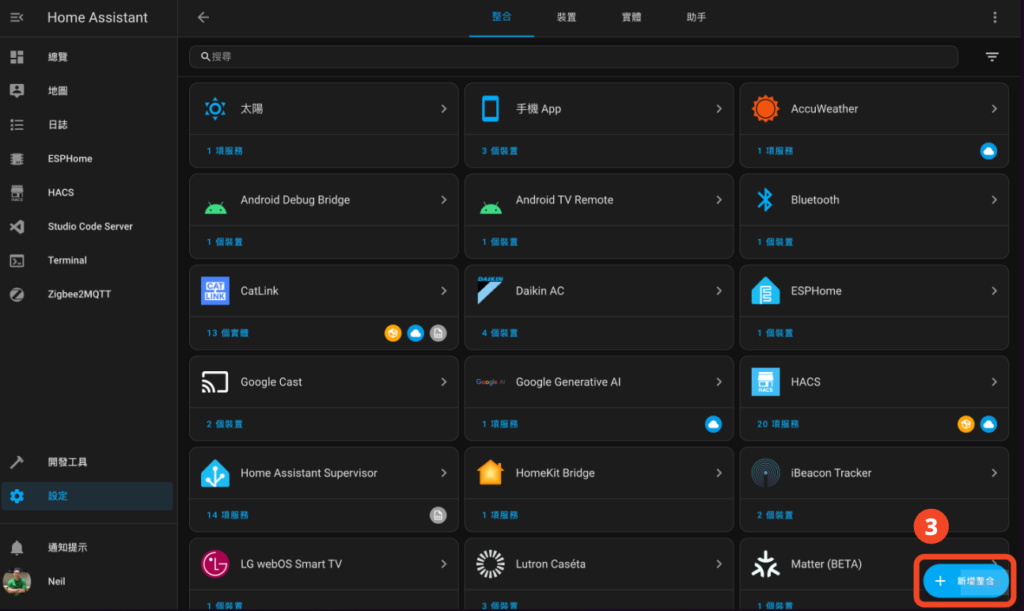
點擊右下「新增整合」
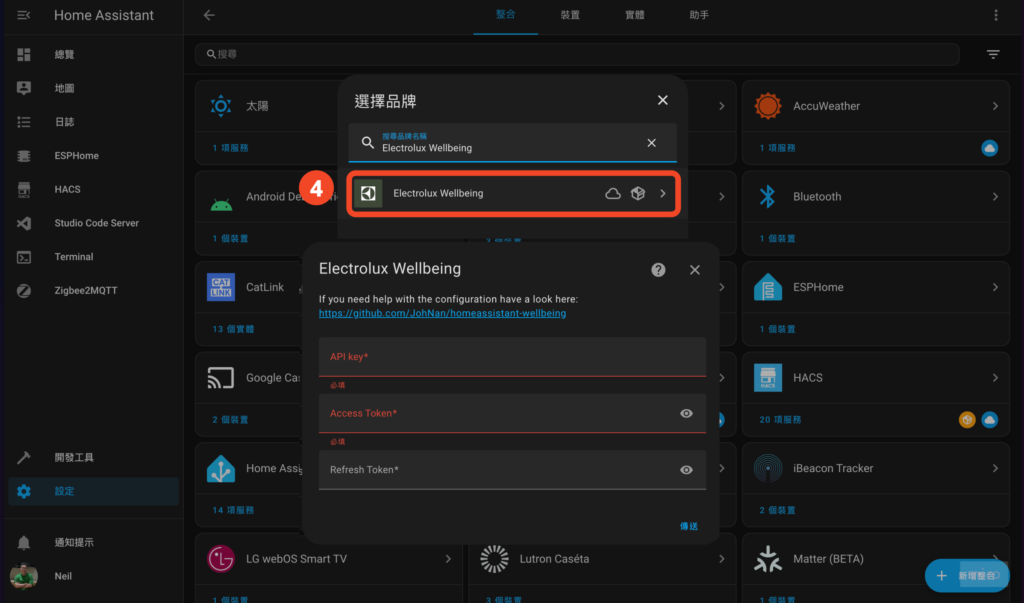
  1. Find and click "Electrolux Wellbeing"
找到並點選「Electrolux Wellbeing」

Step 3. Set up Electrolux Wellbeing

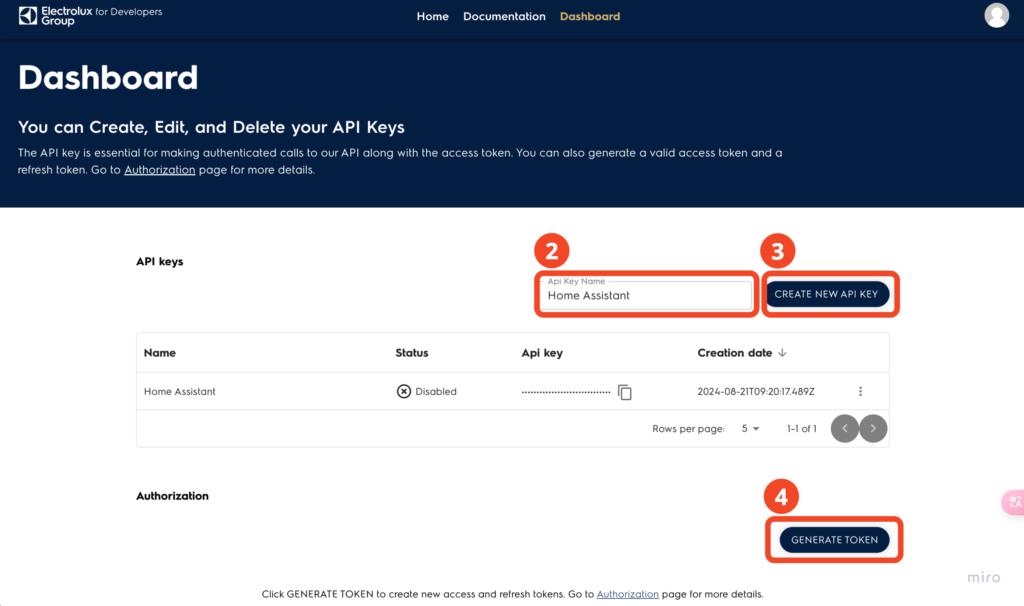
  1. Open and log in "Electrolux for developers"
  2. Enter the Api Key Name (this is for identification only, just give it a name you like)
  3. Click "CREATE NEW API KEY"
  4. Click "GENERATE TOKEN" below
取得 API KEY 及 TOKEN
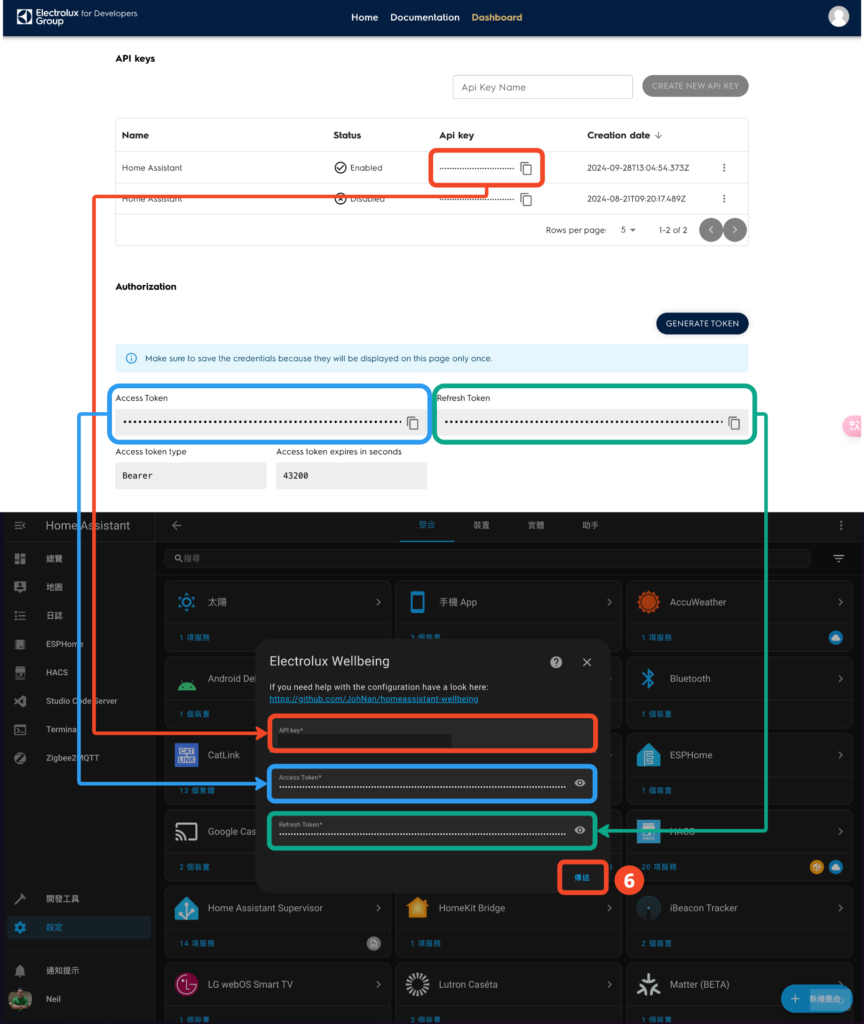
  1. Return to HA and continue to fill in the API key, Access Token, and Refresh Token.
  2. Click "Send"
回到 HA 依續填入 API key、Access Token、Refresh Token

You're done!

That’s it! We currently only have Pure A9 Air PurifierThis air purifier alone has various air quality indicators such as temperature, humidity, CO2, PM 2.5, etc. (as shown below). It is very useful when used with various automatic air conditioners, dehumidifiers, etc.!
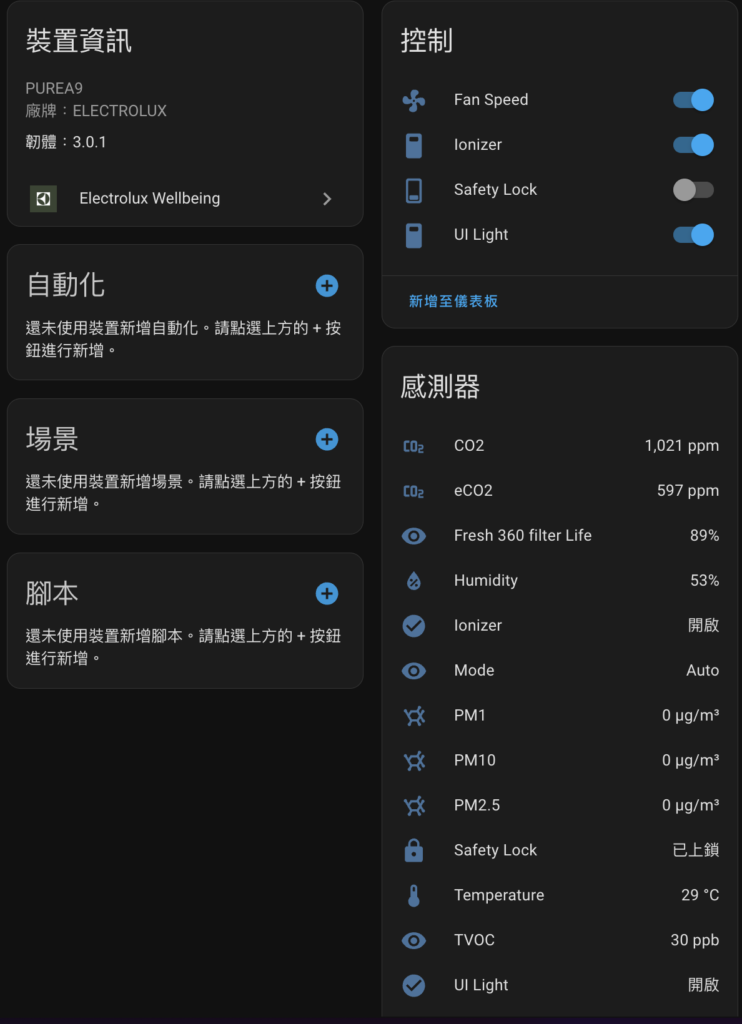
Electrolux Pure A9 空氣清淨機

If you still don’t know how to set up Home Assistant automation, you can also refer to these two tutorials:
7 COMMENTS
    • Hi BEN,
      First go to HACS and search for "Electrolux Wellbeing" and install it, then continue with the following steps. I missed this paragraph when I was writing it, so I just added it~

  1. Hi neil, I have a JIS 300 series air purifier
    After integrating into HA, you can only use the manual mode to adjust the fan speed and cannot use the smart mode. If you use the smart mode, an error will pop up.
    In addition, the device sometimes displays an unavailable status, but as long as it is left for half an hour, it will display normally again.
    The above problem only appeared after Electrolux added api key verification.
    I want to ask if anyone has the same situation QQ

    • Yes, yes, I have encountered the same situation as you. It turns out that I am not alone.

      I have 300 500, pure A9 and pure A9.2 at home.
      Extreme 300 and 500 smarts also report an error, but can use quiet mode. However, pure auto has no problem.

      I'm the same as you about API token, but I don't have a solution at the moment. I can only leave it alone and let it automatically recover. I saw someone on github changed the time interval from 60 to 120, and some people found that the API token is only valid for 24 hours...

      • I think the master on github said that the wind speed adjustment of the Extreme 300/500 only has 3-stage adjustment, unlike the A9, which can be adjusted without steps, so in HA, you can only choose quiet mode, which has a number of steps...
        In addition, after I changed the time to 120, it rarely became unavailable!!!!!

LEAVE A REPLY

Please enter your comment!
Please enter your name here

you might like
recent discussions
  • Neil 2025/05/29Hi Husn, I recommend using Zigbee or Matter for connection! Zigbee accesses HA through Z2M, Matter directly accesses, and WiFi accesses HA through Tuya, which is more troublesome. It is also recommended to find a rectangular one, because generally a small round smart socket inserted into a double socket will compress the space of the other socket.The Ultimate Guide to the Smart Home in 2025! – SMART HOME EP 6
  • Husn 2025/05/29I would like to ask you one more question. I want to use a smart socket to control traditional mechanical home appliances (electric fans). If it is Tuya's small round smart socket, can it be connected to HA? I see that it uses WIFI, or is it better to find one with MATTER? Thank you very much for your guidance.The Ultimate Guide to the Smart Home in 2025! – SMART HOME EP 6
  • Neil 2025/05/24Hi Andy, your understanding is correct. When the switch is turned off, the lamp will be disconnected directly. There are two ways to do this: 1. Replace the switch with a smart switch that supports the "decoupling" function, that is, the button and the relay can be separated, so that the lamp is always powered, and then the switch and lamp are linked through the smart central system. 2. [The switch must have a neutral wire] In the switch box, connect the live wire to the control wire (the control wire does not enter the switch) to change the lamp and switch from series to parallel, so that the lamp is always powered, and then set the switch in the smart central system to link the lamp★ If you are not sure about the wiring, it is recommended to find a professional plumber to handle it!A complete analysis of smart home lighting control solutions: smart switches, smart bulbs, smart relays, there is always one that suits you!
  • Andy 2025/05/24Sorry, I want to ask Neil a very basic question. Currently, we all use HomeKit. The switch has been replaced with a green-silver smart switch. Will there be any problems if the bulb is replaced with a smart bulb? After all, when the switch is turned off, the light should be disconnected directly. Will it show no response in HomeKit? Or can it be avoided by setting it as a group with other accessories? Thank you. I want to keep the position of the physical switch, but also want to control the light color and brightness. I hope you can give me some guidance.A complete analysis of smart home lighting control solutions: smart switches, smart bulbs, smart relays, there is always one that suits you!
  • raja 2025/05/24This article is written in great detail and is very helpful for those who want to get started with smart home! Looking forward to your follow-up tutorials, thank you for sharing!Home Assistant installation steps detailed, quickly build a smart home – step-by-step tutorial EP 1
  • Neil 2025/05/23Hi Husn, looks like there is a chance: https://www.facebook.com/share/p/1UyoRxwx7q/The Ultimate Guide to the Smart Home in 2025! – SMART HOME EP 6
  • Husn 2025/05/23Excuse me, but I have to ask again, is there any chance to achieve dual voice control? Can I use Xiao Ai or OK GOOGLE? In addition, because the Xiao Ai speaker I use has an infrared remote control function, if this part is changed to GOOGLE, is there any way to control it? Thank you very much for your answer!The Ultimate Guide to the Smart Home in 2025! – SMART HOME EP 6
  • Neil 2025/05/23Hi Husn, 1. Voice control: You can use Google Nest Hub for voice control. I am currently using Google Nest Audio. HA settings are in "Settings > Voice Assistant > Google Assistant" 2. Mijia and HA automation conflict: If the same automation is set in both systems, or both systems have automations to operate the same device, there may be conflicts. It is recommended to move all automations to HA management, once and for allThe Ultimate Guide to the Smart Home in 2025! – SMART HOME EP 6
  • Husn 2025/05/23Hello Neil, thank you very much for sharing. I have learned a lot. I would like to ask you a question. I have successfully set up HA with VM on NAS recently. I have also connected Xiaomi products to HA, but I still use Xiaoai for voice control. Is there any way to change this part to Siri or Google home products? For example, Google Nest Hub. I also want to ask, because I used Mijia to set up the automation before, and I still do, so if I switch to HA for setting up, will there be a conflict with Mijia?? Sorry, I have so many questions, thank you for your answers in advanceThe Ultimate Guide to the Smart Home in 2025! – SMART HOME EP 6
  • Neil 2025/05/21Hi Nichole, Home Assistant and Apple Homekit are different systems, so they don’t need to be the same account. If you want to connect a device that has been set up in Homekit to Home Assistant, you can Google to check “Homekit cannot be connected to Home Assistant”Home Assistant installation steps detailed, quickly build a smart home – step-by-step tutorial EP 1
you might like