Guide to traveling in Japan without walking: Experience alternative urban style with LUUP electric scooters

Traveling to Japan is a big test for your legs, especially when you want to visit every must-visit attraction and you have to hold on until the soles of your feet are blistered. However, with the LUUP electric scooter, it is much easier! Imagine riding a scooter and traveling through the bustling streets of major cities such as Tokyo, Osaka, and Yokohama. You no longer have to stop and rest when you get tired, and you have to worry about missing the store you want to go to.

Riding LUUP on the streets of Japan not only saves effort, but also makes it more fun. You can stop wherever you want. When you see a shop you like or a food stall on the street corner, you can stop and enjoy it immediately. LUUP makes your trip no longer a rush from one subway station to another, but a real urban adventure. Today I will introduce how this compact electric scooter can make your trip to Japan easy and fun.

Where can I use LUUP service in Japan?

LUUP services are available in Tokyo, Osaka, Yokohama, Kyoto, Utsunomiya, Kobe, and Nagoya. There are 4,900 stations nationwide (as of 2023/11), of which Tokyo is the most densely populated. Most stations are concentrated near stations, department stores, and convenience stores. It is of great help to tourists who use subway as the main mode of transportation.

東京、大阪、橫濱、京都、宇都宮、神戶、名古屋都有 LUUP 服務
Image Credit: https://luup.sc/en/news/tag/press-en/

Download and register LUUP

There are only two simple conditions for using LUUP services: over 16 years old and having a credit card.

  1. Download LUUP:App Store,Google Play
  2. Register and log in using your mobile phone number
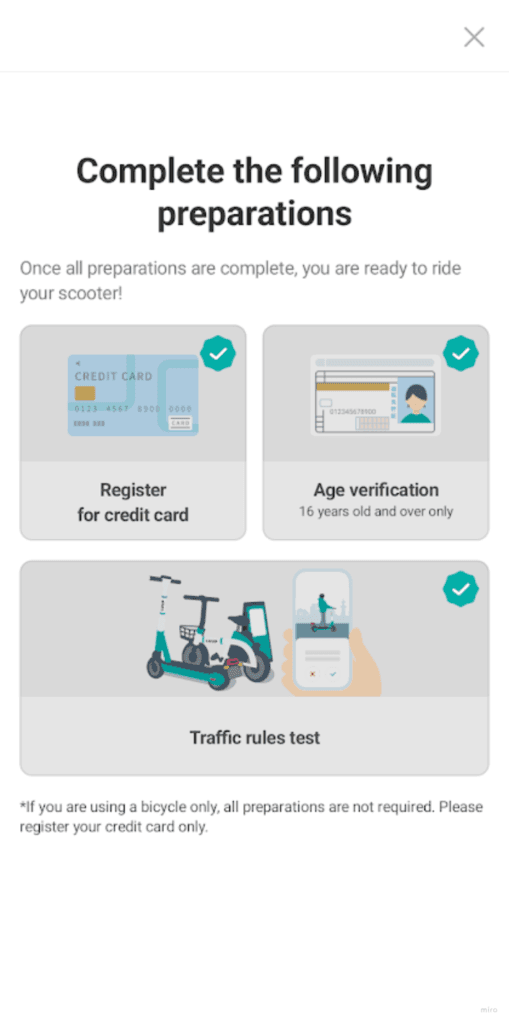
  3. Complete the verification process: Here you will need to bind your credit card, upload your identity document (passport), and complete the traffic rules test
LUUP 使用前三項驗證:信用卡、身分證明文件、交通規則測驗

Find a car and set an itinerary

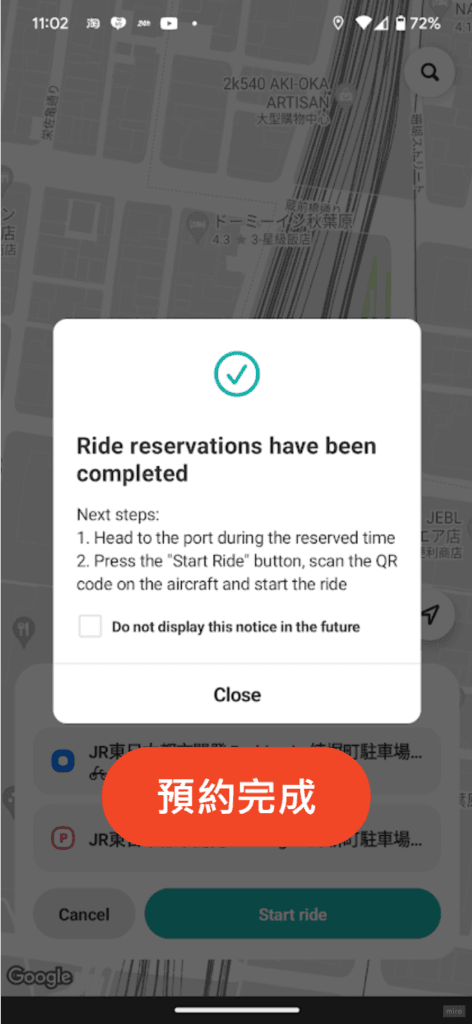
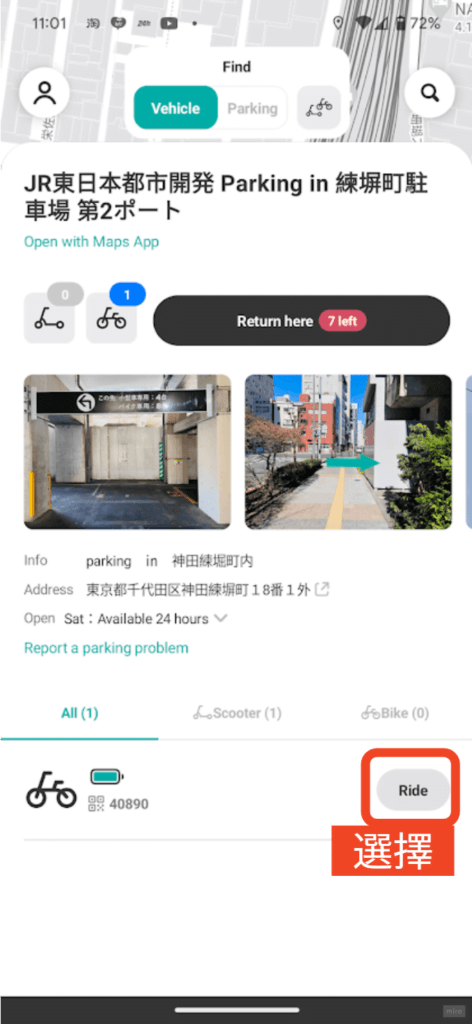
After opening LUUP, you can view nearby sites, select a site with vehicles, reserve a vehicle, set the return site, and the reservation is complete! It doesn’t matter if the parking spot is not determined yet, it can be changed during the next ride.
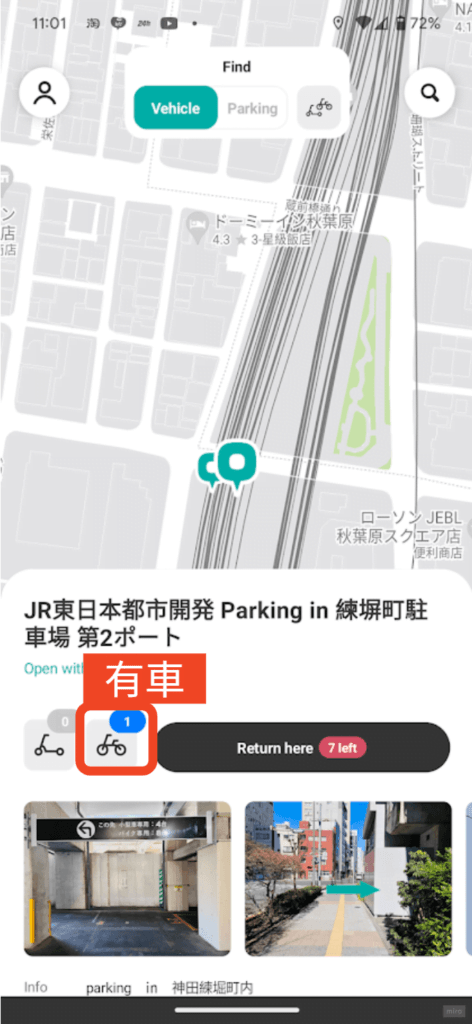
查找 LUUP 站點車輛資訊
預約 LUUP 車輛
設定 LUUP 還車站點
完成 LUUP 車輛預約

Start riding

After finding the reserved vehicle, scan the QR code on the vehicle to start the vehicle. The method of riding is also very simple. Just push your back foot to give the initial power, then press the switch with your right thumb to start moving!

LUUP 滑板車騎乘方式:後腳蹬、右手拇指推
Image Credit: https://luup.sc/news/2023-03-13-free-ride-week/

Arrive at destination

When you arrive at the parking site, you need to take a photo to ensure that you parked in the parking space. Once completed, you will pay directly with the bound credit card.

抵達 LUUP 還車站點
拍照記錄還車
LUUP 自動完成扣款

Let’s start gliding through Japan!

This trip to Tokyo was much more relaxed because of LUUP. I didn’t feel tired from walking every day when I went out to play before. The whole trip was even more chilling! Recommended to you!

1 COMMENT
  1. I also used LUUP when I went to Tokyo recently. It felt great. It felt very different from using other public transportation. It gave me a sense of local life.

LEAVE A REPLY

Please enter your comment!
Please enter your name here

you might like
recent discussions
  • Neil 2025/05/29Hi Husn, I recommend using Zigbee or Matter for connection! Zigbee accesses HA through Z2M, Matter directly accesses, and WiFi accesses HA through Tuya, which is more troublesome. It is also recommended to find a rectangular one, because generally a small round smart socket inserted into a double socket will compress the space of the other socket.The Ultimate Guide to the Smart Home in 2025! – SMART HOME EP 6
  • Husn 2025/05/29I would like to ask you one more question. I want to use a smart socket to control traditional mechanical home appliances (electric fans). If it is Tuya's small round smart socket, can it be connected to HA? I see that it uses WIFI, or is it better to find one with MATTER? Thank you very much for your guidance.The Ultimate Guide to the Smart Home in 2025! – SMART HOME EP 6
  • Neil 2025/05/24Hi Andy, your understanding is correct. When the switch is turned off, the lamp will be disconnected directly. There are two ways to do this: 1. Replace the switch with a smart switch that supports the "decoupling" function, that is, the button and the relay can be separated, so that the lamp is always powered, and then the switch and lamp are linked through the smart central system. 2. [The switch must have a neutral wire] In the switch box, connect the live wire to the control wire (the control wire does not enter the switch) to change the lamp and switch from series to parallel, so that the lamp is always powered, and then set the switch in the smart central system to link the lamp★ If you are not sure about the wiring, it is recommended to find a professional plumber to handle it!A complete analysis of smart home lighting control solutions: smart switches, smart bulbs, smart relays, there is always one that suits you!
  • Andy 2025/05/24Sorry, I want to ask Neil a very basic question. Currently, we all use HomeKit. The switch has been replaced with a green-silver smart switch. Will there be any problems if the bulb is replaced with a smart bulb? After all, when the switch is turned off, the light should be disconnected directly. Will it show no response in HomeKit? Or can it be avoided by setting it as a group with other accessories? Thank you. I want to keep the position of the physical switch, but also want to control the light color and brightness. I hope you can give me some guidance.A complete analysis of smart home lighting control solutions: smart switches, smart bulbs, smart relays, there is always one that suits you!
  • raja 2025/05/24This article is written in great detail and is very helpful for those who want to get started with smart home! Looking forward to your follow-up tutorials, thank you for sharing!Home Assistant installation steps detailed, quickly build a smart home – step-by-step tutorial EP 1
  • Neil 2025/05/23Hi Husn, looks like there is a chance: https://www.facebook.com/share/p/1UyoRxwx7q/The Ultimate Guide to the Smart Home in 2025! – SMART HOME EP 6
  • Husn 2025/05/23Excuse me, but I have to ask again, is there any chance to achieve dual voice control? Can I use Xiao Ai or OK GOOGLE? In addition, because the Xiao Ai speaker I use has an infrared remote control function, if this part is changed to GOOGLE, is there any way to control it? Thank you very much for your answer!The Ultimate Guide to the Smart Home in 2025! – SMART HOME EP 6
  • Neil 2025/05/23Hi Husn, 1. Voice control: You can use Google Nest Hub for voice control. I am currently using Google Nest Audio. HA settings are in "Settings > Voice Assistant > Google Assistant" 2. Mijia and HA automation conflict: If the same automation is set in both systems, or both systems have automations to operate the same device, there may be conflicts. It is recommended to move all automations to HA management, once and for allThe Ultimate Guide to the Smart Home in 2025! – SMART HOME EP 6
  • Husn 2025/05/23Hello Neil, thank you very much for sharing. I have learned a lot. I would like to ask you a question. I have successfully set up HA with VM on NAS recently. I have also connected Xiaomi products to HA, but I still use Xiaoai for voice control. Is there any way to change this part to Siri or Google home products? For example, Google Nest Hub. I also want to ask, because I used Mijia to set up the automation before, and I still do, so if I switch to HA for setting up, will there be a conflict with Mijia?? Sorry, I have so many questions, thank you for your answers in advanceThe Ultimate Guide to the Smart Home in 2025! – SMART HOME EP 6
  • Neil 2025/05/21Hi Nichole, Home Assistant and Apple Homekit are different systems, so they don’t need to be the same account. If you want to connect a device that has been set up in Homekit to Home Assistant, you can Google to check “Homekit cannot be connected to Home Assistant”Home Assistant installation steps detailed, quickly build a smart home – step-by-step tutorial EP 1
you might like