If you do not have a professional background in water and electricity, and want to handle smart homes by yourself, the first and easiest place to get stuck is how to make a smart switch. Today I will use my own experience to share with you how to use the zero fire switch setting in Home Assistant. It doesn’t matter if you don’t use Home Assistant as a smart home hub system to determine the multi-cut synchronization method. The previously installed parts are basically the same. Only the dual-cut synchronization part can be set in the respective systems.
Table of contents
What is "zero fire"?
"What is "Zero Fire"? ’ may be the first question that pops into your mind.
If you have been collecting information related to smart homes, you may see many people saying, "To make a smart home, just pull the neutral line on the switch first" or "Remember to pull the neutral line"...etc., and "Zero "Fire" two words:
- "Zero" refers to the "zero line", also known as the "neutral line" and "water line".
- "Fire" refers to "line of fire".
Corresponding to the "zero fire switch" is the "single fire switch". In Taiwan, in the past, switches generally had the live wire in and the lamp load wire out. This is called "single fire"; the so-called "zero fire" means that the switch and the electrical box are connected to the neutral wire. and the live wire, and the other side is connected to the load wire of the lamp, as shown in the figure below:
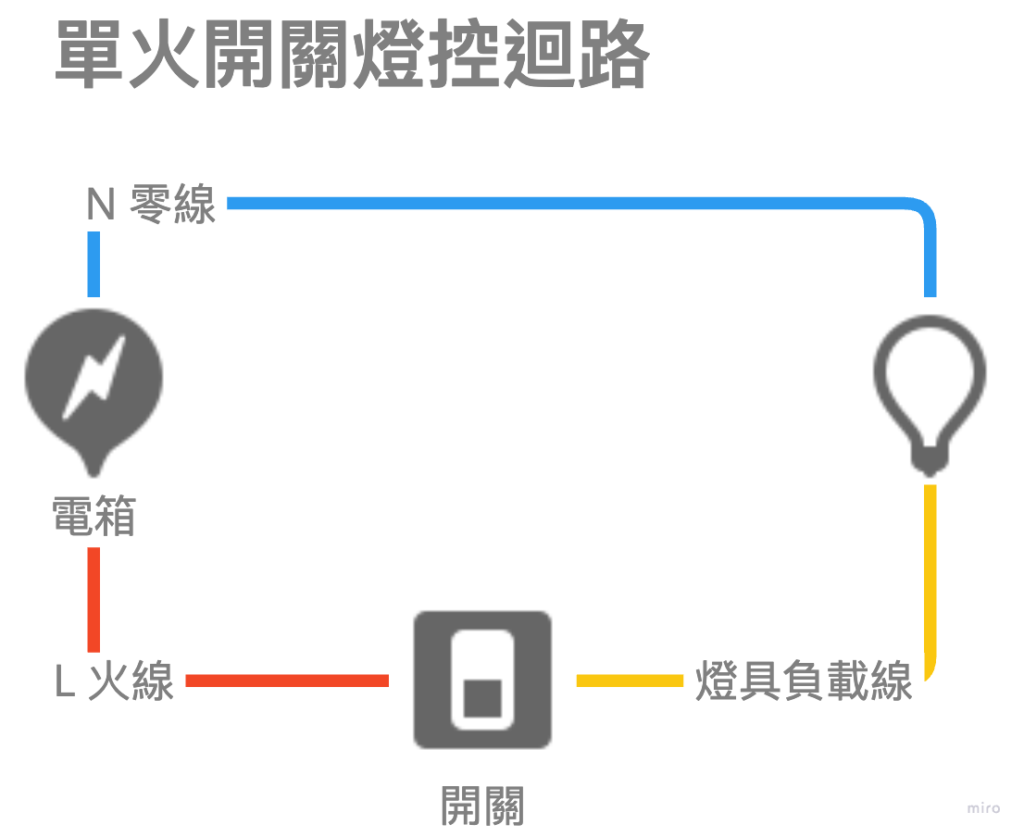
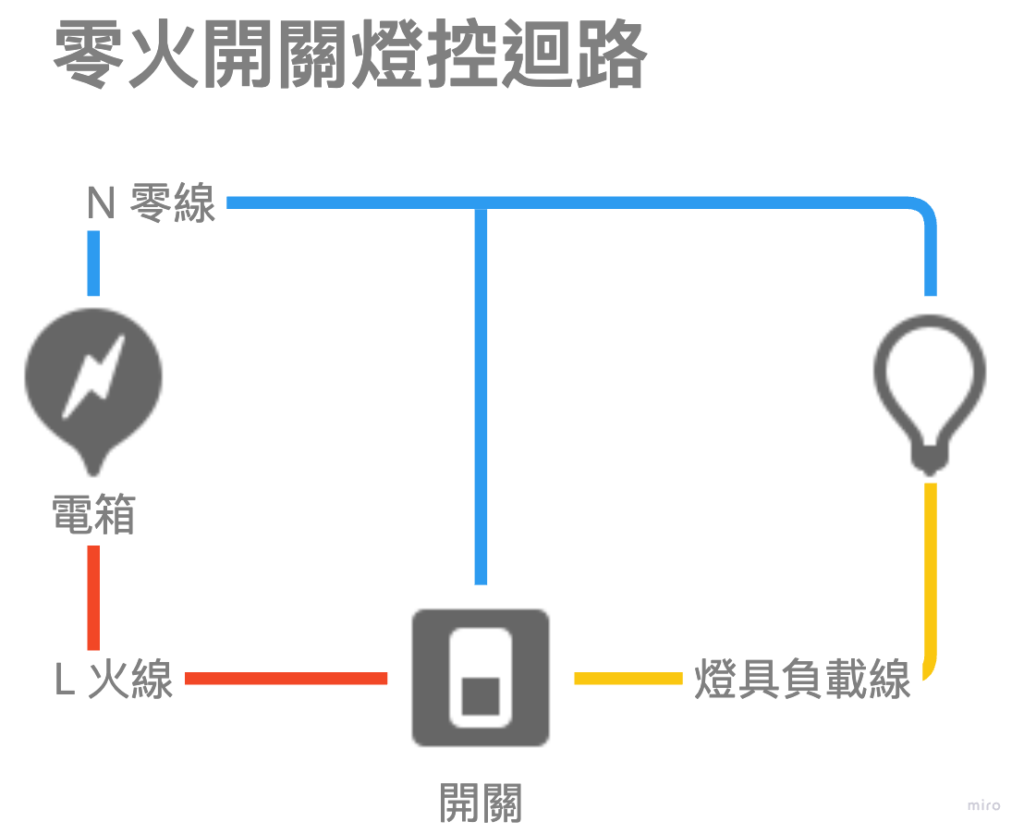
More complete zero-fire switch circuit wiring instructions:

Why does a smart switch need a neutral wire?
The reason why smart switches need a neutral line is to allow the switch itself to have a stable current to maintain the connection between the switch and the smart home central system when the lights are turned off.
From the above circuit diagram, we can know that when the general switch does not turn on the light, the switch itself has no current, so there is no way to connect to the smart home system in any way; in order to solve the problem, there is no way to add zero There are also many "single fire switch" smart switch products on the market, that is, smart switches that do not require a neutral wire. The principle of a single fire switch is to pass a small current through the original live wire and light wire to switch the smart switch. powered by.
Isn’t the single fire switch nice?
The single-fire switch is of course great for people who have no way to pull the neutral line but want to enjoy the convenience of a smart home, but of course they have to pay a corresponding price. The disadvantages and solutions of the single-fire switch:
Will-o'-the-wisp problem
In order to be able to connect to the smart home system, the single-fire switch will supply power to itself through a small amount of current in the circuit. Therefore, when the single-fire switch happens to encounter a lamp with a small wattage that can store electricity, it will recharge when it is fully charged. The explosion produces a will-o'-the-wisp; the solution is to connect a higher wattage capacitor across the lamp end so that this tiny amount of current can be released. However, this will be another expense and also increase the entire circuit. complexity, there will be one more link to consider during future maintenance.
Possible loss of lamps
Because the single-fire switch will release a small amount of current to the lamp for a long time and will not completely cut off the power, the single-fire switch will cause additional losses to the lamp.
Limited functionality
If you, like me, choose Zigbee as the main device connection method in your smart home, then the zero-fire switch will also be a better choice, because the zero-fire switch has complete current support and can become a repeater in the Zigbee mesh network To extend the Zigbee network coverage, the single-fire switch cannot become a Zigbee relay because it only draws a small amount of current from the circuit.
How to install zero fire switch with double cut and multi cut?
Without further ado, let’s go straight to the picture!
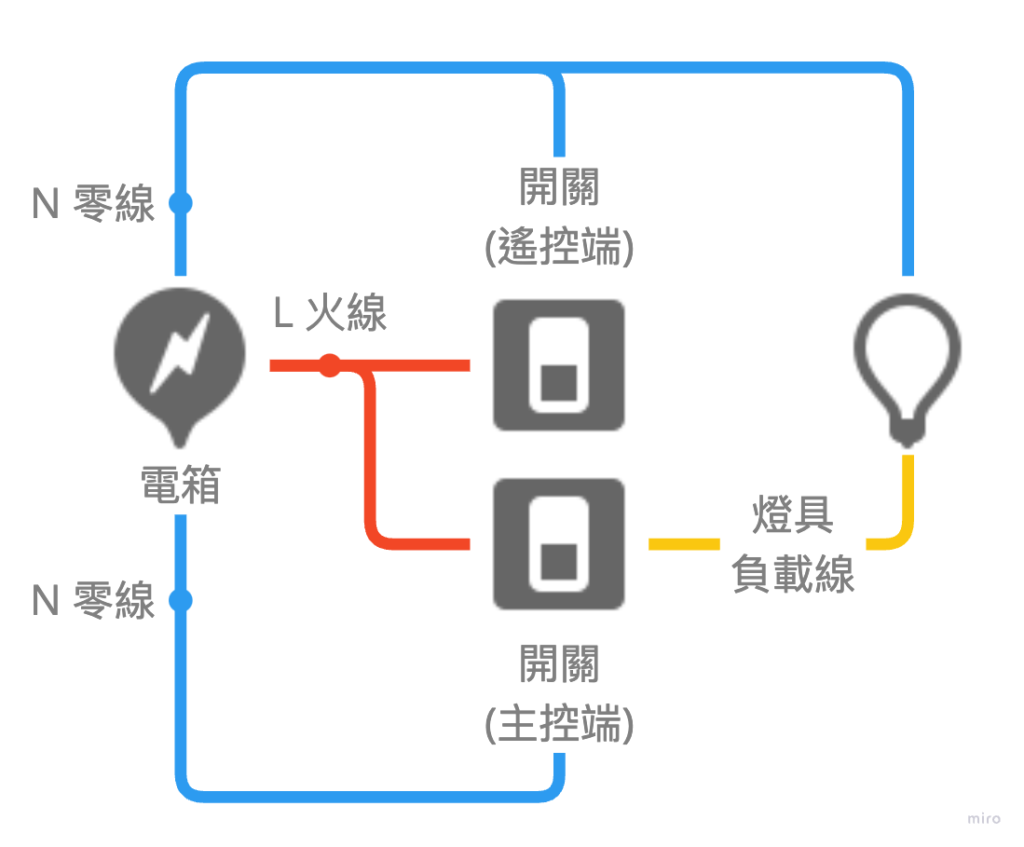
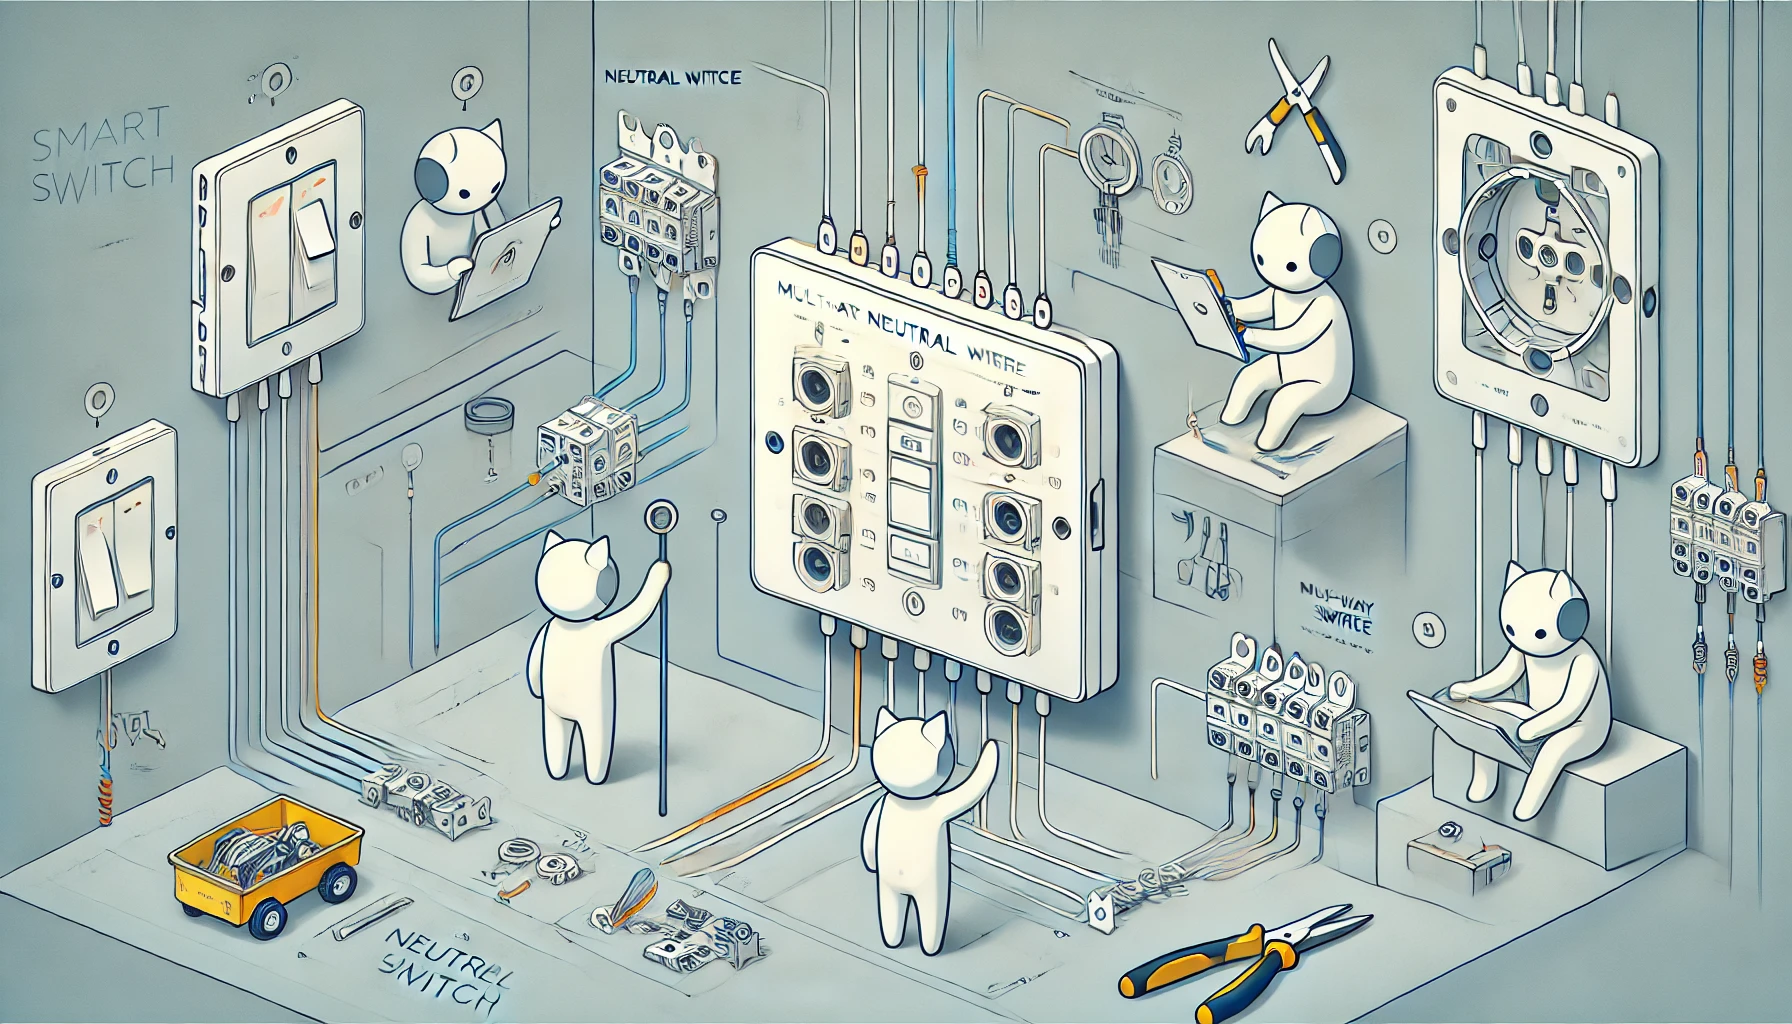
One end is the "main control end", which is connected to the live wire, neutral wire, and light wire, and is the part that is actually wired to control the lamp; the other end, the "remote control end", is only connected to the neutral wire and live wire, so that the switch itself has power and can be connected to the smart home. The central system is wired for control.
In fact, the concept is that simple. You can use the remote control as much or as little as you want. In fact, you still need to decide the method of operation based on the condition of your home wiring. If you don’t have enough electrical knowledge, you should leave it to a professional plumber. It’s safer! Please also respect the profession and don’t give my article to the plumbers to follow before you understand it🤣
After completing the installation of the hardware, only the main control switch can control the lamps. Pressing the switch on the remote control will not affect the lamps. This is normal. Please don’t be nervous. Next, you only need to connect the main control and remote control in the smart home system. By setting the linkage on both ends, you can achieve double-cut control.
How to set dual-cut and multi-cut switches in Home Assistant?
Friends who don’t know how to use Blueprint in Home Assistant can refer to the following article first:

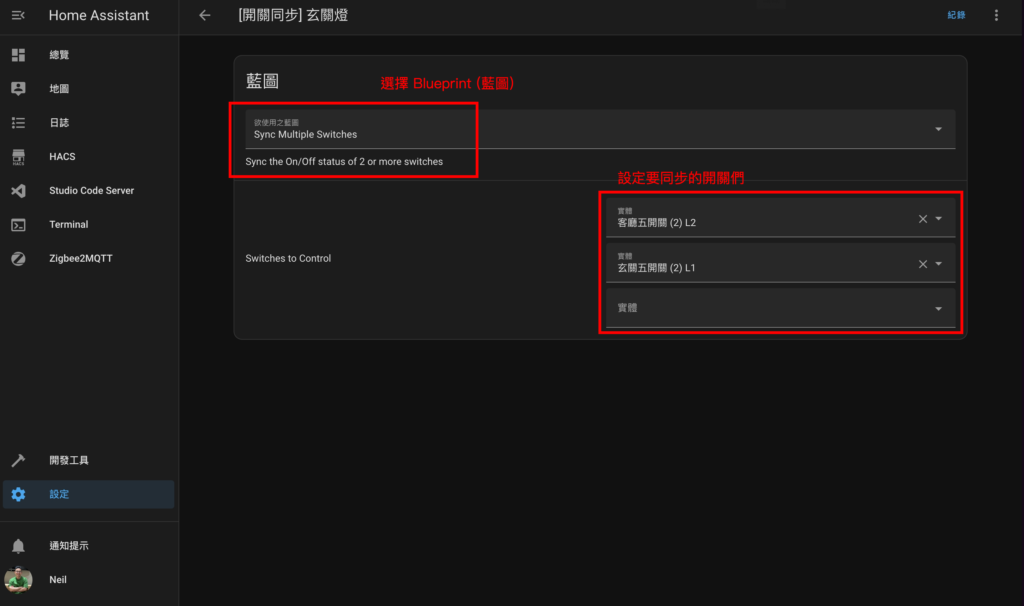
Here we use the "Sync Multiple Switches" Blueprint to set up, add the switches we want to link, and the setting is complete!
FAQ
What do "zero fire" and "single fire" mean? What's the difference?
"Zero fire" means that the switch needs to be connected to the neutral wire, while "single fire" means that the switch does not need to be connected to the neutral wire.
What should I do if my switch has no neutral wire?
Ask a plumber to pull the neutral line, or change the line yourself (there is danger). You can refer to:https://youtu.be/oShovxG_7UM.
Hello Neil, my family is planning to build a smart home recently. The designer has given me an estimate, but I am currently having problems with the lamps and switches.
The quotation includes the switch circuit, switch circuit, and light circuit.
I asked someone and they said that there is no need to switch the circuits, as it can be set up through the smart switch backend.
But other circuits (switch circuit, light circuit) are still necessary
In addition to the need for neutral wires in smart switches, each smart lamp must also have a neutral wire in order to individually control the brightness, switch, and color temperature of each lamp. Otherwise, traditional lamps that support color temperature and brightness control must be used, and the controller must be hidden in the ceiling. This method is more cost-effective and can control the lamps of an entire circuit at once, but it is not possible to control them individually.
Is the above understanding wrong? How did you choose the lamps in your home? Thanks for clarifying my doubts.
Hi Frank,
1. The cut-off circuit is indeed not necessary when using a zero-fire switch, but I still keep it in case the new owner needs it in the future.
2. The combination of smart switches and smart lamps is more complicated. There must be a neutral line at the lamp. If your lamp is controlled individually, you only need to connect the live wire and the load line directly at the switch (and branch them to the switch at the same time. At this time, the switch does not actually affect the lamp). In this way, the lamp will always have power, and then control the brightness and color temperature of each lamp through the smart hub, and set the switch to link the lamp.
My current choice is a smart switch with a traditional recessed light, because we don’t really need to control the brightness and color temperature at home. Of course, it’s good to have it, but whether the usage rate is high enough is something you need to evaluate yourself according to your usage needs.
Hi Neil
Sorry to ask for advice
Do you know if the switch adding method of vizo single fire version is the same as that of zero fire version? I have tried it and found that the zero-fire version can be successfully added to HA, but the single-fire version cannot be found.
I can't find any information online, so I want to ask you for advice.
I also want to ask, I have used Blueprint to add the switches I want to link to Multiple Switches, but the linkage is still not successful. However, a double-open switch appears. Should that switch remain permanently open? Or are there any other settings that we should pay attention to in the future?
Hi L,
Blueprint should not generate another switch, that may be your other switch device
The information you provided is a bit too little, so it's hard to tell where the problem is. You can send us a private message on IG and take a screenshot of your settings.
https://www.instagram.com/_eggshell_diary/
Hi L,
Are your single-fire and zero-fire switches connected via Zigbee? If yes, use Z2M/ZHA to access HA
If it is a WiFi connection, you may want to try local Tuya access
Hi Neil, they are all Zigbee, and later they all joined with ZHA smoothly!
Thanks~
"Add the neutral wire to the switch end and the live wire to the lamp end."
Can I ask if only one can be used (one is a smart switch and the other is a Relay)?
If so, which one do you recommend?
Hi HHA,
If the relay can be plugged into the electrical box or switch box, then choosing relay or switch is almost the same. However, whether it is switch or relay, it is recommended to use the neutral version!
If you choose directly, I would recommend choosing a switch. One less device and one less variable "light bulb, switch" vs "light bulb, relay, switch". One less device will make future debugging less complicated.
Hi Neil,
I have successfully added the vizo switch to Z2M (and can control the switch in the Z2M interface), but I cannot find the "entity" of the switch. I would like to ask how to set the "entity" of the device.
(From Settings-Devices and Services-Entities, I can't find any switch entity QQ at all, so I can't select the switch to be synchronized in the blueprint)
Hi Geo,
If everything is set correctly, you should be able to see it. Look in the following two places:
If you can't find these two places, there is probably a problem during the setting process. It is recommended to restore and then set it again.
Thank you Neil~
The reason is that in Settings > Devices and Services > Integration > MQTT, MQTT was not automatically added. After manually adding the integration, the entity ran out!!!
You can also use blueprints to double-cut smoothly>
Thank you very much
So good 👍
Hi Neil,
Please tell me about the synchronization of one-to-many switches (for example: one touch). Is there any way to achieve it if it is the built-in automation of HA?
My usage scenarios are as follows: A (remote control), BCD (physical control)
A On/Off: BCD on/off at the same time
Any one of BCD is opened: A is opened in conjunction with others, and the others remain as they are.
BCD all off: Linked to A
Currently I use 2 automations, and there is a disco phenomenon (that is, the light turns on quickly and then turns off quickly)
Hi Mark,
HA can achieve one-to-many switch synchronization. It seems that the problem should be a conflict in the automation logic you currently set, because your second and third logic will trigger the first logic. Try adjusting it to the following logic:
In vernacular terms the effect is:
It can probably be understood that the effect you want to achieve is "no matter how many times the light is turned on, it must be fully turned off, and no matter how many times it is turned on, it must be fully turned on." But the logic itself conflicts. If you want to achieve it, you will need two one Touch buttons, one is responsible for fully opening, the other is responsible for fully closing
But it’s no longer one touch, it’s become “two touch” 🤣
Hi Neil,
I later switched to "situational" control, which became simpler and easier to maintain.
In addition, Blueprint is really easy to use. I used this to set up double-cutting and even multi-cutting at home.
grateful
👍 Using situational processing is also a good way
OK, I'll try it, thanks.
Where can I find the [Sync Multiple Switches] blueprint?
Hi childe,
For blueprint search steps, please refer tohere
Or go directly to this link:
https://community.home-assistant.io/t/general-sync-switches/367102/12
grateful