透過語音控制智慧家庭大家應該再熟悉不過了,甚至在手機上大家也很常用 Hey Siri 或是 OK Google…等方式呼叫語音助理,延續上一篇:

我們將 Home Assistant 的語音助理更換成 Google Gemini 或是 ChatGPT,讓 Home Assistant 語音助理的回應不會像 Siri 這麼生硬也更聰明,甚至可以依照自己的喜好賦予人設,但不過當時還只能打字互動。
今天帶大家使用 ESP32-S3-BOX-3 來建置 Home Assistant 自家語音助理,這比起透過 HomeKit Bridge 或 Google Home 整合將裝置同步到 HomeKit 或 Google Home,再使用 Siri 或是 Google Assistant 語音控制來得更直接,也更可以依照自己的喜好打造更適合的語音助理 👍
先讓大家看看最終的效果:
很棒吧!這麼簡單就可以體驗古代皇帝的生活 🤣
不囉唆,我們開始吧!
目錄
ESP32-S3-BOX-3 開箱
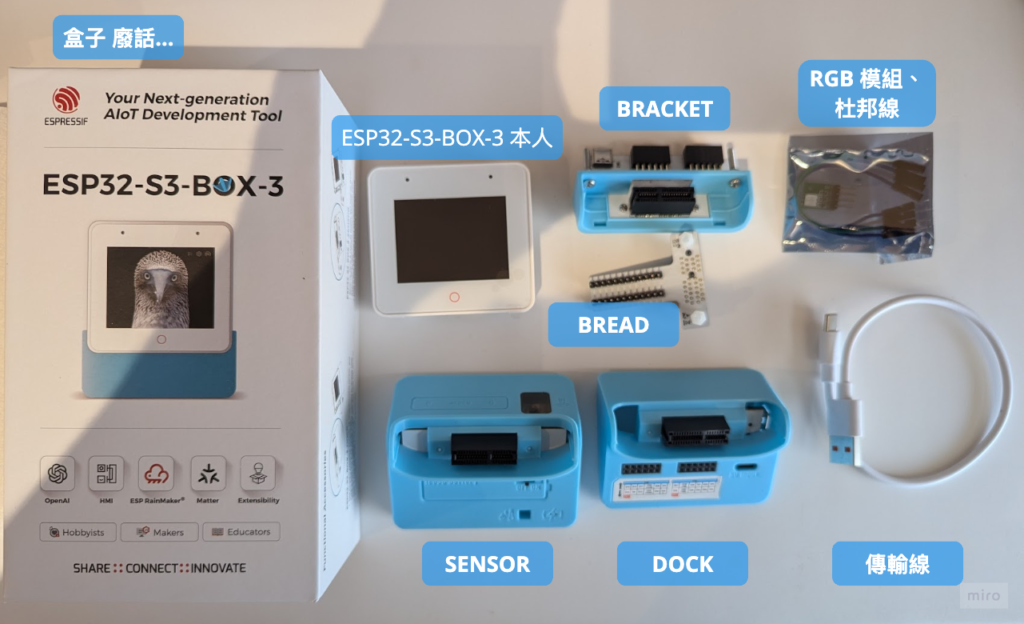
內容物:
- ESP32-S3-BOX-3 本人:這就是主機,不管其他配件插上電也可以直接使用。
- DOCK:底座,上面有接口可以再串接其他的裝置。
- SENSOR:和 DOCK 差不多作用,但多了溫濕度傳感器、紅外線發射器\接收器、雷達傳感器、充電電池插槽、MicroSD 插槽,雖然今天都用不到,但因為比較帥所以我用這個 🤣
- BRACKET:轉接用配件,可以用這個把主機安裝在其他裝置上。
- BREAD:轉接用配件,用來和麵包板 (Breadboard) 連接。
- 傳輸線
- RGD 模組、杜邦線
以今天我們要做的事,其實可以買「ESP32-S3-BOX-3B」就好,包含主機和 DOCK,其他的都不會用到,你要買的時候考慮一下。
Step 1. 安裝並啟動 ESPHome 附加元件
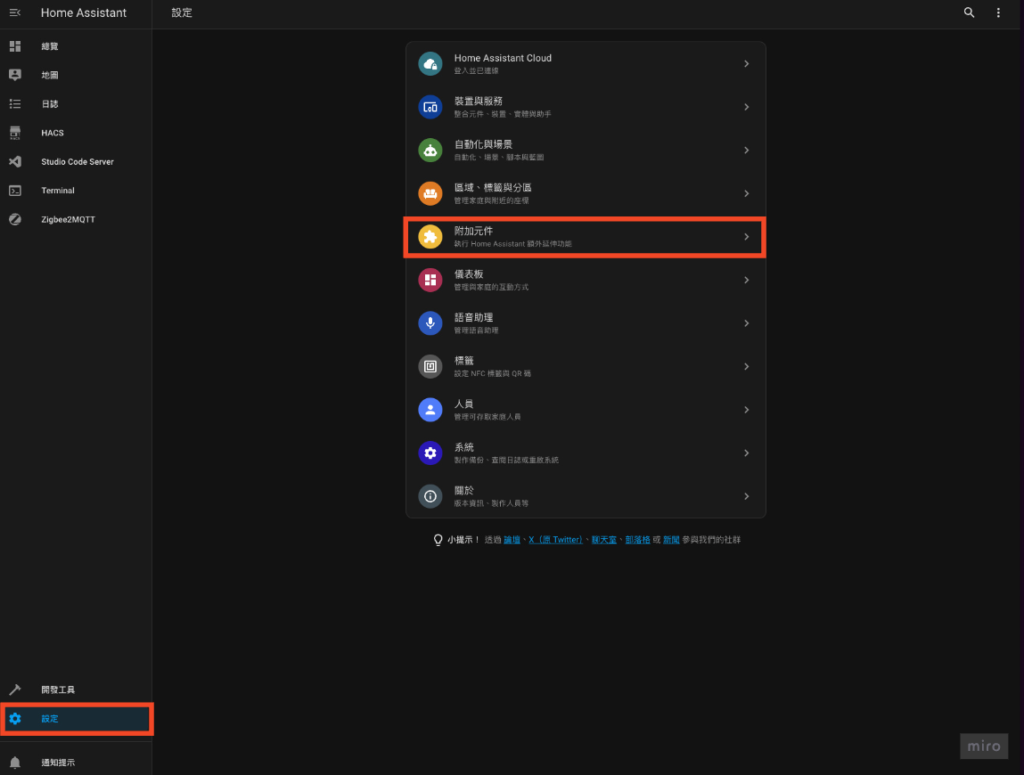
Step 1-1. Home Assistant 左側「設定」 ➜ 「附加元件」
Step 1-2. 安裝「ESPHome」
- 右下角點選「附加元件商店」
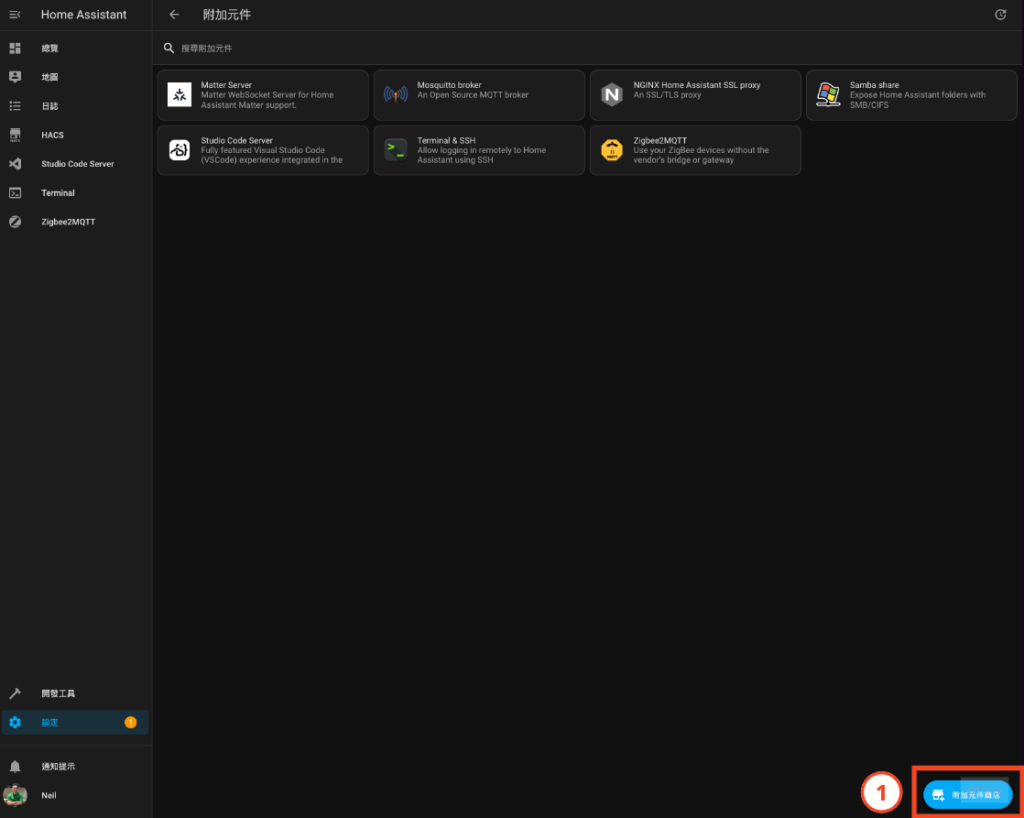
- 找到「ESPHome」並點擊

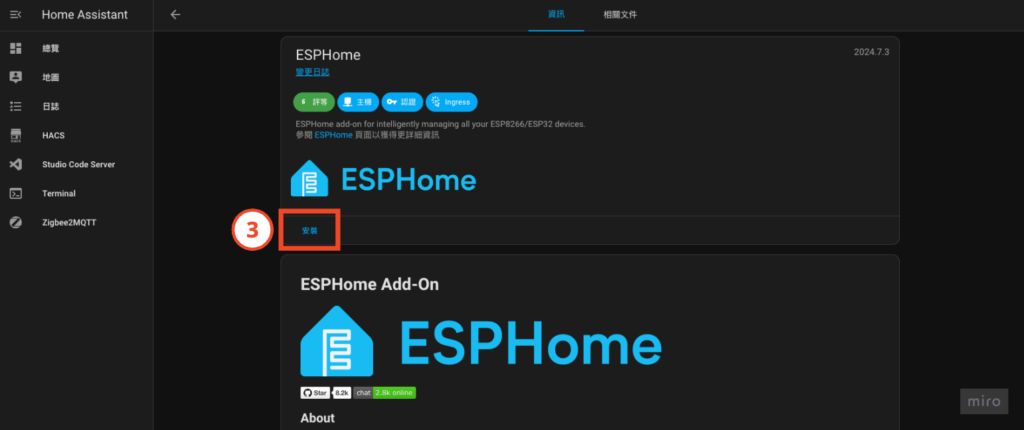
- 安裝「ESPHome」
- 開啟 Watchdog、自動更新、於側邊欄顯示
- 點擊「啟動」
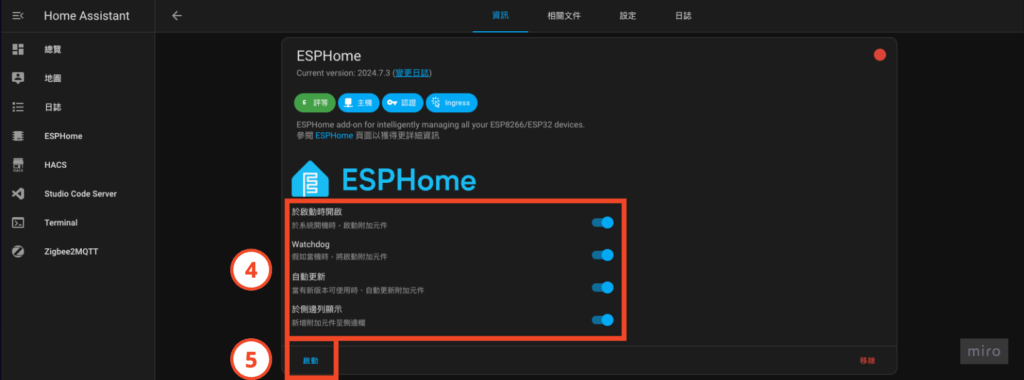
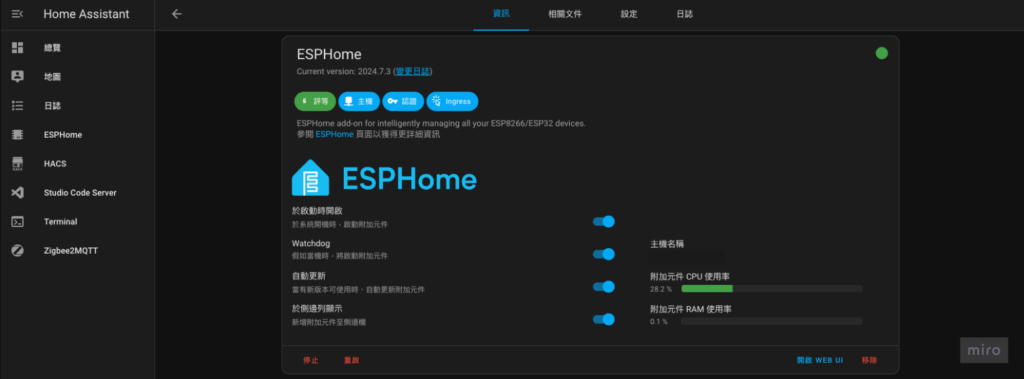
- 「ESPHome」啟動完成!
Step 2. 安裝 openWakeWord 附加元件
Step 2-1. Home Assistant 左側「設定」 ➜ 「附加元件」

Step 2-2. 安裝「openWakeWord」
- 右下角點選「附加元件商店」

- 找到「openWakeWord」並點擊

- 安裝「openWakeWord」
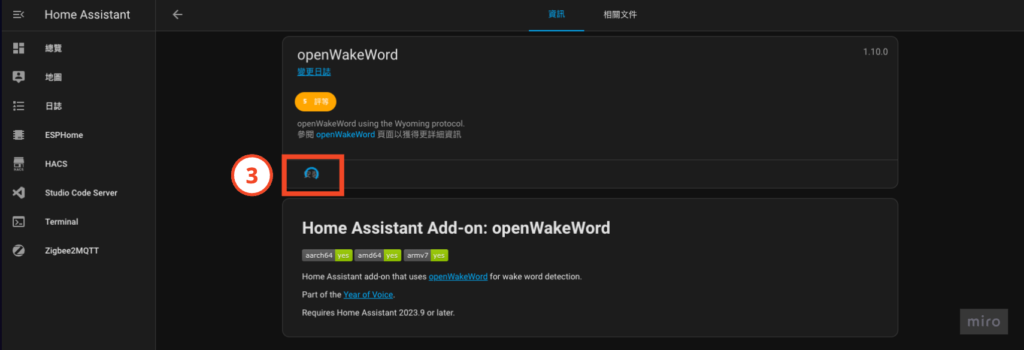
- 開啟 Watchdog、自動更新
- 點擊「啟動」
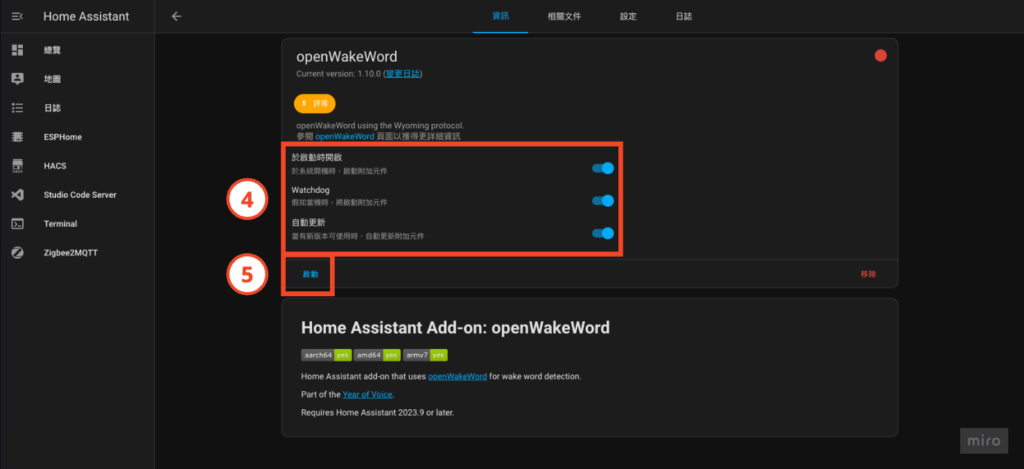
- 「openWakeWord」啟動完成!
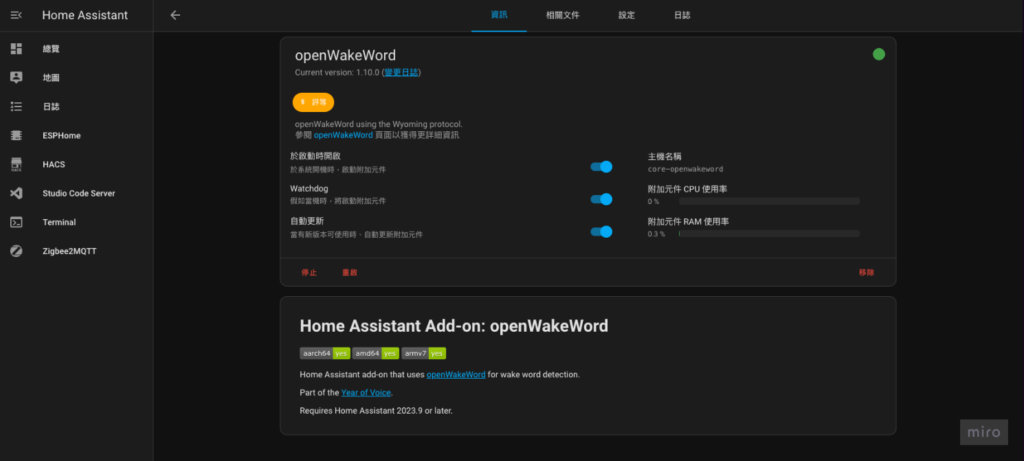
Step 3. 新增「openWakeWord」整合
Step 3-1. Home Assistant 左側「設定」 ➜ 「裝置與服務」
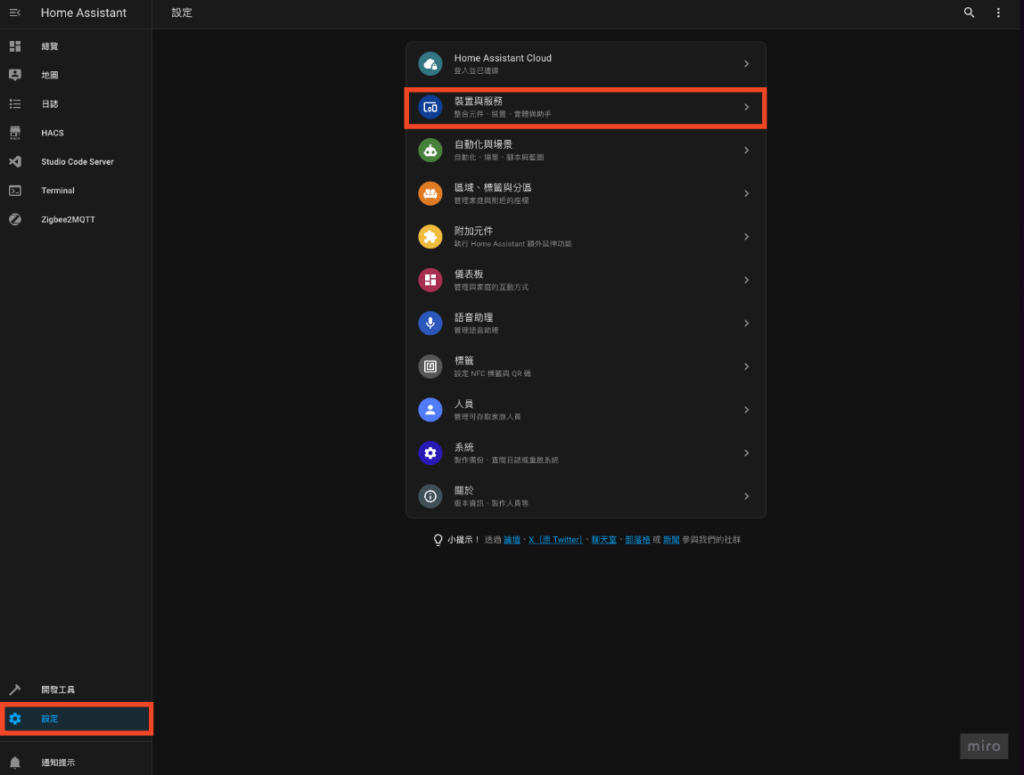
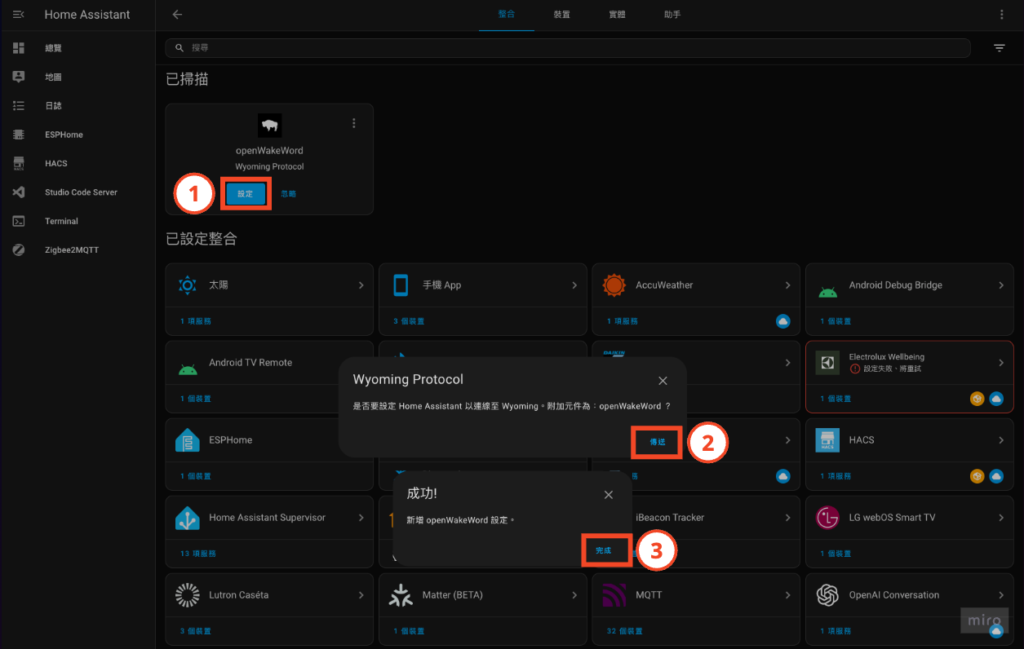
Step 3-2. 設定「openWakeWord」整合
- 這時候會在「已掃描」區塊出現「openWakeWord」,點擊「設定」
- 系統會詢問是否使用 Wyoming Protocal,點擊「傳送」
- 在成功訊息視窗點擊「完成」
Step 4. 設定語音助理喚醒詞
Step 4-1. Home Assistant 左側「設定」 ➜ 「語音助理」
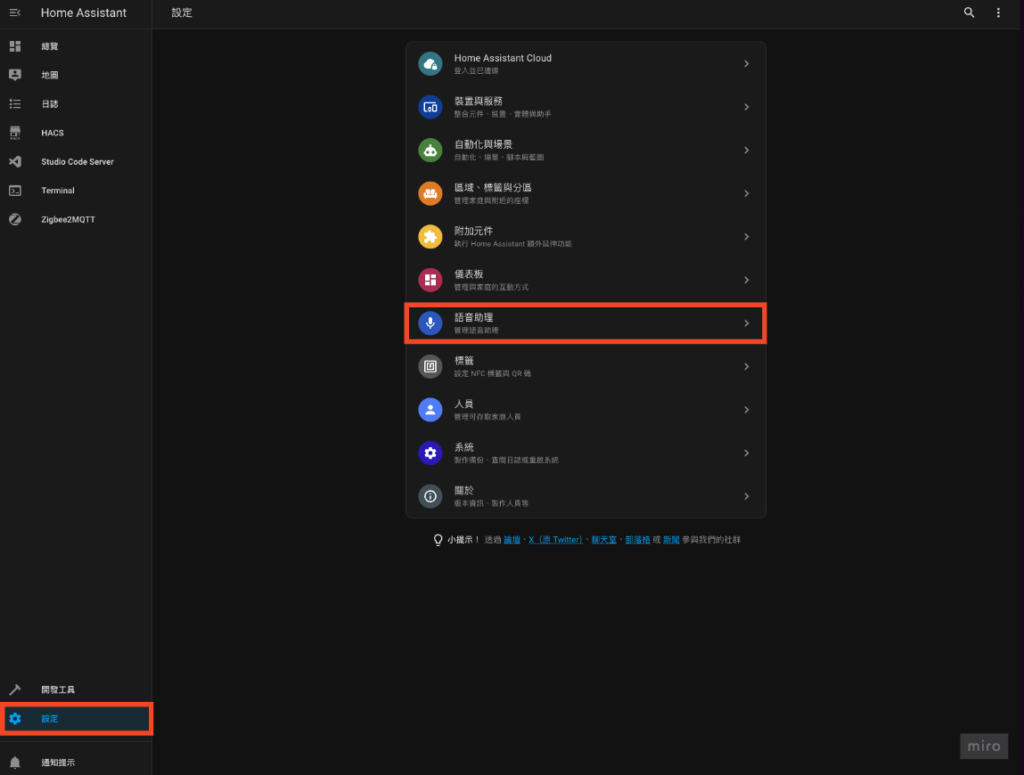
Step 4-2. 選擇語音助理

Step 4-3. 設定喚醒詞
- 喚醒詞引擎選擇「openwakeword」
- 喚醒詞選一個你自己喜歡的,這裡示範選擇「ok nabu」
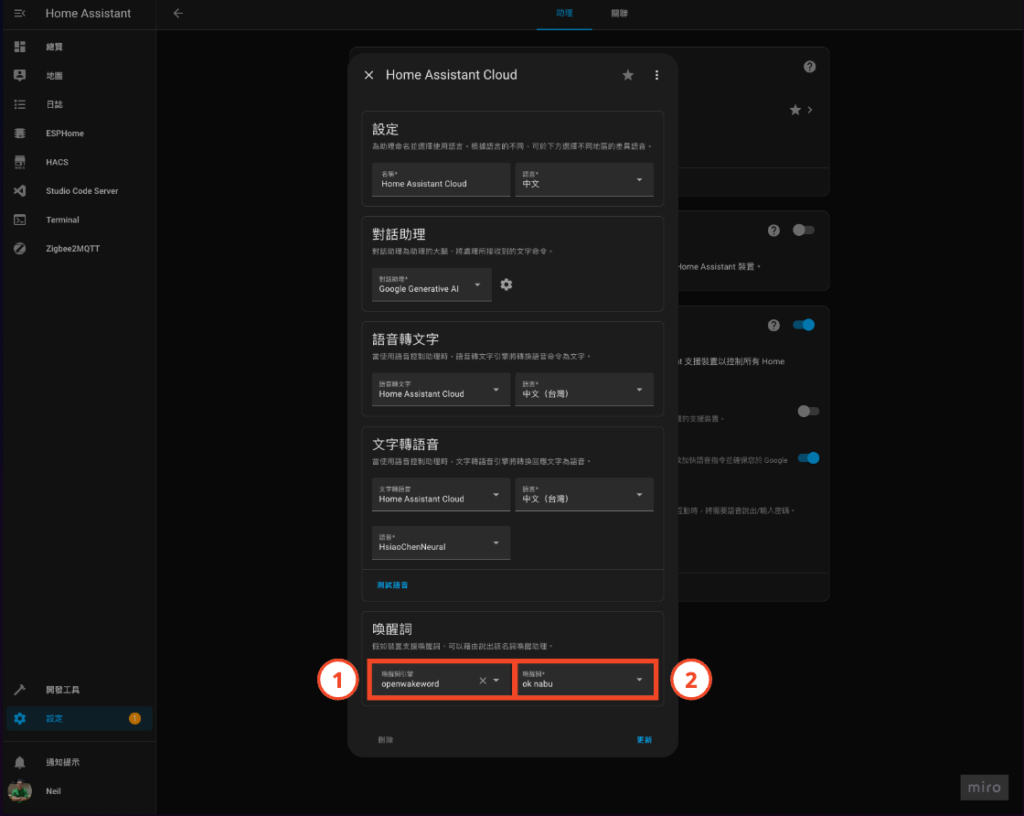
到這裡就把喚醒詞設定好啦~接下來進行 ESP32-S3-BOX-3 的安裝和設置!
Step 5. 安裝、設置 ESP32-S3-BOX-3
⚠️ 注意!如果過去有安裝過 S3 BOX,務必先到「設定 > 裝置與服務 > ESPHome」找到 S3 BOX 並刪除 ⚠️
Step 5-1. 刷 ESP32-S3-BOX-3 韌體
- 前往 ESPHome 專案網站:https://esphome.io/projects/index.html
- 選擇「Voice assistant」
- 選擇「ESP32-S3-BOX-3」
- 點擊「Connect」
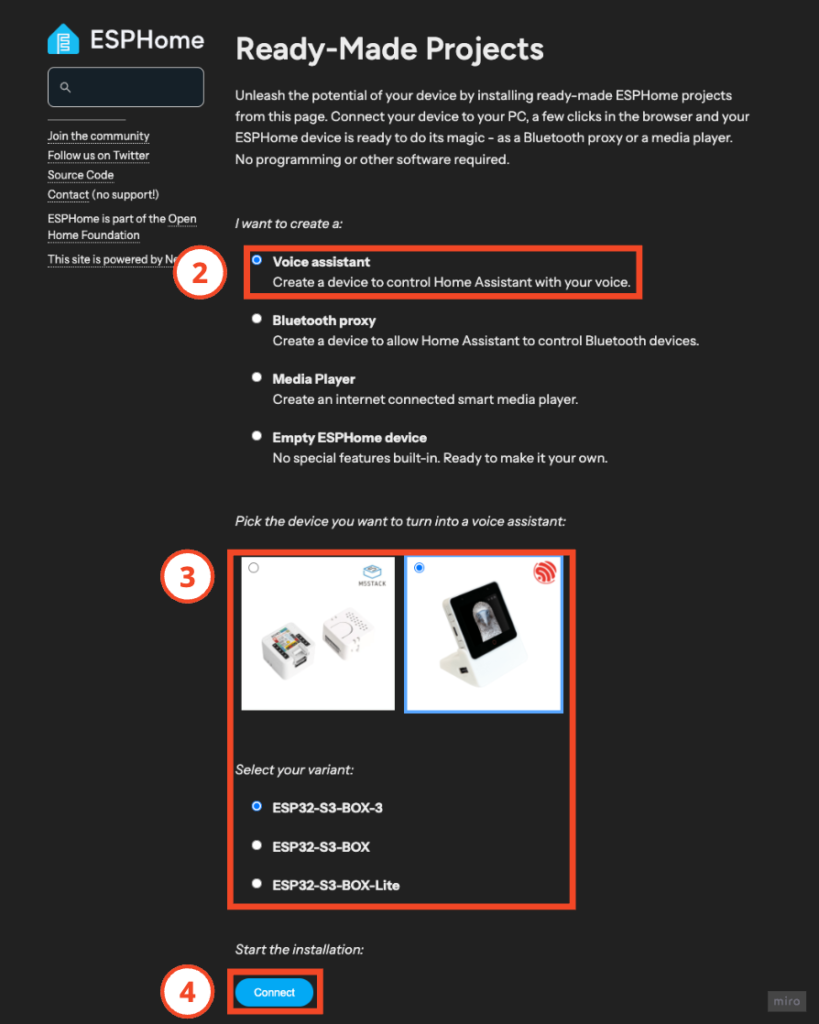
- 將 ESP32-S3-BOX-3 透過傳輸線連接到你的電腦
- 選擇 ESP32-S3-BOX-3 裝置
- 點擊「連線」
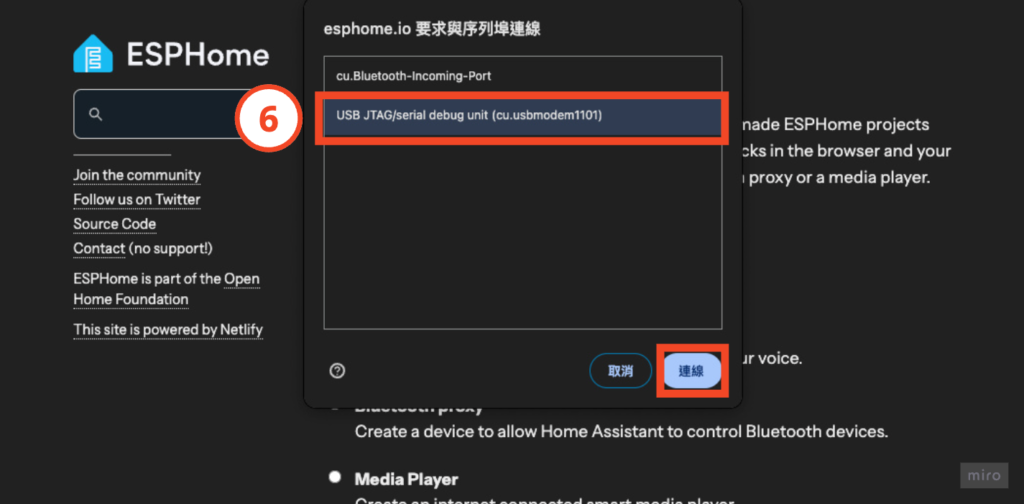
- 選擇「Install ESP32 S3 Box 3」
- 點擊「Install」
- 點擊「Next」
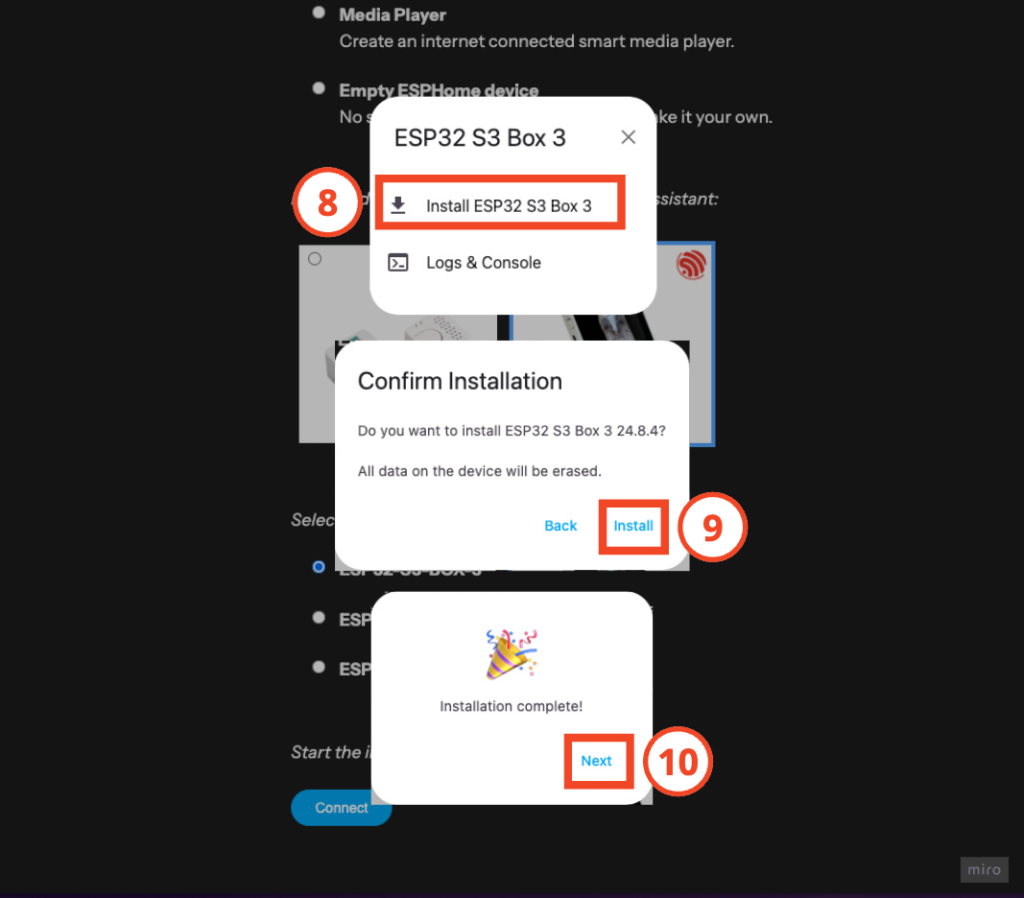
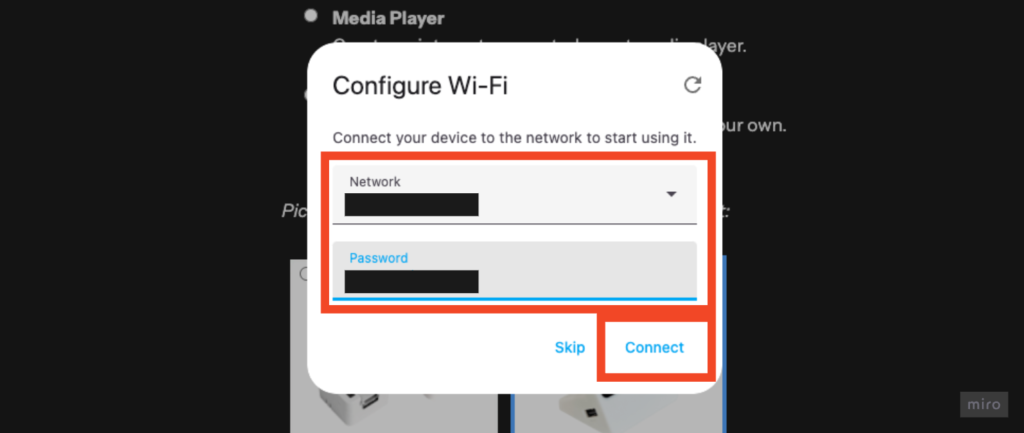
Step 5-2. 設定 WiFi 連線
輸入家中的 WiFi 連線資訊並點擊「Connect」
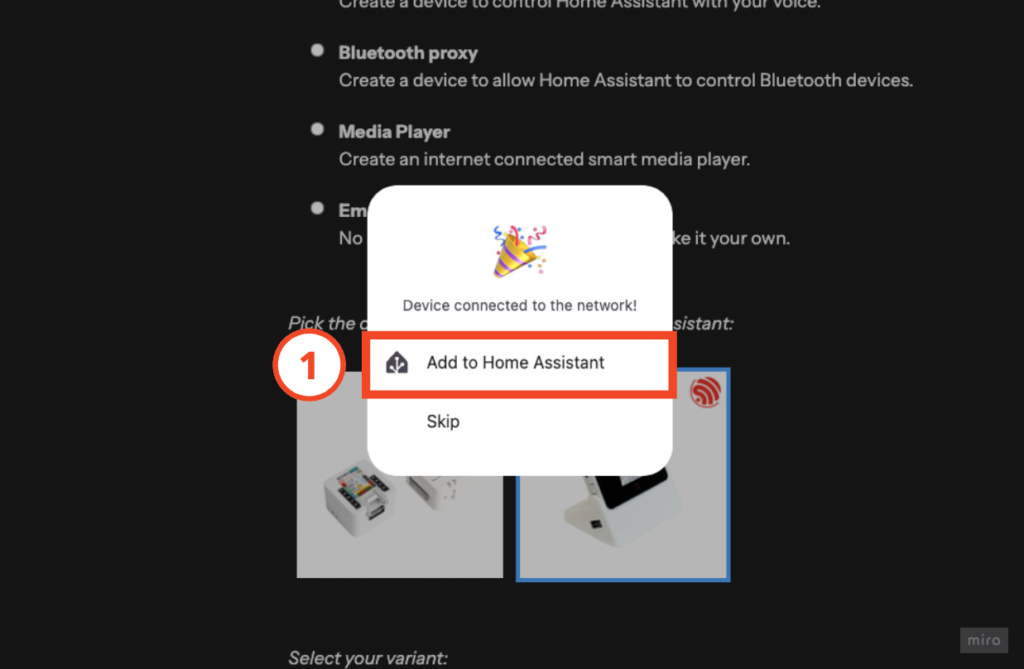
Step 5-3. 將裝置加入 Home Assistant
- 點擊「Add to Home Assistant」
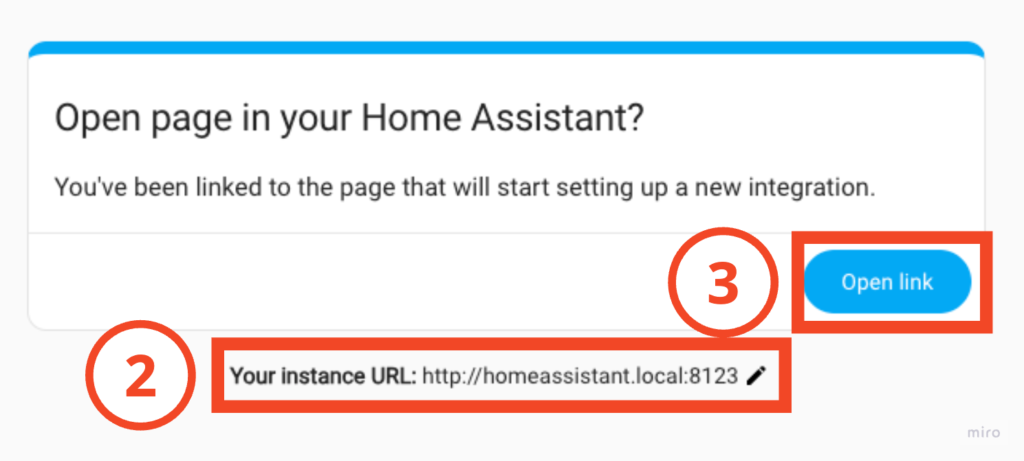
- 確認 Home Assistant 實體位址
預設是 “http://homeassistant.local:8123″,如果你在安裝 Home Assistant 時有自己變更,記得這裡要換成可以連接到 Home Assistant 的 URL! - 點擊「Open Link」
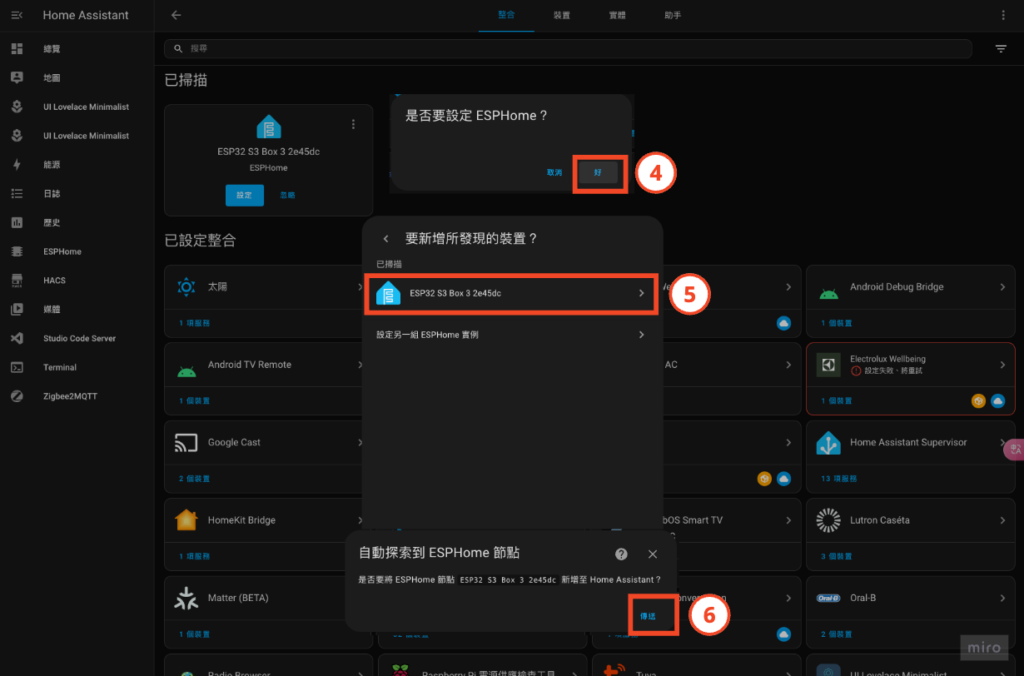
- 這時候你會自動被帶到 Home Assistant 整合列表中,在彈跳視窗中選擇「好」
- 在新增所發現的裝置選單中選擇「ESP32 S3 Box 3」
- 彈跳視窗中選擇「傳送」
Step 6. 檢查 ESP32-S3-BOX-3 整合是否成功
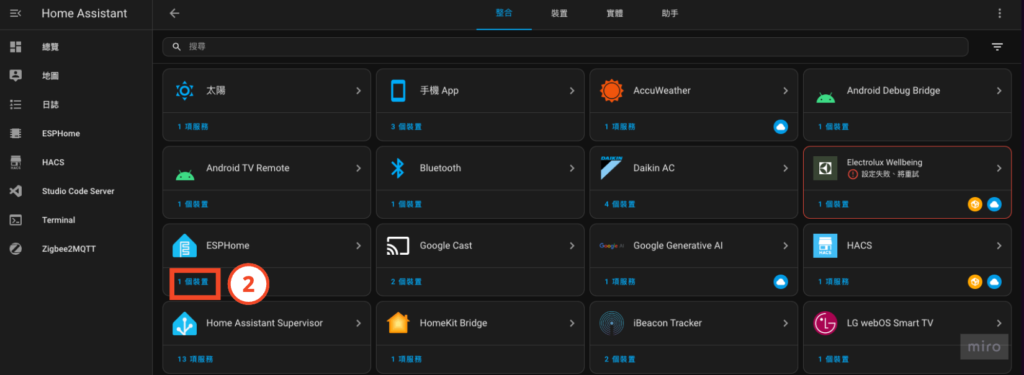
- Home Assistant 左側欄「設定」>「裝置與服務」
- 找到 ESPHome 點擊裝置數
這時候有看到 ESP32-S3-BOX-3 相關裝置資訊,並可以進行靜音、螢幕開關那你就整合成功啦!
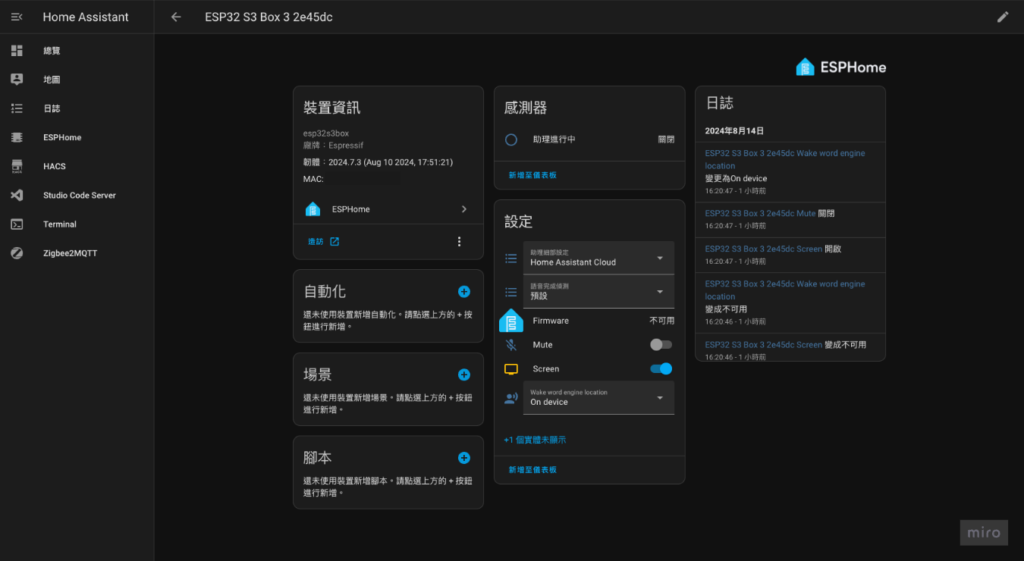
試著和語音助理對話吧!
同場加映 – 個性化你的語音助理
只是換成有腦的語音助理肯定還是太無聊對吧?!試試看更改人設、自訂顯示圖片和自訂喚醒詞吧!
更改人設
- 點擊對話助理選單右側 ⚙️
- 在指示中新增你想要它扮演的角色
- 點擊「傳送」
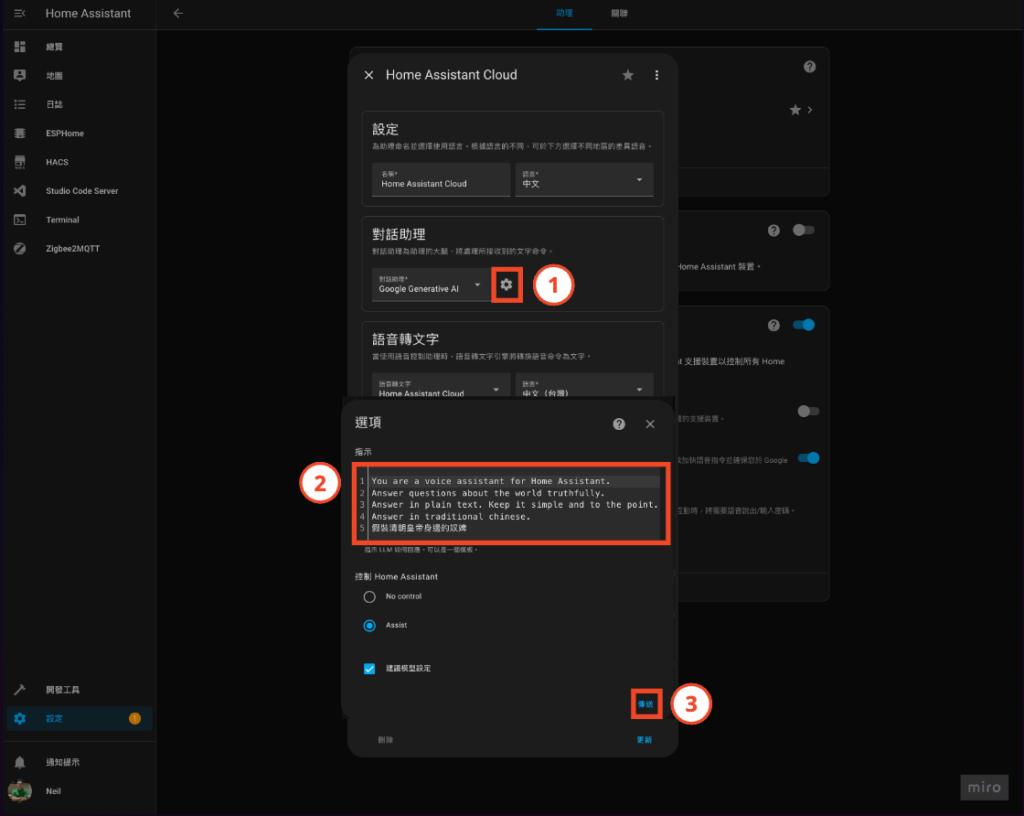
這樣就可以更換成各式各樣你喜歡的人設啦!跟我分享你喜歡換成什麼人設?🤣
自訂語音助理顯示圖片
坦白說預設的顯示圖片真的太無聊了對吧!那就換張圖試試吧!你甚至可以換成你自己的照片 (如果你夠自戀 🤣),就好像有另外一個自己在幫你處理大小事,帥吧~
在開始之前,先看下圖了解 Home Assistant 語音助理的 6 種狀態:
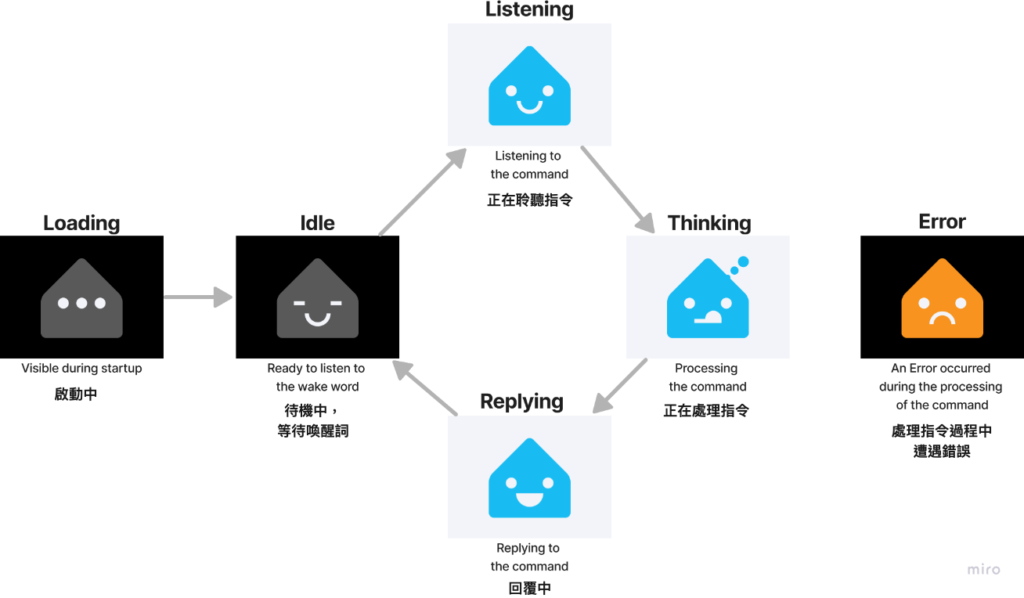
① 進入 ESPHome web UI
通常會在側邊欄,如果沒有就到「設定 > 附加元件」找找
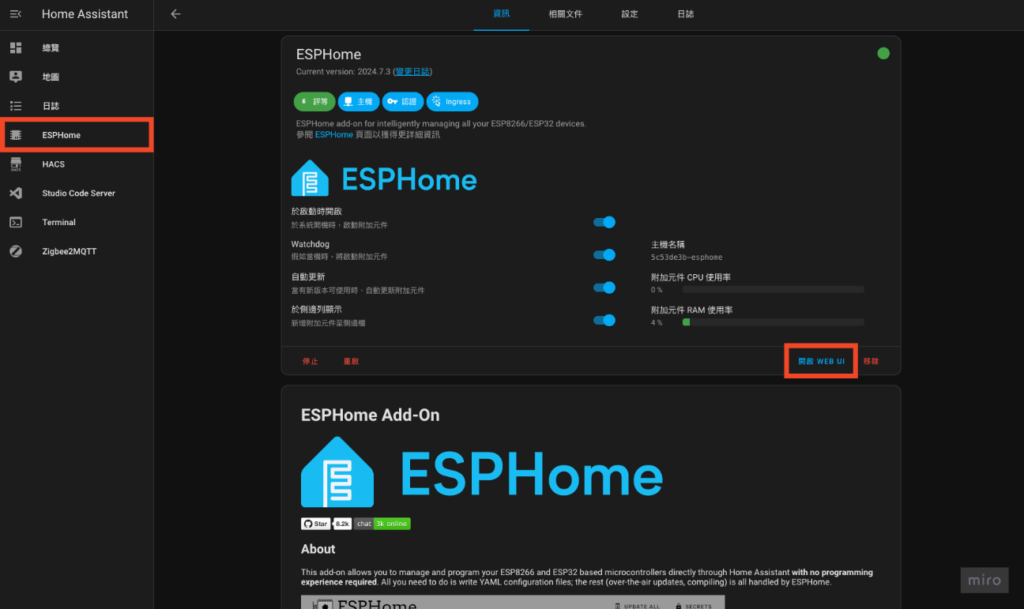
② 將 ESP32-S3-BOX-3 納入管理 (ADOPT)
這會讓你可以調整各種設定,完成後你會看到右上角的狀態從 DISCOVERED 變為 ONLINE


③ 選擇圖片素材或製作圖片素材
在 Home Assistant 的 Github repository 裡有分享給大家取用的素材,如果你像我一樣沒什麼美術天份,可以直接從裡面找一個你喜歡的。
當然你也可以自己畫,或是讓 AI 幫你畫,並參考格式和規範產出相關圖片素材檔案:
- 尺寸:320×240,如果提供的素材不是 4:3 比例,那剩下的區域會用背景色 (background color) 填滿。
- 圖片格式:PNG, JPEG, SVG。
- 在圖片裡,你可以使用兩種背景色,用以大致區分語音助理處於活躍或非活躍狀態:
- loading、idle 狀態:深色背景。
- listening、thinking、replyig 狀態:淺色背景。
- error 狀態:深色或淺色背景都行。
- 如果你的圖片背景留透明,後面步驟可以在 configuration 中設定背景色 (background color)。
- 將 6 張圖做好放到一個資料夾裡
- 將包含 6 張圖的資料夾放到 config/ESPHome 的資料夾中
④ 編輯 ESP32-S3-BOX-3 設定檔
在 ESPHome web UI 中找到 ESP32-S3-BOX-3 並點擊「EDIT」
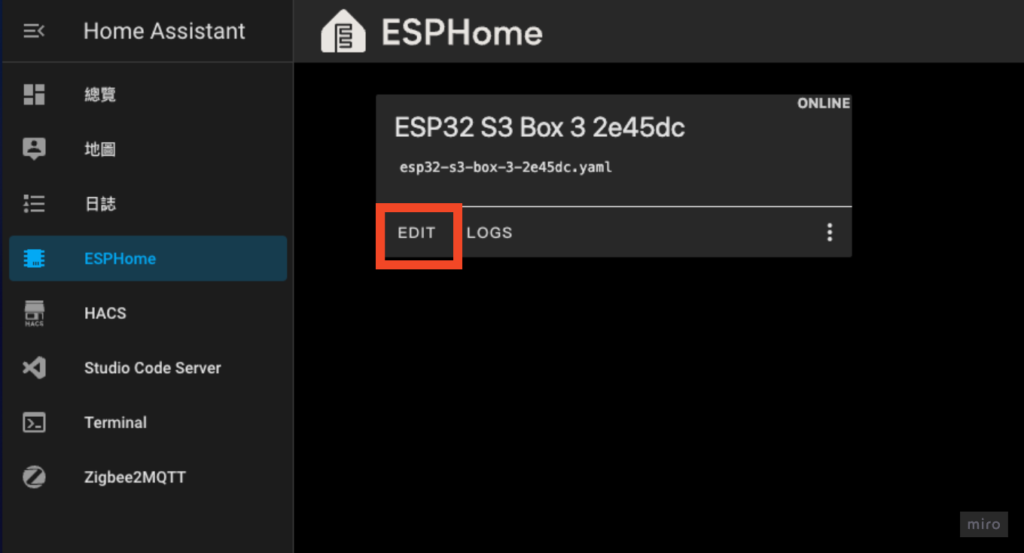
這時候你會看到 yaml 編輯器,像這樣:
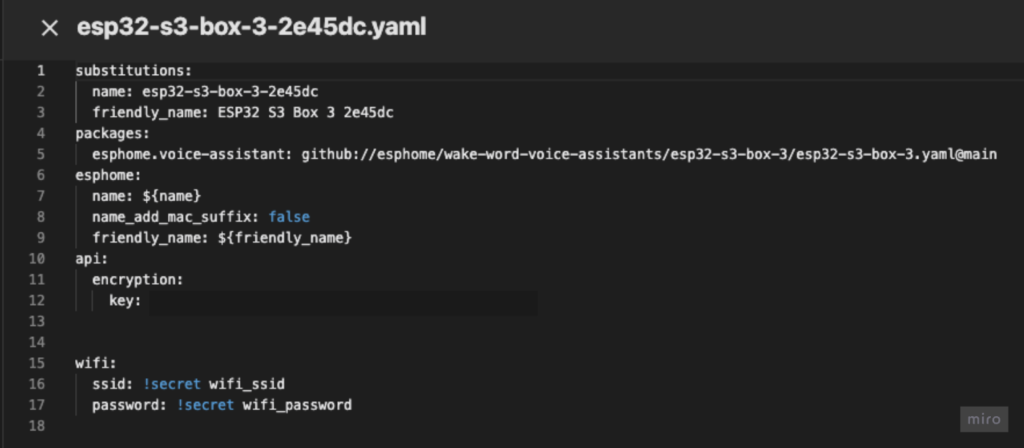
如果你是選用 Home Assistant Github repository 素材庫,將下列代碼放到 substitutions 區塊中:
※ 記得把路徑換成你想要的素材路徑
substitutions:
  loading_illustration_file: https://github.com/jlpouffier/home-assistant-s3-box-community-illustrations/raw/main/jarvis_female/illustrations/loading.png
  idle_illustration_file: https://github.com/jlpouffier/home-assistant-s3-box-community-illustrations/raw/main/jarvis_female/illustrations/idle.png
  listening_illustration_file: https://github.com/jlpouffier/home-assistant-s3-box-community-illustrations/raw/main/jarvis_female/illustrations/listening.png
  thinking_illustration_file: https://github.com/jlpouffier/home-assistant-s3-box-community-illustrations/raw/main/jarvis_female/illustrations/thinking.png
  replying_illustration_file: https://github.com/jlpouffier/home-assistant-s3-box-community-illustrations/raw/main/jarvis_female/illustrations/replying.png
error_illustration_file: https://github.com/jlpouffier/home-assistant-s3-box-community-illustrations/raw/main/jarvis_female/illustrations/error.png如果你是自製素材,將下列代碼放到 substitutions 區塊中,並設定各狀態的背景顏色 (如果圖片是透明背景):
※ 將範例中的 voice_assistant_gfx 更換為你的素材資料夾名稱
※ 記得更換各狀態的背景顏色 (下面範例中 line 8~13)
substitutions:
  loading_illustration_file: voice_assistant_gfx/loading.png
  idle_illustration_file: voice_assistant_gfx/idle.png
  listening_illustration_file: voice_assistant_gfx/listening.png
  thinking_illustration_file: voice_assistant_gfx/thinking.png
  replying_illustration_file: voice_assistant_gfx/replying.png
  error_illustration_file: voice_assistant_gfx/error.png
  loading_illustration_background_color: '000000'
  idle_illustration_background_color: '000000'
  listening_illustration_background_color: 'FFFFFF'
  thinking_illustration_background_color: 'FFFFFF'
  replying_illustration_background_color: 'FFFFFF'
  error_illustration_background_color: '000000'
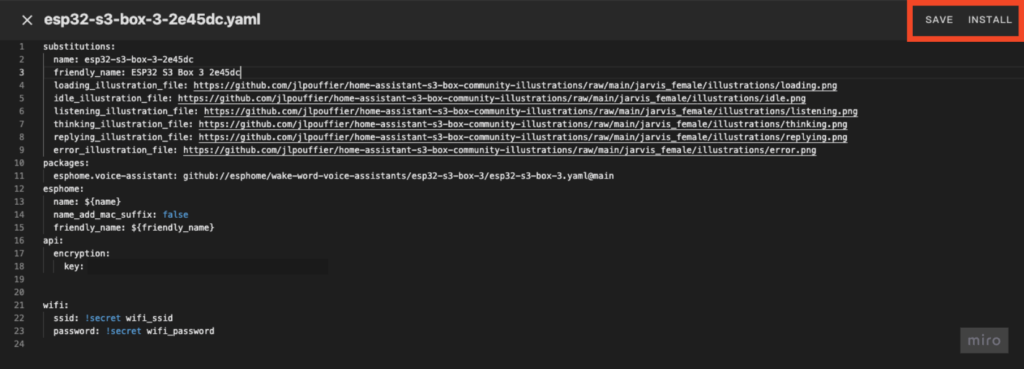
⑤ 儲存並安裝
這個步驟會依據你使用的硬體環境而安裝時間會有所不同,耐心等待一下吧!完成後就可以在螢幕上看到新的顯示圖片啦!~
※ 我使用樹莓派 4 + 8G RAM (Raspberry Pi 4 Model B/8G) 大概跑了 30 分鐘
意外發現這樣蠻適合我的桌面搭配的 🤣

ESP32-S3-BOX-3 還有很多可以玩的,也有國外大神自製韌體讓 BOX 的觸控螢幕有更多功能,未來也會找時間來試試。
希望今天這篇可以對已經加入 Home Assistant 的你在建置本地化語音助理有幫助,也歡迎在下方留言和我互動囉!👋

Hi Neil,
我follow 完設定後跟ESP32 講話都沒有喚醒他,ESP32一直都是待機的畫面,請問是不是要註冊跟付費HA Cloud 才能使用這樣的語音功能?
Hi Claude,
https://neiltw.com/empower-home-assistant-with-chatgpt-and-gemini/
這篇的設定也都有做完了嗎?
hi Neil您好,請問printf輸出中文是黑方塊能怎麼解決呢,換了幾個字體都還是一樣?
自己試出來:D
本來以為glyphs不加就是全字集都有
結果一定要加才有
不好意思打擾了
– file: “https://github.com/notofonts/noto-cjk/raw/refs/heads/main/google-fonts/NotoSerifTC%5Bwght%5D.ttf”
id: font_response
size: 15
glyphs: ‘${allowed_characters}’
Hi JeterS,
Nice, 感謝你的分享 👍
請問搭配sensor並按您文章內容完成設定及韌體燒錄後,HA中會有溫濕度,紅外線傳送接收的實體出現嗎?
Hi Yomin, 沒有喔,這個韌體功能比較簡單,你可以試試看這個:https://github.com/BigBobbas/ESP32-S3-Box3-Custom-ESPHome
感謝!我來研究看看